Aller au contenu principal

Hasbro furby 2012 DC Motor Replacement

Ce dont vous avez besoin

  1. Hasbro furby 2012 DC Motor Replacement, Outer Shell: étape 1, image 1 de 3 Hasbro furby 2012 DC Motor Replacement, Outer Shell: étape 1, image 2 de 3 Hasbro furby 2012 DC Motor Replacement, Outer Shell: étape 1, image 3 de 3
    • Use a flathead screwdriver to remove the two 10mm screws on the base of the Furby.

  2. Hasbro furby 2012 DC Motor Replacement: étape 2, image 1 de 3 Hasbro furby 2012 DC Motor Replacement: étape 2, image 2 de 3 Hasbro furby 2012 DC Motor Replacement: étape 2, image 3 de 3
    • Use a Phillips #0 driver to unscrew the eight 10mm screws.

    • Remove the base ring after unscrewing all the screws.

    • Be careful when lifting the base ring from the Furby. There are sharp edges that hold the base ring in place.

  3. Hasbro furby 2012 DC Motor Replacement: étape 3, image 1 de 2 Hasbro furby 2012 DC Motor Replacement: étape 3, image 2 de 2
    • Unhook the white ribbon from the tab on the base.

  4. Hasbro furby 2012 DC Motor Replacement: étape 4, image 1 de 3 Hasbro furby 2012 DC Motor Replacement: étape 4, image 2 de 3 Hasbro furby 2012 DC Motor Replacement: étape 4, image 3 de 3
    • Roll the Furby's fur downward.

    • Disconnect the now exposed red wire.

  5. Hasbro furby 2012 DC Motor Replacement: étape 5, image 1 de 3 Hasbro furby 2012 DC Motor Replacement: étape 5, image 2 de 3 Hasbro furby 2012 DC Motor Replacement: étape 5, image 3 de 3
    • Locate the two middle clips first.

    • Locate the two remaining clips on Furby's sides, they are opposite each other.

    • Orient the Furby upside down with the tail facing away from you.

  6. Hasbro furby 2012 DC Motor Replacement: étape 6, image 1 de 3 Hasbro furby 2012 DC Motor Replacement: étape 6, image 2 de 3 Hasbro furby 2012 DC Motor Replacement: étape 6, image 3 de 3
    • Insert a metal prying tool directly into the clip opening.

    • Press upward into the clip. At the same time, use your other hand to pull away the plastic seam from the Furby's body.

    • Repeat the previous step to remove the remaining three clips.

  7. Hasbro furby 2012 DC Motor Replacement: étape 7, image 1 de 3 Hasbro furby 2012 DC Motor Replacement: étape 7, image 2 de 3 Hasbro furby 2012 DC Motor Replacement: étape 7, image 3 de 3
    • Locate the two 10mm screws and remove them with the Phillips #0 head screwdriver.

    • Lift up on the fur covering until the face of the Furby is exposed.

  8. Hasbro furby 2012 DC Motor Replacement: étape 8, image 1 de 3 Hasbro furby 2012 DC Motor Replacement: étape 8, image 2 de 3 Hasbro furby 2012 DC Motor Replacement: étape 8, image 3 de 3
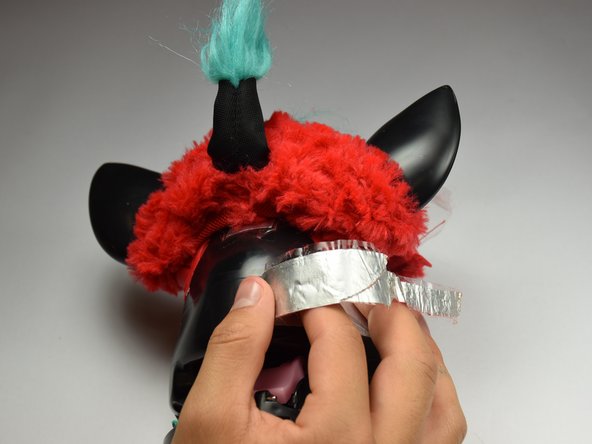
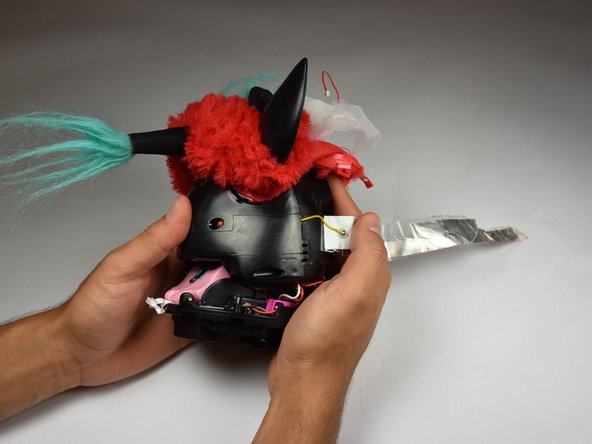
    • Orient the Furby on its side to where the beak is facing left and locate the edge of the aluminum tape.

    • Lift tape gently and peel back until the tape is nearly removed.

    • Do not pull on the yellow wire located on the opposite end of the tape.

  9. Hasbro furby 2012 DC Motor Replacement: étape 9, image 1 de 2 Hasbro furby 2012 DC Motor Replacement: étape 9, image 2 de 2
    • Locate the four 10mm screws. Two on either side of body, and two on top of back plate, around the tape.

    • Remove the 10mm screws with the Phillips#0 screwdriver.

  10. Hasbro furby 2012 DC Motor Replacement: étape 10, image 1 de 1
    • Peel the tape gently, grabbing it from the bottom edge and folding the tape upward.

    • Peel the tape up until it is nearly detached from the black case.

  11. Hasbro furby 2012 DC Motor Replacement: étape 11, image 1 de 2 Hasbro furby 2012 DC Motor Replacement: étape 11, image 2 de 2
    • Orient the Furby face down, with the base facing away from you.

    • Locate the clips below the ears.

    • Repeat the technique used in Step 6. Create leverage using a metal prying tool to press upward into the clip, while also pulling back on the clip itself.

  12. Hasbro furby 2012 DC Motor Replacement: étape 12, image 1 de 2 Hasbro furby 2012 DC Motor Replacement: étape 12, image 2 de 2
    • Remove the loose, plastic back panel by pulling the panel away from Furby's body.

  13. Hasbro furby 2012 DC Motor Replacement, Light Sensor: étape 13, image 1 de 3 Hasbro furby 2012 DC Motor Replacement, Light Sensor: étape 13, image 2 de 3 Hasbro furby 2012 DC Motor Replacement, Light Sensor: étape 13, image 3 de 3
    • Remove the 10mm Phillips #0 screw holding the circuit board in.

    • Gently lift out the circuit board.

  14. Hasbro furby 2012 DC Motor Replacement: étape 14, image 1 de 2 Hasbro furby 2012 DC Motor Replacement: étape 14, image 2 de 2
    • Orient the Furby with the tail pointing left and the face pointing right.

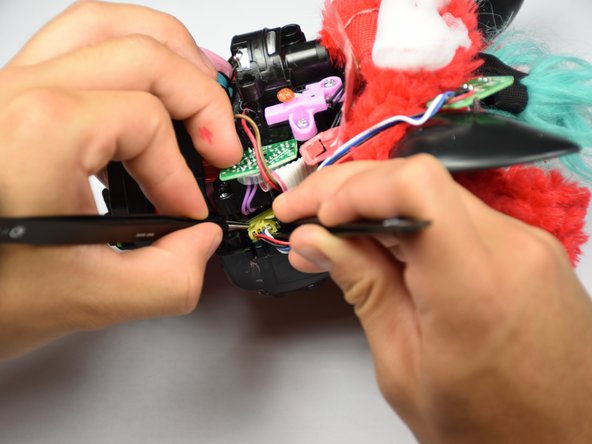
    • Use the pointed tweezers to spread open the socket, and the blunt tweezers to grip and tug out the connector.

    • Insert your replacement light sensor connector.

  15. Hasbro furby 2012 DC Motor Replacement, DC Motor: étape 15, image 1 de 2 Hasbro furby 2012 DC Motor Replacement, DC Motor: étape 15, image 2 de 2
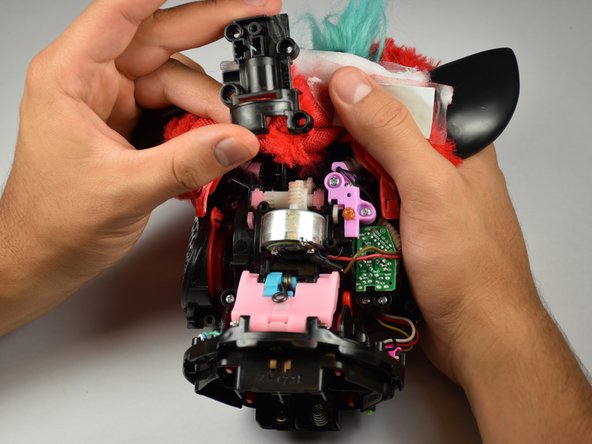
    • Unscrew the four screws holding the motor housing in place.

    • Remove the motor housing.

    • Their is lubricant on and around the DC motor, be careful when handling.

  16. Hasbro furby 2012 DC Motor Replacement: étape 16, image 1 de 3 Hasbro furby 2012 DC Motor Replacement: étape 16, image 2 de 3 Hasbro furby 2012 DC Motor Replacement: étape 16, image 3 de 3
    • Orient Furby with the beak facing right.

    • Locate the red DC motor connector.

    • Gently remove the connector using blunt and pointed tweezers.

Conclusion

To reassemble your device, follow these instructions in reverse order.

7 autres ont terminé cette réparation.

Jordan Castillo

Membre depuis le 10/06/16

912 Réputation

5 tutoriels rédigés

Équipe

Cal Poly, Team 15-5, Livingston Fall 2016 Membre de l'équipe Cal Poly, Team 15-5, Livingston Fall 2016

CPSU-LIVINGSTON-F16S15G5

4 membres

9 tutoriels rédigés

10 commentaires

How do you connect the new motor after that? and does this work for Furby Booms too?

Dom Barr - Réponse

Donde puedo comprar el motor? Se supone que si necesito cambiarlo es porque tengo que comprar primero uno. Gracias

jaimeama - Réponse

Hi. Where can I buy a replacement motor please?

rebeccataylor1972 - Réponse

Generic replacement motors are on Ebay. The one I got was RF-300CA

I could not find the exact motor.

Specs: 1.5-6 volt.

24.2mm x 12.4mm (24x12).

10 or 12mm long shaft x 2mm diameter.

.99 cents free shipping. Two weeks from China.

https://www.ebay.com/itm/RF-300CA-DC-1-5V-6V-815...

You will need to de-solder the little half-moon shaped control board off the bottom of the old motor. Crazy glue it to the bottom of the new motor. Then solder the the red wires together and black wires together. Then solder them to the board. The old motor had spikes sticking out the bottom to connect the control board. The generic replacement motors have wires instead. I searched the entire internet. I could not find the exact motor.

https://www.youtube.com/watch?v=6WWecJ_I... It’s in Spanish, but you’ll get the idea.

To get the ears off. Firmly twist and pull them…HARD.

Good luck.

kewrock - Réponse

And how do I disconnect the coil from the motor? Just pulling hard?

Ronkly -

Ajouter un commentaire

Nombre de vues :

Dernières 24 heures : 8

7 derniers jours : 48

30 derniers jours : 179

Total : 11,972