Aller au contenu principal

Honda Light Duty Tiller F220K1AT715492 Carburetor Replacement

Ce dont vous avez besoin

  1. Honda Light Duty Tiller F220K1AT715492 Carburetor Replacement, Disconnect the spark plug: étape 1, image 1 de 2 Honda Light Duty Tiller F220K1AT715492 Carburetor Replacement, Disconnect the spark plug: étape 1, image 2 de 2
    • Before you begin, make sure the engine is switched off and cool to the touch.

    • Pull the spark plug connector straight off of the spark plug.

  2. Honda Light Duty Tiller F220K1AT715492 Carburetor Replacement, Remove the air filter: étape 2, image 1 de 2 Honda Light Duty Tiller F220K1AT715492 Carburetor Replacement, Remove the air filter: étape 2, image 2 de 2
    • Push down on the two tabs at the top of the air filter cover.

    • With the two tabs depressed, swing the top of the cover down.

    • Remove the cover.

  3. Honda Light Duty Tiller F220K1AT715492 Carburetor Replacement: étape 3, image 1 de 1
    • Pull the air filter out of the housing and remove it.

  4. Honda Light Duty Tiller F220K1AT715492 Carburetor Replacement, Unscrew the air cleaner housing: étape 4, image 1 de 1
    • Use an 8 mm socket to remove the following fasteners securing the air cleaner housing:

    • Two silver nuts

    • One black bolt

  5. Honda Light Duty Tiller F220K1AT715492 Carburetor Replacement, Disconnect the breather tubes: étape 5, image 1 de 2 Honda Light Duty Tiller F220K1AT715492 Carburetor Replacement, Disconnect the breather tubes: étape 5, image 2 de 2
    • Slide the pink breather tube out of its clip on the back of the air cleaner housing.

  6. Honda Light Duty Tiller F220K1AT715492 Carburetor Replacement: étape 6, image 1 de 3 Honda Light Duty Tiller F220K1AT715492 Carburetor Replacement: étape 6, image 2 de 3 Honda Light Duty Tiller F220K1AT715492 Carburetor Replacement: étape 6, image 3 de 3
    • Use a flathead screwdriver to gently pry the black breather tube off of its connector on the back of the air cleaner housing.

  7. Honda Light Duty Tiller F220K1AT715492 Carburetor Replacement, Remove the air cleaner housing: étape 7, image 1 de 3 Honda Light Duty Tiller F220K1AT715492 Carburetor Replacement, Remove the air cleaner housing: étape 7, image 2 de 3 Honda Light Duty Tiller F220K1AT715492 Carburetor Replacement, Remove the air cleaner housing: étape 7, image 3 de 3
    • Hold the black carburetor hose in place and rotate the air cleaner housing clockwise until you can slide the hose out of its slot on the air cleaner housing.

    • Remove the air cleaner housing.

  8. Honda Light Duty Tiller F220K1AT715492 Carburetor Replacement, Remove the air cleaner gasket: étape 8, image 1 de 1
    • Remove the air cleaner gasket 17228-Z0G-000.

    • This gasket can be replaced as part of the carburetor service kit.

  9. Honda Light Duty Tiller F220K1AT715492 Carburetor Replacement, Disconnect the carburetor: étape 9, image 1 de 3 Honda Light Duty Tiller F220K1AT715492 Carburetor Replacement, Disconnect the carburetor: étape 9, image 2 de 3 Honda Light Duty Tiller F220K1AT715492 Carburetor Replacement, Disconnect the carburetor: étape 9, image 3 de 3
    • Use a pair of pliers to pinch the tabs on the carburetor fuel hose clamp together, then slide the hose clamp about an inch down the fuel hose.

    • Pull the fuel hose straight down to slide it off of the carburetor's hose connector.

  10. Honda Light Duty Tiller F220K1AT715492 Carburetor Replacement: étape 10, image 1 de 2 Honda Light Duty Tiller F220K1AT715492 Carburetor Replacement: étape 10, image 2 de 2
    • Slide the carburetor to the end of its bracket.

    • The carburetor is still connected to the tiller, so don't try to remove it. Just slide it out until it stops.

  11. Honda Light Duty Tiller F220K1AT715492 Carburetor Replacement: étape 11, image 1 de 2 Honda Light Duty Tiller F220K1AT715492 Carburetor Replacement: étape 11, image 2 de 2
    • Lift the choke rod out of its hole on the the choke adjuster.

  12. Honda Light Duty Tiller F220K1AT715492 Carburetor Replacement: étape 12, image 1 de 3 Honda Light Duty Tiller F220K1AT715492 Carburetor Replacement: étape 12, image 2 de 3 Honda Light Duty Tiller F220K1AT715492 Carburetor Replacement: étape 12, image 3 de 3
    • Rotate the small clip holding the governor rod on the governor arm clockwise.

    • With the clip out of the way, slide the governor rod out of the governor arm.

  13. Honda Light Duty Tiller F220K1AT715492 Carburetor Replacement: étape 13, image 1 de 1
    • Remove the governor spring from the carburetor.

  14. Honda Light Duty Tiller F220K1AT715492 Carburetor Replacement, Remove the carburetor: étape 14, image 1 de 3 Honda Light Duty Tiller F220K1AT715492 Carburetor Replacement, Remove the carburetor: étape 14, image 2 de 3 Honda Light Duty Tiller F220K1AT715492 Carburetor Replacement, Remove the carburetor: étape 14, image 3 de 3
    • Slide the carburetor off of its bracket and remove it.

  15. Honda Light Duty Tiller F220K1AT715492 Carburetor Replacement, Remove the carburetor gasket: étape 15, image 1 de 2 Honda Light Duty Tiller F220K1AT715492 Carburetor Replacement, Remove the carburetor gasket: étape 15, image 2 de 2
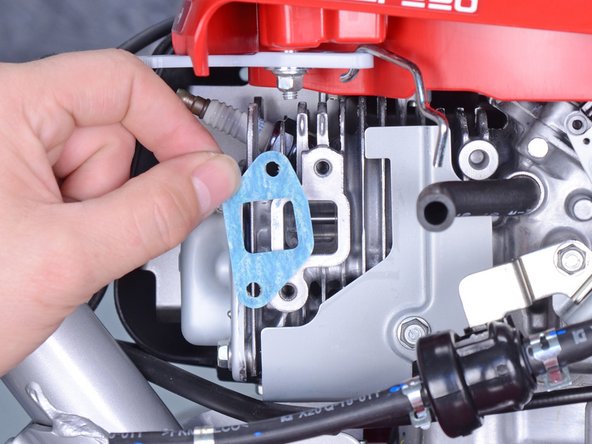
    • Slide the carburetor gasket 16221-ZG0-801 off of the carburetor bracket and remove it.

    • This gasket can be replaced as part of the carburetor service kit.

  16. Honda Light Duty Tiller F220K1AT715492 Carburetor Replacement, Remove the carburetor bracket: étape 16, image 1 de 1
    • Use a Phillips #2 screwdriver to remove the two screws securing the carburetor bracket.

  17. Honda Light Duty Tiller F220K1AT715492 Carburetor Replacement: étape 17, image 1 de 1
    • Remove the carburetor bracket, along with the carburetor nozzle and insulator plate.

  18. Honda Light Duty Tiller F220K1AT715492 Carburetor Replacement, Remove the insulator gasket: étape 18, image 1 de 1
    • Remove the insulator gasket 16212-ZM7-000.

    • This gasket can be replaced as part of the carburetor service kit.

Conclusion

To reassemble your device, follow these instructions in reverse order.

8 autres ont terminé cette réparation.

Adam O'Camb

Membre depuis le 04/11/15

196 215 Réputation

416 tutoriels rédigés

0 commentaires

Ajouter un commentaire

Nombre de vues :

Dernières 24 heures : 5

7 derniers jours : 53

30 derniers jours : 230

Total : 4,027