Aller au contenu principal

Hover-1 Superstar Battery Replacement

Ce dont vous avez besoin

  1. Hover-1 Superstar Battery Replacement, Bottom Case: étape 1, image 1 de 3 Hover-1 Superstar Battery Replacement, Bottom Case: étape 1, image 2 de 3 Hover-1 Superstar Battery Replacement, Bottom Case: étape 1, image 3 de 3
    • Flip your Hover-1 Superstar device upside down.

    • Using a Phillips #1 screwdriver, remove all twenty of the 18mm screws holding the case onto the device.

    • Remove the bottom case. Be careful of the connector holding the case and the device together.

  2. Hover-1 Superstar Battery Replacement: étape 2, image 1 de 1
    • Locate the cable connected to the front lights.

    • Pull apart the wires until the black clip separates.

  3. Hover-1 Superstar Battery Replacement, Battery: étape 3, image 1 de 2 Hover-1 Superstar Battery Replacement, Battery: étape 3, image 2 de 2
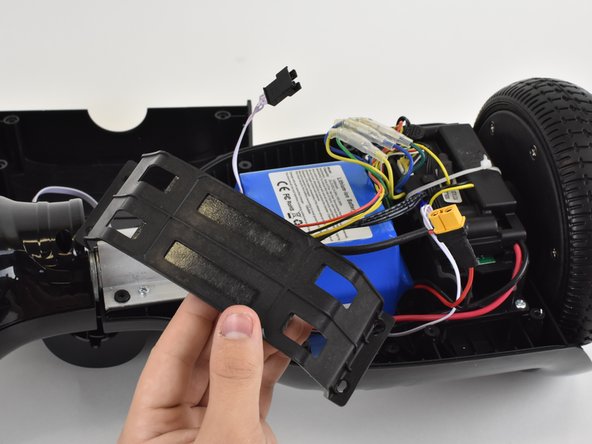
    • Locate the four 14mm screws securing the battery bracket.

    • Remove the screws with a Phillips #1 screwdriver.

  4. Hover-1 Superstar Battery Replacement: étape 4, image 1 de 1
    • Pull and disconnect the cable connector that is connected to the battery.

  5. Hover-1 Superstar Battery Replacement: étape 5, image 1 de 1
    • Pull on the battery until it separates from the hover board. You may need to use some force.

    • Be sure the battery is disconnected before performing this step to avoid electrocution.

    • There will be a loud crack when the battery is removed. This is normal due to the adhesive on the back of the battery.

    • Pull the battery out of the hoverboard. Move wires away from the battery if necessary.

Conclusion

To reassemble your device, follow these instructions in reverse order.

Keegan

Membre depuis le 10/04/18

632 Réputation

5 tutoriels rédigés

Un commentaire

How do u get a 25.2v battery at for my hover-1

chivitbprince Boonking - Réponse

Ajouter un commentaire

Nombre de vues :

Dernières 24 heures : 2

7 derniers jours : 11

30 derniers jours : 21

Total : 1,645