Aller au contenu principal

How to Disassemble an OXO Container Lid for Cleaning

Ce dont vous avez besoin

  1. How to Disassemble an OXO Container Lid for Cleaning, How to Disassemble an OXO Container Lid for Cleaning: étape 1, image 1 de 2 How to Disassemble an OXO Container Lid for Cleaning, How to Disassemble an OXO Container Lid for Cleaning: étape 1, image 2 de 2
    • Twist the bottom piece off by following the directions displayed on the lid.

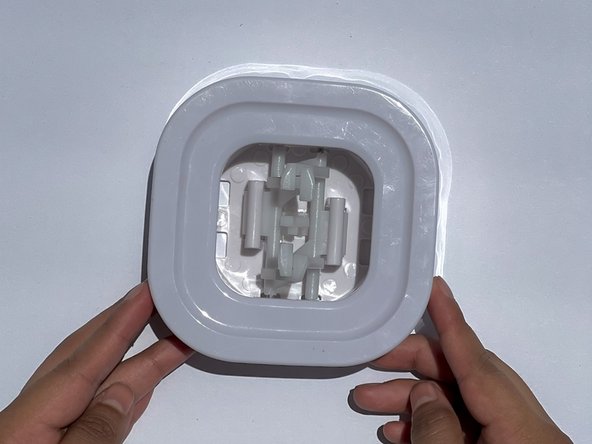
    • Once inside, remove the outer layer seal from the lid by pulling it straight up.

  2. How to Disassemble an OXO Container Lid for Cleaning: étape 2, image 1 de 3 How to Disassemble an OXO Container Lid for Cleaning: étape 2, image 2 de 3 How to Disassemble an OXO Container Lid for Cleaning: étape 2, image 3 de 3
    • Flip the lid so the button faces up. Then remove the button from the base of the lid.

    • This requires more added force.

    • Separate the interior prongs.

  3. How to Disassemble an OXO Container Lid for Cleaning: étape 3, image 1 de 2 How to Disassemble an OXO Container Lid for Cleaning: étape 3, image 2 de 2
    • After separating the prongs, the spring and the circular spring cap will separate from the square frame with little force.

    • With some force, remove the two prongs from the base of the lid by snapping them out of the bracket. Be careful not to break the bracket's small prongs.

    • The disassembled parts can now be cleaned with warm, soapy water.

  4. How to Disassemble an OXO Container Lid for Cleaning: étape 4, image 1 de 2 How to Disassemble an OXO Container Lid for Cleaning: étape 4, image 2 de 2
    • To reassemble the lid, start by connecting the outer layer piece with the base piece. Grooves in the parts will only allow them to be connected in the correct way.

    • Place the spring in the center of the lid within the circular outline.

  5. How to Disassemble an OXO Container Lid for Cleaning: étape 5, image 1 de 1
    • Take the small interior circle and place it on top of the spring.

    • Use force to push this piece down. Make sure the slots align.

    • This piece will not stay in place on its own. Flip the lid over and keep it on a flat surface to prevent the spring from releasing.

  6. How to Disassemble an OXO Container Lid for Cleaning: étape 6, image 1 de 2 How to Disassemble an OXO Container Lid for Cleaning: étape 6, image 2 de 2
    • Reattach the two prongs to the lid.

    • Intertwine the two prongs together.

    • The spring should now be firmly held in place.

  7. How to Disassemble an OXO Container Lid for Cleaning: étape 7, image 1 de 2 How to Disassemble an OXO Container Lid for Cleaning: étape 7, image 2 de 2
    • Twist the bottom piece back on the lid.

    • Reattach the button to the center of the lid.

Ligne d'arrivée

2 autres ont terminé cette réparation.

Lorna Lauro

Membre depuis le 04/20/22

187 Réputation

1 tutoriel rédigé

Équipe

CSU Los Angeles, Team 7-77, Harris Spring 2022 Membre de l'équipe CSU Los Angeles, Team 7-77, Harris Spring 2022

CSULA-HARRIS-S22S7G77

1 membre

1 tutoriel rédigé

Un commentaire

Excellent guide, a set I got came with the metal pins of the prongs unseated from their holes, causing the lid to operate incorrectly. I was able to re-seat them and get the lid working with the help of this.

Stefan Rust - Réponse

Ajouter un commentaire

Nombre de vues :

Dernières 24 heures : 12

7 derniers jours : 79

30 derniers jours : 335

Total : 11,576