Aller au contenu principal

How to Hook up Front Panel Connectors to an ATX Motherboard

Ce dont vous avez besoin

  1. How to Hook up Front Panel Connectors to an ATX Motherboard, How to Hook up Front Panel Connectors to an ATX Motherboard: étape 1, image 1 de 3 How to Hook up Front Panel Connectors to an ATX Motherboard, How to Hook up Front Panel Connectors to an ATX Motherboard: étape 1, image 2 de 3 How to Hook up Front Panel Connectors to an ATX Motherboard, How to Hook up Front Panel Connectors to an ATX Motherboard: étape 1, image 3 de 3
    • Lay your PC on its side and unscrew the side panel thumb screws. (Open your PC case)

    • For some computer cases you may need a screw driver to remove actual screws.

  2. How to Hook up Front Panel Connectors to an ATX Motherboard: étape 2, image 1 de 2 How to Hook up Front Panel Connectors to an ATX Motherboard: étape 2, image 2 de 2
    • Once the screws are removed lift off the side panel to expose the motherboard and internal cables.

    • Locate where the front panel pins are.

  3. How to Hook up Front Panel Connectors to an ATX Motherboard: étape 3, image 1 de 3 How to Hook up Front Panel Connectors to an ATX Motherboard: étape 3, image 2 de 3 How to Hook up Front Panel Connectors to an ATX Motherboard: étape 3, image 3 de 3
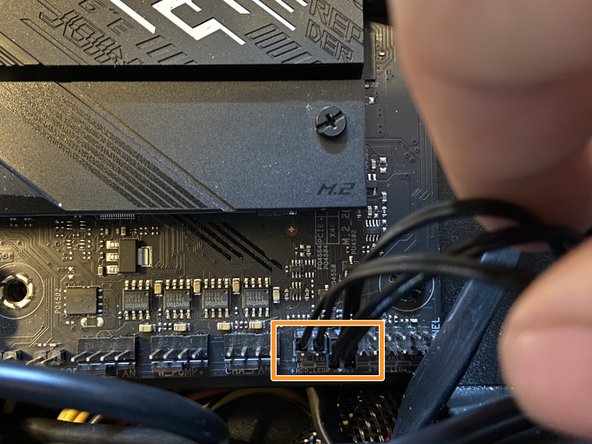
    • Plug the cable marked Reset SW into the motherboard. This will allow your reset button to actually work.

  4. How to Hook up Front Panel Connectors to an ATX Motherboard: étape 4, image 1 de 3 How to Hook up Front Panel Connectors to an ATX Motherboard: étape 4, image 2 de 3 How to Hook up Front Panel Connectors to an ATX Motherboard: étape 4, image 3 de 3
    • Plug the Power SW cable in above the Reset SW on the motherboard. This will allow you to turn on your computer with the power button on the front of your PC case.

  5. How to Hook up Front Panel Connectors to an ATX Motherboard: étape 5, image 1 de 3 How to Hook up Front Panel Connectors to an ATX Motherboard: étape 5, image 2 de 3 How to Hook up Front Panel Connectors to an ATX Motherboard: étape 5, image 3 de 3
    • Plug the Power Led + into the top left prong. Positive goes on the left prong.

  6. How to Hook up Front Panel Connectors to an ATX Motherboard: étape 6, image 1 de 3 How to Hook up Front Panel Connectors to an ATX Motherboard: étape 6, image 2 de 3 How to Hook up Front Panel Connectors to an ATX Motherboard: étape 6, image 3 de 3
    • Connect the Power Led - cable to the prong on the right.

    • This is the final cable structure.

  7. How to Hook up Front Panel Connectors to an ATX Motherboard: étape 7, image 1 de 1
    • Power LED

    • Power Switch

    • Reset Switch

Conclusion

To reassemble your device, follow the instructions, steps 1 and 2, in reverse order.

8 autres ont terminé cette réparation.

Nathan Carini

Membre depuis le 03/26/21

297 Réputation

1 tutoriel rédigé

Équipe

UMass Dartmouth, Team S1-G5, O'Connell Spring 2021 Membre de l'équipe UMass Dartmouth, Team S1-G5, O'Connell Spring 2021

UMASSD-O'CONNELL-S21S1G5

1 membre

6 tutoriels rédigés

Un commentaire

Petite précision :

Les broches sur lesquels il faut brancher les connecteurs des différents éléments du boitier sont indiquées dans la notice de la carte mère (button power, LEDs, etc.). L’emplacement et l’ordre de branchement des différents éléments du boitier est susceptible de varier selon le modèle de la carte mère.

Cela concerne aussi le buzzer si vous en avez un.

Brendan - Réponse

Ajouter un commentaire

Nombre de vues :

Dernières 24 heures : 103

7 derniers jours : 683

30 derniers jours : 3,273

Total : 71,792