Aller au contenu principal

How to Open Your DualShock 4 (CUH-ZCT1U)

Conditions préalables uniquement
Ce tutoriel est uniquement destiné à être utilisé comme prérequis d'autres tutoriels. Il ne se suffit pas à lui-même.

Ce dont vous avez besoin

  1. How to Open Your DualShock 4 (CUH-ZCT1U), Check your controller model: étape 1, image 1 de 1
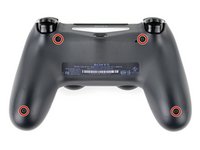
    • Check the model number on the back of your controller. This guide was written using model CUH-ZCT1U. If you have another model, the guide procedure and replacement parts may differ slightly.

    • If you have the second generation DualShock 4, model CUH-ZCT2U, use these guides.

  2. How to Open Your DualShock 4 (CUH-ZCT1U), Unfasten the rear case: étape 2, image 1 de 2 How to Open Your DualShock 4 (CUH-ZCT1U), Unfasten the rear case: étape 2, image 2 de 2
    Outil utilisé dans cette étape :
    Microfiber Cleaning Cloths
    $3.99
    • If you need to stabilize your controller during this repair, lay it on a soft surface such as a microfiber cloth.

    • Use a Phillips screwdriver to remove the four 6.4 mm-long screws securing the rear case.

  3. How to Open Your DualShock 4 (CUH-ZCT1U), Remove the L1 button: étape 3, image 1 de 3 How to Open Your DualShock 4 (CUH-ZCT1U), Remove the L1 button: étape 3, image 2 de 3 How to Open Your DualShock 4 (CUH-ZCT1U), Remove the L1 button: étape 3, image 3 de 3
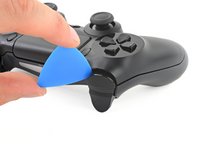
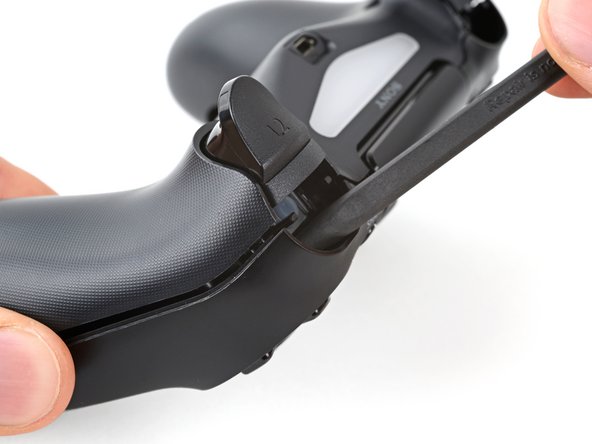
    • Use an opening pick to pry each corner of the L1 button from the front case.

    • Cover the button to prevent it from ejecting out of your workspace.

    • Remove the button.

  4. How to Open Your DualShock 4 (CUH-ZCT1U), Remove the R1 button: étape 4, image 1 de 1
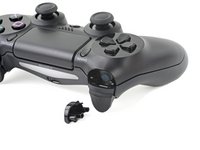
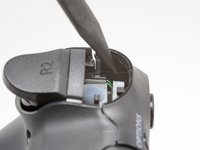
    • Use your opening pick to pry and remove the R1 button, just as you did for the L1 button.

  5. How to Open Your DualShock 4 (CUH-ZCT1U), Unclip the rear case: étape 5, image 1 de 3 How to Open Your DualShock 4 (CUH-ZCT1U), Unclip the rear case: étape 5, image 2 de 3 How to Open Your DualShock 4 (CUH-ZCT1U), Unclip the rear case: étape 5, image 3 de 3
    • Six plastic clips secure the rear case to the front case. The next four steps demonstrate how to release these clips before you can open the controller.

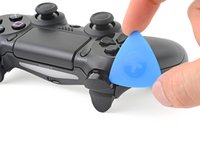
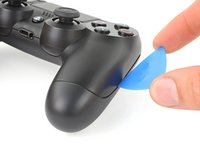
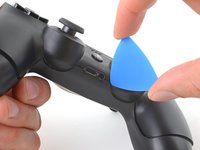
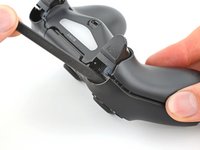
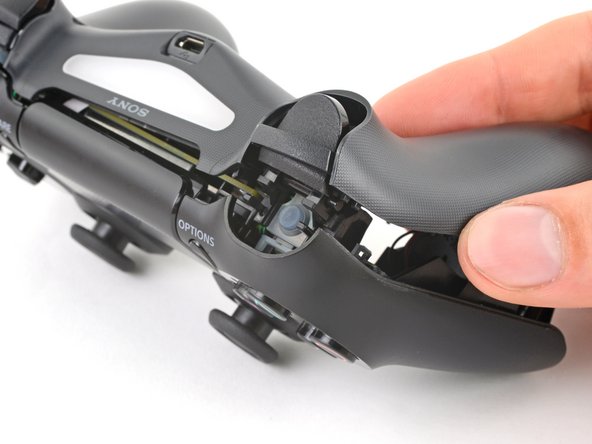
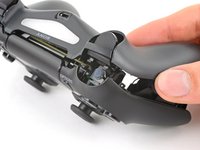
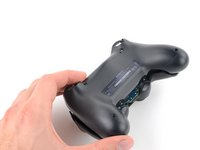
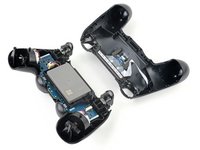
    • Insert your opening pick at a downward angle between the front case and rear case, halfway between the handle and the action buttons.

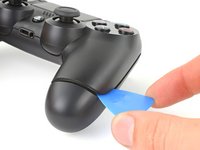
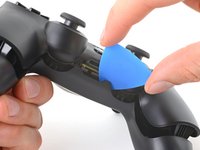
    • Slide your pick toward the handle and pry up to release the first clip.

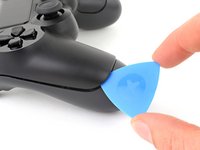
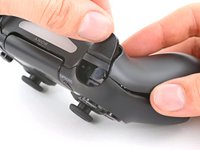
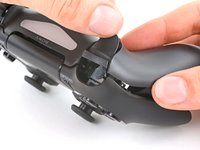
    • Repeat this procedure on the other side of the controller to release the second clip.
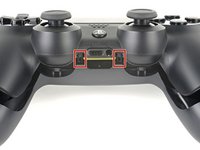
  6. How to Open Your DualShock 4 (CUH-ZCT1U): étape 6, image 1 de 3 How to Open Your DualShock 4 (CUH-ZCT1U): étape 6, image 2 de 3 How to Open Your DualShock 4 (CUH-ZCT1U): étape 6, image 3 de 3
    • Two more clips secure the rear case near the extension port and the headphone jack.

    • Insert your opening pick between the front case and rear case at either side of the ports.

    • Twist your pick to unclip this section of the rear case from the front case.

    • If the rear case feels stuck, insert and twist your pick from different angles.

    • Don't open the controller yet, as it's still held together by two very delicate clips near the triggers.

  7. How to Open Your DualShock 4 (CUH-ZCT1U): étape 7, image 1 de 1
    • The final two clips are very delicate, and must be disengaged from inside the controller. If you break them, don't worry—it won't affect this repair or your controllers functionality.

    • Locate the clips by looking through the gap above the R2 or L2 buttons.

  8. How to Open Your DualShock 4 (CUH-ZCT1U): étape 8, image 1 de 3 How to Open Your DualShock 4 (CUH-ZCT1U): étape 8, image 2 de 3 How to Open Your DualShock 4 (CUH-ZCT1U): étape 8, image 3 de 3
    • Insert the point of a spudger through the gap above the R2 button and push the retaining clip outward.

    • While pushing the clip outward, slowly pull the rear case away from the front case until you feel them separate.

    • Don't fully open the controller until each of the R2 and L2 clips have been disengaged.

    • Repeat this procedure for the clip near the L2 button.

  9. How to Open Your DualShock 4 (CUH-ZCT1U), Remove the rear case: étape 9, image 1 de 3 How to Open Your DualShock 4 (CUH-ZCT1U), Remove the rear case: étape 9, image 2 de 3 How to Open Your DualShock 4 (CUH-ZCT1U), Remove the rear case: étape 9, image 3 de 3
    • Press the R2 button and slide the rear case over it.

  10. How to Open Your DualShock 4 (CUH-ZCT1U): étape 10, image 1 de 1
    • Press the L2 button and slide the rear case over it.

  11. How to Open Your DualShock 4 (CUH-ZCT1U): étape 11, image 1 de 3 How to Open Your DualShock 4 (CUH-ZCT1U): étape 11, image 2 de 3 How to Open Your DualShock 4 (CUH-ZCT1U): étape 11, image 3 de 3
    • Flip the rear case over the top of the controller and lay it down, being careful not to strain the interconnect cable.

  12. How to Open Your DualShock 4 (CUH-ZCT1U), Disconnect the interconnect cable: étape 12, image 1 de 3 How to Open Your DualShock 4 (CUH-ZCT1U), Disconnect the interconnect cable: étape 12, image 2 de 3 How to Open Your DualShock 4 (CUH-ZCT1U), Disconnect the interconnect cable: étape 12, image 3 de 3
    Outil utilisé dans cette étape :
    Tweezers
    $4.99
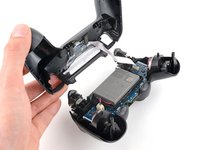
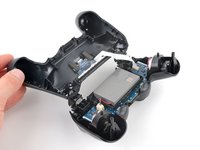
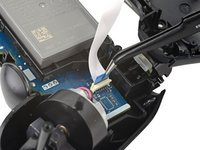
    • Use tweezers or your fingers to remove the interconnect cable by pulling its blue pull tab straight out of the socket.

    • During reassembly, reconnect the cable with its blue pull tab facing the outside of the controller.

Conclusion

To reassemble your device, follow these instructions in reverse order.

Une autre personne a terminé cette réparation.

Clay Eickemeyer

Membre depuis le 09/19/22

81 019 Réputation

455 tutoriels rédigés

Équipe

Guide Team Membre de l'équipe Guide Team

Staff

9 membres

11 337 tutoriels rédigés

0 commentaires

Ajouter un commentaire

Nombre de vues :

Dernières 24 heures : 6

7 derniers jours : 6

30 derniers jours : 6

Total : 81