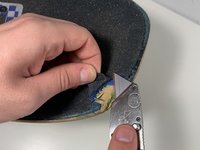
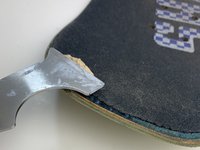
Aller au contenu principal

How to Repair a Chipped Skateboard

Ce dont vous avez besoin

  1. How to Repair a Chipped Skateboard, Repair a Chipped Skateboard: étape 1, image 1 de 3 How to Repair a Chipped Skateboard, Repair a Chipped Skateboard: étape 1, image 2 de 3 How to Repair a Chipped Skateboard, Repair a Chipped Skateboard: étape 1, image 3 de 3
    • Unscrew the top screw from the deck using the Phillips #2 screwdriver while holding the corresponding nut on the truck.

    • Use the socket to remove the nuts on the trucks.

    • 8x25mm Phillips #2 screws and 8x3/8 Nuts

  2. How to Repair a Chipped Skateboard: étape 2, image 1 de 3 How to Repair a Chipped Skateboard: étape 2, image 2 de 3 How to Repair a Chipped Skateboard: étape 2, image 3 de 3
    • Using an X-Acto knife or a razor, cut off any excess grip tape that is not sticking to the board.

  3. How to Repair a Chipped Skateboard: étape 3, image 1 de 3 How to Repair a Chipped Skateboard: étape 3, image 2 de 3 How to Repair a Chipped Skateboard: étape 3, image 3 de 3
    • Remove any loose pieces of wood with tweezers to make the surface even.

  4. How to Repair a Chipped Skateboard: étape 4, image 1 de 2 How to Repair a Chipped Skateboard: étape 4, image 2 de 2
    • Place the quick evaporating liquid onto a cotton rag and dabble dampened portion on the chipped surface to clean.

    • Make sure to keep liquid away from contact with eyes or children.

    • Make sure to wear gloves to prevent dryness/irritation of skin.

  5. How to Repair a Chipped Skateboard: étape 5, image 1 de 3 How to Repair a Chipped Skateboard: étape 5, image 2 de 3 How to Repair a Chipped Skateboard: étape 5, image 3 de 3
    • Apply generous amounts of wood putty to the putty knife.

    • Slather the putty onto the chipped area.

    • Smooth the area with the knife to conform to the profile of the board.

    • Let putty dry for an hour or more if needed.

  6. How to Repair a Chipped Skateboard: étape 6, image 1 de 3 How to Repair a Chipped Skateboard: étape 6, image 2 de 3 How to Repair a Chipped Skateboard: étape 6, image 3 de 3
    • Evenly sand the excess putty using the sanding sponge to fit the shape of the board.

    • Make sure to sand both sides of the board so that putty is only filling the affected area.

    • The sanding should roughly take 5 to 10 minutes depending on how much excess putty there is.

  7. How to Repair a Chipped Skateboard: étape 7, image 1 de 3 How to Repair a Chipped Skateboard: étape 7, image 2 de 3 How to Repair a Chipped Skateboard: étape 7, image 3 de 3
    • Put the trucks of the board back on by first inserting the screws back in from the top.

    • Then fit the trucks to align with the screws and place nuts over area where the screws are overlapping.

    • Tighten the nuts using the socket and the screws with the Phillips #2 screwdriver.

    • 8x25mm Phillips #2 screws and 8x3/8 Nuts

  8. How to Repair a Chipped Skateboard: étape 8, image 1 de 3 How to Repair a Chipped Skateboard: étape 8, image 2 de 3 How to Repair a Chipped Skateboard: étape 8, image 3 de 3
    • To clean the remaining sanding dust off the board, dampen the rag with soap and water.

    • Make sure to clean both the top and bottom.

    • Make sure to keep liquid away from contact with eyes and wear gloves if cleaner being used is not soap and can cause potential harm to oneself.

Conclusion

Once all the steps are done, you are ready to use your newly repaired board.

Joshua Simpson

Membre depuis le 01/23/20

157 Réputation

1 tutoriel rédigé

0 commentaires

Ajouter un commentaire

Nombre de vues :

Dernières 24 heures : 1

7 derniers jours : 8

30 derniers jours : 43

Total : 2,910