Introduction
Use this guide for fine adjustments after you assembled your Strive AL 6.0 Race.
Ce dont vous avez besoin
-
-
After assembling your bike you may realize, the gear system of your Strive AL 6.0 Race isn't working perfectly.
-
One common problem is the displacement of the two sprockets in the rear end as you can see in the picture, causing the chain to run aslope instead of straight. To fix this, use the two screw nuts of the rear derailleur.
-
Flip your bike upside down for a better workflow.
-
The left screw nut is to move the big sprocket, the right one for the small sprocket. Use an allen key until both are aligned.
-
-
-
When it seems like the chain is running straight through both sprockets give it a double check and try to spin your rear wheel.
-
Move one of the crank arms to see if the chain runs straight and even. If not repeat the adjustment procedure.
-
Final adjustments of the rear derailleur can be done at the bar end of the derailleur cable.
-
-
-
It can happen that your brake disc doesn't run smoothly in your brake caliper and roams on one or both sides.
-
Loosen the two screw nuts of the brake caliper and try to bring the brake disc in a straight position with an air gap left and right inside of the brake caliper.
-
Tighten the two screw nuts afterwards with the torque wrench with 9-10 Nm.
-
-
-
-
The adjustment procedure for the front brake is the same as for the rear brake. Loosen the two screw nuts, position the brake so that the brake disc doesn't roam to one side of the brake caliper, tighten screw nuts afterwards with 9-10 Nm.
-
-
-
To tighten your headset, loosen the rear screw nuts of your stem at first.
-
Use your torque wrench in the top screw nut of your headset and tighten it to about 2 Nm.
-
Afterwards tighten the side bolts of your stem to the tightening torque of 13 Nm.
-
-
-
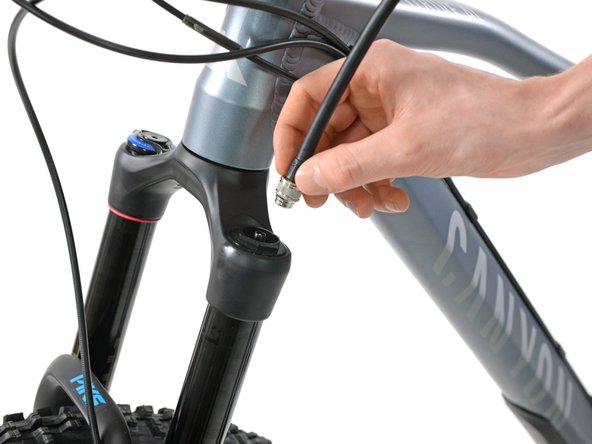
Remove the cap on the left side of the suspension fork.
-
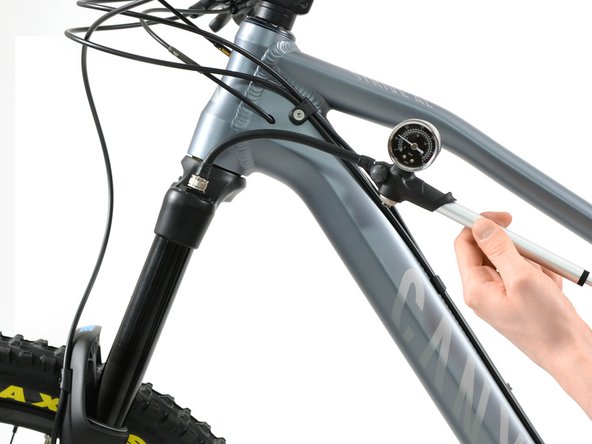
Screw your suspension pump into the designated thread.
-
Go on and give your suspension fork some pressure! Consider the weight table printed on to your fork.
-
-
-
Remove the lid on top left side of your damper.
-
Screw your suspension pump into the designated thread.
-
Give your damper a nice pump and some pressure - depending on your weight and your preferences! In our case it was about 20 - 30% on the scale printed on the damper.
-


Repeat these steps for readjustments if needed.
Repeat these steps for readjustments if needed.

