Aller au contenu principal

How to use the macOS Creator

Ce dont vous avez besoin

  1. How to use the macOS Creator, Download the tool: étape 1, image 1 de 2 How to use the macOS Creator, Download the tool: étape 1, image 2 de 2
  2. How to use the macOS Creator, Unzipping the script: étape 2, image 1 de 3 How to use the macOS Creator, Unzipping the script: étape 2, image 2 de 3 How to use the macOS Creator, Unzipping the script: étape 2, image 3 de 3
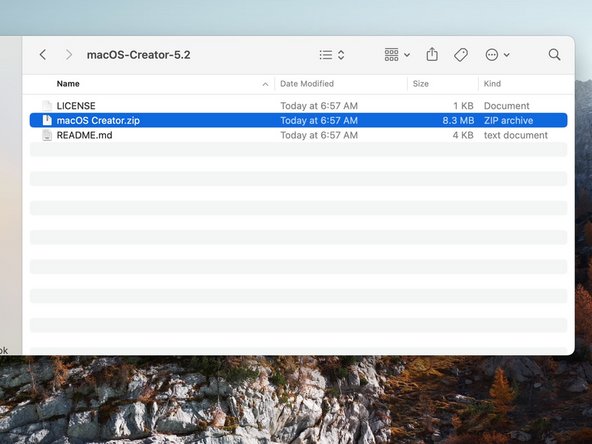
    • Open the folder that contains the script.

    • Unzip the "macOS Creator.zip" file located inside.

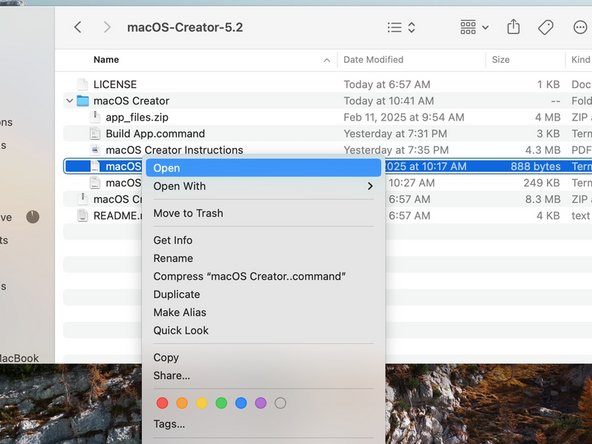
    • A new folder will appear

  3. How to use the macOS Creator, Opening the tool: étape 3, image 1 de 3 How to use the macOS Creator, Opening the tool: étape 3, image 2 de 3 How to use the macOS Creator, Opening the tool: étape 3, image 3 de 3
    • Double click on the macOS Creator.command file.

    • You may get an issue on OS X El Capitan or later that says macOS Creator.command cannot be opened because it is from an unidentified developer.

    • This is easy to fix, simply control-click (right-click) the script and choose "Open"

  4. How to use the macOS Creator, Welcome window: étape 4, image 1 de 3 How to use the macOS Creator, Welcome window: étape 4, image 2 de 3 How to use the macOS Creator, Welcome window: étape 4, image 3 de 3
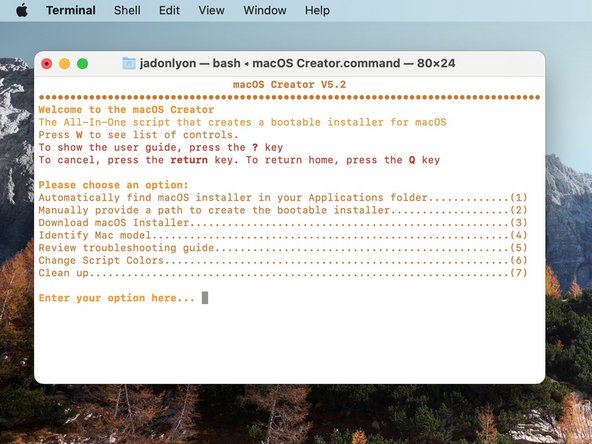
    • Once running, you will be greeted to the welcome window. (This window appears only the first time you launch the script.)

    • If you wish, you can press the (Y) key to check out the user guide. This is a step-by-step guide that shows you how to use the macOS Creator. It is very helpful for getting comfortable with the UI.

    • As a general reminder: Press (return) to cancel. Press (W) to go one step back. Press (Q) to start over.

    • You can press any other key if you do not want to check out the user guide.

    • You can actually review the user guide at any point if you wish by pressing the (?) key in the home menu.

  5. How to use the macOS Creator, Getting started: étape 5, image 1 de 3 How to use the macOS Creator, Getting started: étape 5, image 2 de 3 How to use the macOS Creator, Getting started: étape 5, image 3 de 3
    • In the picture, you can see what the home menu looks like.

    • To begin, let's press the (1) key. This will search your Applications folder for valid macOS Installers.

    • Each command corresponds to the number listed.

    • We will be using macOS Sequoia in this tutorial, but remember, this script works with any macOS and OS X version from Mac OS X Lion and newer.

    • If the script does not find any macOS Installers, make sure the installer is actually in your Applications folder and press (S) to search again. If you need to download a new installer, refer to step 10.

  6. How to use the macOS Creator, Providing a Drive: étape 6, image 1 de 3 How to use the macOS Creator, Providing a Drive: étape 6, image 2 de 3 How to use the macOS Creator, Providing a Drive: étape 6, image 3 de 3
    • When the script finds a valid macOS Installer, press the (Y) key to continue.

    • The script will also check to make sure your Mac can create the installer. If you Mac is too old, or perhaps you are running on Apple Silicone, the script will notify you and cancel the operation.

    • If you feel as though the script is judging your Mac incorrectly, you can run it in Safe Mode (Refer to step 21).

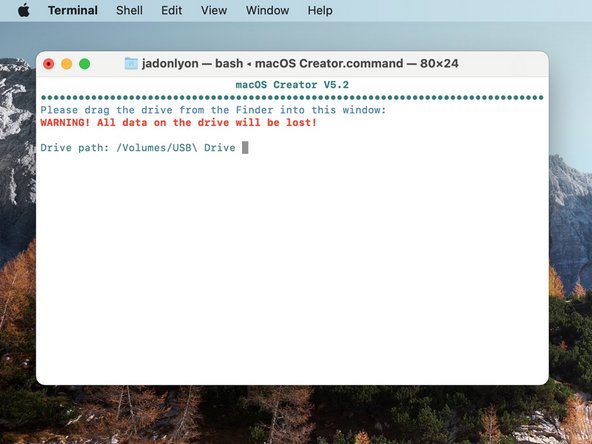
    • To provide a drive, the script will list out the available disks connected to your Mac. Simply press the number that corresponds to that drive.

    • Note for advanced users: to save time quickly, you can format the drive in Disk Utility as name it "Untitled." This way, the macOS Creator will actually skip this step entirely.

    • Note: Your startup drive is hidden from this list.

    • If the script does not list any drives, or if the drive you need does not appear, simply press the (S) key.

  7. How to use the macOS Creator: étape 7, image 1 de 3 How to use the macOS Creator: étape 7, image 2 de 3 How to use the macOS Creator: étape 7, image 3 de 3
    • To manually provide a drive, simply drag it from the Finder into the terminal window.

    • Then press (return) to continue.

    • If you drag anything other than a valid drive, the script will show an error message, and ask for you to try again.

  8. How to use the macOS Creator, Creating the Drive: étape 8, image 1 de 3 How to use the macOS Creator, Creating the Drive: étape 8, image 2 de 3 How to use the macOS Creator, Creating the Drive: étape 8, image 3 de 3
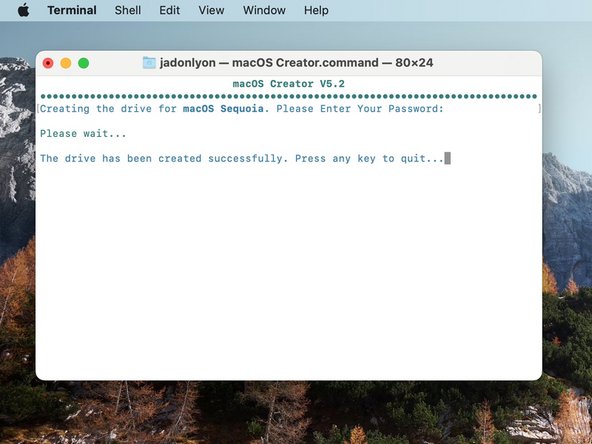
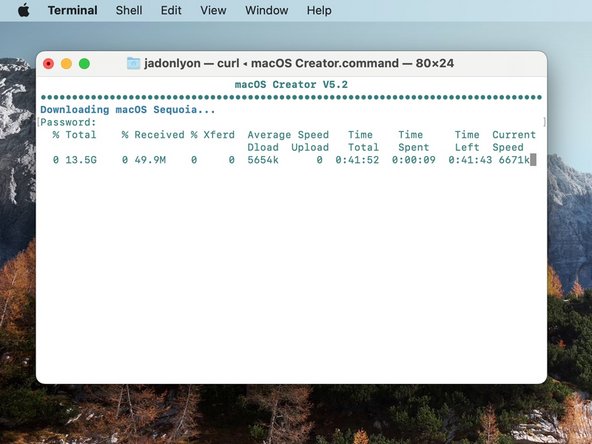
    • Now to create the drive itself, the macOS Creator may need your password.

    • Terminal will not show your password as you type it

    • The tool will then begin to create the installer.

    • The script will not show any activity while creating the drive. All commands used to create the drive run in the background. (It may appear to be frozen at times, but the script is still running.)

    • Once finished, the script will notify you. You can then either press any key to quit, or press the (Q) key to return to the home menu.

  9. How to use the macOS Creator, Manually providing the Installer: étape 9, image 1 de 3 How to use the macOS Creator, Manually providing the Installer: étape 9, image 2 de 3 How to use the macOS Creator, Manually providing the Installer: étape 9, image 3 de 3
    • If you have a valid macOS Installer that is not in your Applications folder (maybe in your downloads folder or on another hard drive), you can manually provide it.

    • From the Home Menu, simply press the (2) key instead of (1).

    • Remember, each command corresponds to its number.

    • Drag the macOS Installer from its location into the terminal window and press the return key.

    • You will then be asked to provide the drive as before.

  10. How to use the macOS Creator, Downloading macOS: étape 10, image 1 de 1
    • If you do not have a valid macOS Installer, you can download one from either Apple's servers or the Internet Archive.

    • This time from the Home Menu, press the (3) key.

    • If you do not know which version of macOS to download, refer to step 14.

  11. How to use the macOS Creator: étape 11, image 1 de 2 How to use the macOS Creator: étape 11, image 2 de 2
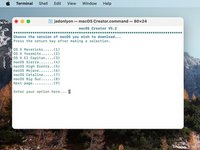
    • You will see a list of available macOS Versions to download (Please note: Mac OS X Lion and OS X Mountain Lion cannot be downloaded here. This is planned to be fixed in a future update.)

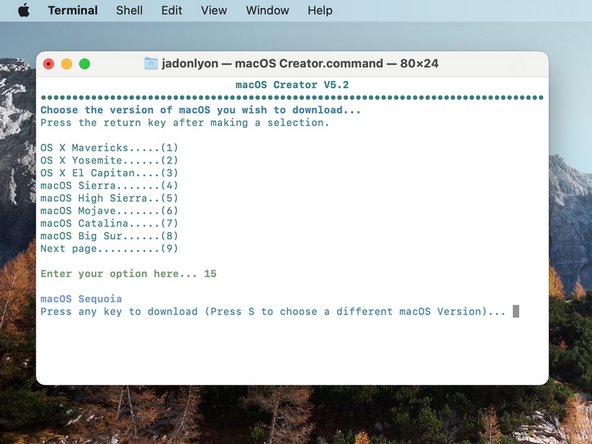
    • To choose a macOS Version to download, press the number it corresponds to and then press the (return) key.

    • The script will ask for confirmation. If you selected the incorrect macOS Version, press the (S) key to choose a different version.

    • If you do not see your version listed, press the (9) key and then the (return) key to see the next page.

  12. How to use the macOS Creator: étape 12, image 1 de 2 How to use the macOS Creator: étape 12, image 2 de 2
    • As a quick time saver for more advanced users, you can also type the macOS version name or version number and press the (return) key.

    • For example, to download macOS Sequoia, type out "sequoia" and press the return key. Or, type out "15" and press the return key.

  13. How to use the macOS Creator: étape 13, image 1 de 2 How to use the macOS Creator: étape 13, image 2 de 2
    • In order to download, you must type in your password and then press the return key.

    • The macOS Creator will then download the macOS Installer to your /tmp folder, so it will not take up extra space on your Mac. If you wish to delete this file, refer to step 16.

    • Once finished, follow the on-screen instructions to install

  14. How to use the macOS Creator, Identifying Mac: étape 14, image 1 de 3 How to use the macOS Creator, Identifying Mac: étape 14, image 2 de 3 How to use the macOS Creator, Identifying Mac: étape 14, image 3 de 3
    • The macOS Creator also has a nice tool for identifying your Mac model. This can be used if you do not know which latest macOS Version is compatible with the Mac.

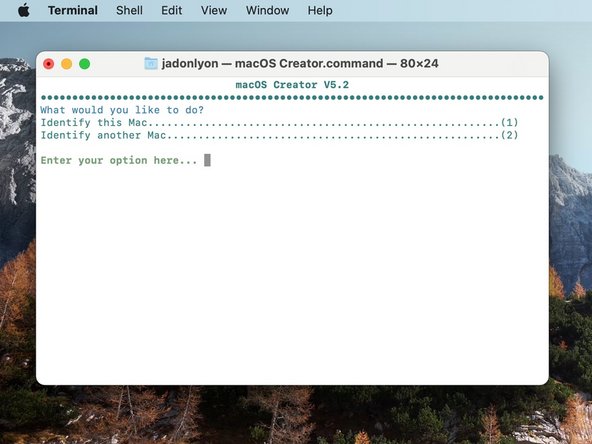
    • From the Home Menu, press the (4) key.

    • A note of caution: This tool has been tested as thoroughly as possible. Unfortunately, this tool has not yet been run on every Mac in existence, so it may or may not identify your Mac correctly. If you notice any issues, feel free to drop a comment down below.

    • You will see two options: Identify your current Mac or identify another Mac.

    • If you will be creating the bootable installer for your current Mac, then press the (1) key, and the script will show you the latest compatible macOS Version.

    • This script was run on a MacBook 2017. Therefore the latest compatible macOS Version is macOS Ventura (13)

  15. How to use the macOS Creator: étape 15, image 1 de 3 How to use the macOS Creator: étape 15, image 2 de 3 How to use the macOS Creator: étape 15, image 3 de 3
    • If you are working on a different Mac, then press the (2) key instead, and this will give you a step-by-step list to identify just the Mac you are working on.

    • Remember, if you choose the wrong command, simply go back by pressing the (W) key.

  16. How to use the macOS Creator, Clean up: étape 16, image 1 de 1
    • While downloading macOS, the script saves multiple files to your Mac. Fortunately, these files are saved to your Mac's tmp folder, so by restarting the Mac, all of the files will be deleted.

    • If you wish to remove them immediately however, you can by using the Clean Up tool.

    • From the Home Menu, press the (7) key.

  17. How to use the macOS Creator: étape 17, image 1 de 2 How to use the macOS Creator: étape 17, image 2 de 2
    • You have several options with this tool.

    • (1) Remove temporary files: This removes those files from the tmp folder.

    • (2) Remove macOS Installers: If you have any installers in your Applications folder, the script can remove those (which is nice because those installers can get up to 12 GB!).

    • (3) Fix drive permissions: When creating the Application, or when modifying macOS Installers, certain disk images may or may not mount invisibly. This tool will unmount those disk images and then fix any issues it may find on your Mac's startup drive.

    • (4) All of the above: Runs all of these tools.

    • You will need to enter your password for these tools.

    • These commands are also hidden, if you wish to see them running, try running the script in Verbose Mode (Step 21).

  18. How to use the macOS Creator, Changing the Script Colors: étape 18, image 1 de 1
    • If you do not like the blue text in this script, you may change it. From the Home Menu, press the (6) key.

  19. How to use the macOS Creator: étape 19, image 1 de 3 How to use the macOS Creator: étape 19, image 2 de 3 How to use the macOS Creator: étape 19, image 3 de 3
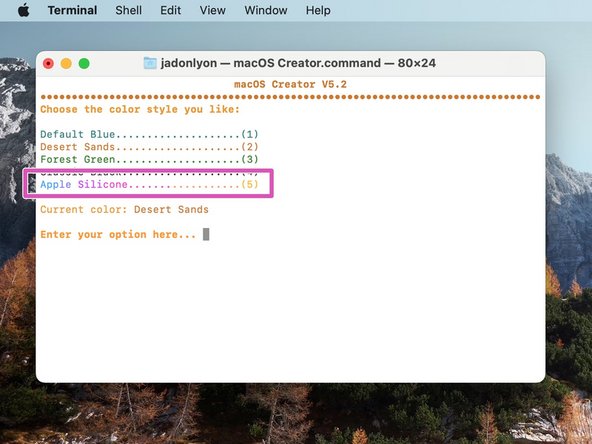
    • Here you will see several color themes, including a classic black from V2.3 and older.

    • Choose the color style you like by pressing the number corresponding to each color. (This is Desert Sands in the picture)

    • All colors have been optimized for both light mode and dark mode on macOS Mojave and newer.

    • As a fun easter egg, there is an all-exclusive rainbow color theme for Macs that have the Apple Silicone chip.

    • This feature will not work under any circumstances if the script is modified. Changing the script text within itself is quite case-sensitive, and it requires all variables to be perfect. AVOID MODIFYING AT ALL COSTS!

  20. How to use the macOS Creator, Troubleshooting: étape 20, image 1 de 2 How to use the macOS Creator, Troubleshooting: étape 20, image 2 de 2
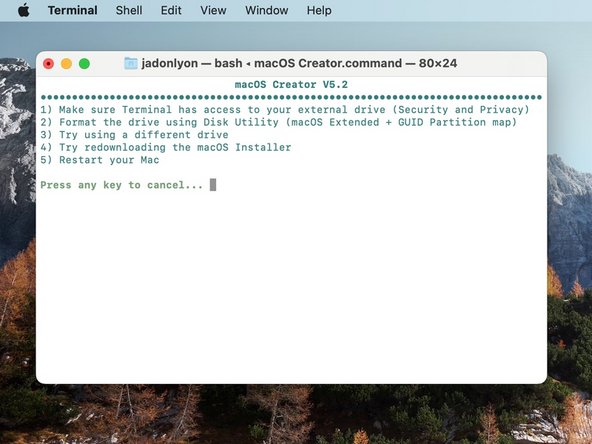
    • If drive creation fails, the macOS Creator provides several tools to fix the issue.

    • First, you can press the (Y) key to review any troubleshooting tips.

    • To return back to the main menu, press the (Q) key.

  21. How to use the macOS Creator, Running in Verbose or Safe Mode: étape 21, image 1 de 3 How to use the macOS Creator, Running in Verbose or Safe Mode: étape 21, image 2 de 3 How to use the macOS Creator, Running in Verbose or Safe Mode: étape 21, image 3 de 3
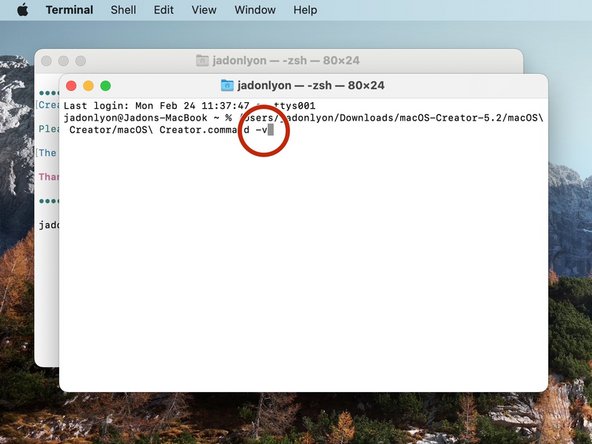
    • If you want to know exactly what the issue is, you can run the script in Verbose Mode. To do this, open a new terminal window by pressing Command + N.

    • Drag the macOS Creator.command file into the terminal window.

    • Add the verbose argument (-v) and then press the (return) key.

    • Follow the same steps to create the drive, except in Verbose Mode the script will output all of the commands used, along with error information, drive details, etc.

    • Follow these same steps, except add (-s) instead to run the script in Safe Mode, which will disable all checks and run the commands even if they could fail.

  22. How to use the macOS Creator: étape 22, image 1 de 1
    • Here's a common list for troubleshooting errors:

    • This is not a valid macOS Installer ••• Redownload the installer from the "Download macOS" tool.

    • This is not a valid mount point ••• Format the drive with Disk Utility (macOS Extended - GUID Partition Map)

    • Permission denied (Or something else similar to this) ••• Grant Terminal full disk access in the Security and Privacy preference pane.

  23. How to use the macOS Creator, Building the Application: étape 23, image 1 de 3 How to use the macOS Creator, Building the Application: étape 23, image 2 de 3 How to use the macOS Creator, Building the Application: étape 23, image 3 de 3
    • If you use the macOS Creator on a regular basis, you can create an application that will appear directly in your Applications folder

    • This will save the script to a hidden folder in your Home folder, and the application simply runs an automator command to launch that script.

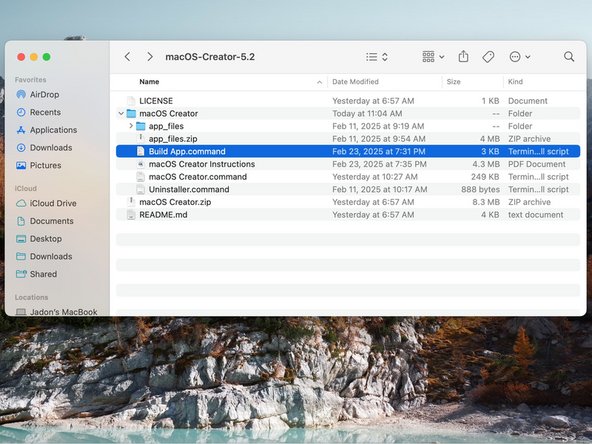
    • Unzip the "app_files.zip" file.

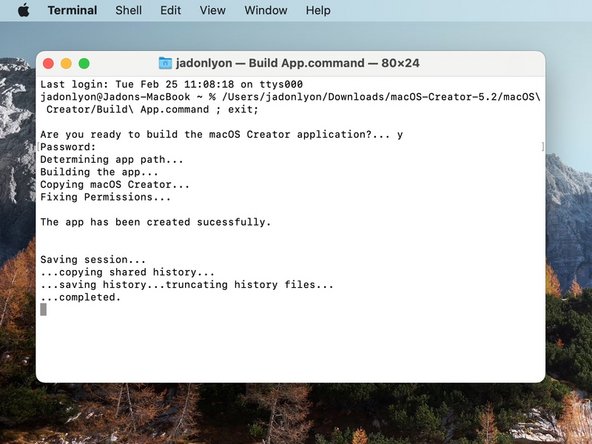
    • Open the "Build App.command" script.

    • You may have to right-click the script and choose "Open" if macOS refuses to open the script.

  24. How to use the macOS Creator: étape 24, image 1 de 3 How to use the macOS Creator: étape 24, image 2 de 3 How to use the macOS Creator: étape 24, image 3 de 3
    • In this script, press the (Y) key to build the app.

    • You will need to enter your password in order to do this.

    • If you change your mind and decide not to build the app, press any other key to cancel.

    • You can also do this if you are reinstalling the app.

  25. How to use the macOS Creator, Removing the App: étape 25, image 1 de 2 How to use the macOS Creator, Removing the App: étape 25, image 2 de 2
    • If you decide you do not like the app, you can uninstall it with the "Uninstaller.command" file.

    • You will need to enter your password to do this... you know the drill.

  26. How to use the macOS Creator, Good takeaways: étape 26, image 1 de 1
    • Here are some takeaways you should always remember using this script:

    • Press the (W) key in the Home Menu to see a list of controls.

    • Press the (return) key at any point to cancel the script operation.

    • Press the (Q) key at any point to return to the Home Menu

    • Press the (W) key to go one step backwards.

    • If you can't remember what to do at some point, you can always press the (?) key (even the / key works too) to show the help menu for a particular topic.

Conclusion

Enjoy using the macOS Creator! If you have any suggestions, feel free to drop a comment down below!

Jadon Lyon

Membre depuis le 09/05/23

3 808 Réputation

8 tutoriels rédigés

0 commentaires

Ajouter un commentaire

Nombre de vues :

Dernières 24 heures : 0

7 derniers jours : 6

30 derniers jours : 27

Total : 114