Aller au contenu principal

Hp Pavilion dv6-2155dx USB Port Replacement

Ce dont vous avez besoin

  1. Hp Pavilion dv6-2155dx USB Port Replacement, Hard Drive: étape 1, image 1 de 2 Hp Pavilion dv6-2155dx USB Port Replacement, Hard Drive: étape 1, image 2 de 2
    • Shutdown your computer and remove the battery before beginning the replacement.

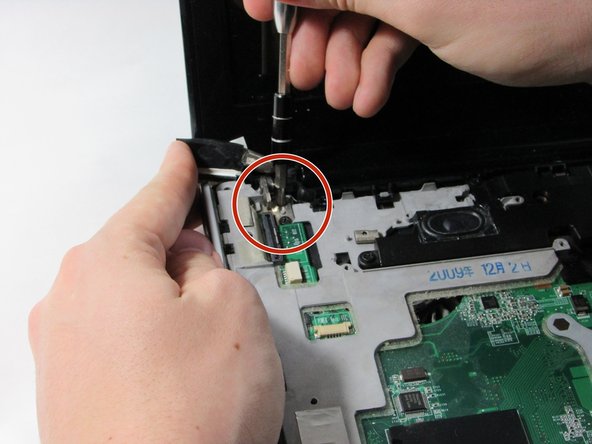
    • Loosen the screws using Phillips #01 screwdriver with the extension attached.

    • The screws will not come out completely but stay on the panel.

  2. Hp Pavilion dv6-2155dx USB Port Replacement: étape 2, image 1 de 1
    • After removing the two screws securing the Hard Drive to the bottom case, remove the panel to reveal the hard drive.

  3. Hp Pavilion dv6-2155dx USB Port Replacement: étape 3, image 1 de 2 Hp Pavilion dv6-2155dx USB Port Replacement: étape 3, image 2 de 2
    • Locate the tab of the black Mylar film on the right hand side of the hard drive.

    • Gently grip it with your thumb and index finger.

  4. Hp Pavilion dv6-2155dx USB Port Replacement: étape 4, image 1 de 2 Hp Pavilion dv6-2155dx USB Port Replacement: étape 4, image 2 de 2
    • Pull the Hard Drive to the right to loosen the it from the frame.

    • The left side of the hard drive will pop up and should slide out freely until you see the black connector on it's right side, connecting it to the computer.

  5. Hp Pavilion dv6-2155dx USB Port Replacement: étape 5, image 1 de 2 Hp Pavilion dv6-2155dx USB Port Replacement: étape 5, image 2 de 2
    • When removing the Hard Drive from the frame, you will see a black connector on it's right side.

    • Turn the Hard Drive over and grasp the Hard Drive with one hand as you grip the connector with the other hand to remove the connector from the hard drive.

    • To safely remove the Hard Driver, do not wiggle or jerk the connector off of the Hard Drive, pull straight off.

  6. Hp Pavilion dv6-2155dx USB Port Replacement, Keyboard: étape 6, image 1 de 1
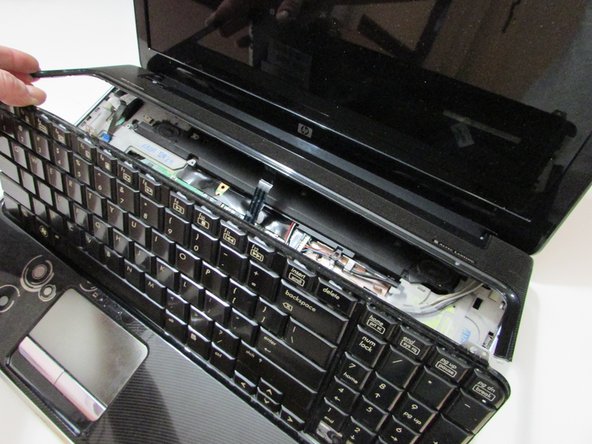
    • Remove the six screws. Four are marked with a keyboard icons, two are located on the top corner.

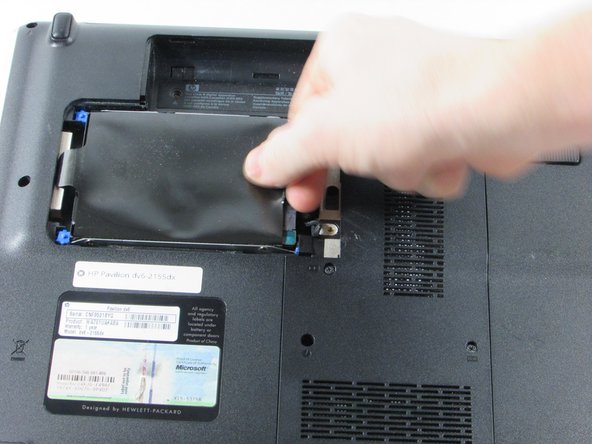
    • Remove the three screws located in the battery port.

    • Red marked screws: 7mm long and the head is 4mm wide. Orange marked screws: 4mm long and head is 4mm wide.

  7. Hp Pavilion dv6-2155dx USB Port Replacement: étape 7, image 1 de 2 Hp Pavilion dv6-2155dx USB Port Replacement: étape 7, image 2 de 2
    • Use a plastic spudger to gently un-clip the top panel above keyboard.

    • Tab openings are located by the F1 key, F5 key, and page up key

    • Once loose, do not try and remove it completely

  8. Hp Pavilion dv6-2155dx USB Port Replacement: étape 8, image 1 de 2 Hp Pavilion dv6-2155dx USB Port Replacement: étape 8, image 2 de 2
    • Once the top panel is propped open, remove the three 4mm silver screws located at the top of the keyboard with a Philips head screw driver, size #1.

    • Flip keyboard forward and raise the keyboard off the frame.

    • Be careful not to prop the top panel up too high as to disconnect the two ribbons connecting it to the inside of the laptop.

  9. Hp Pavilion dv6-2155dx USB Port Replacement: étape 9, image 1 de 1
    • Once you have removed the three screws, gently lift the keyboard away from the laptop.

    • Be careful when lifting the keyboard as to not break or damage the ribbon cable that connects the keyboard to the laptop.

  10. Hp Pavilion dv6-2155dx USB Port Replacement: étape 10, image 1 de 2 Hp Pavilion dv6-2155dx USB Port Replacement: étape 10, image 2 de 2
    • Use plastic spudger to flip up the black strip on the ZIF connector that connects the ribbon cable to the motherboard.

    • Be sure to flip the hinge retaining flap, not pulling the connector itself.

  11. Hp Pavilion dv6-2155dx USB Port Replacement: étape 11, image 1 de 1
    • Remove the film from system board to then safely remove the keyboard.

  12. Hp Pavilion dv6-2155dx USB Port Replacement, USB Port: étape 12, image 1 de 2 Hp Pavilion dv6-2155dx USB Port Replacement, USB Port: étape 12, image 2 de 2
    • Flip the laptop over and locate the memory module panel and loosen the 3 screws holding down the panel.

    • Remove the panel to expose the 2 memory modules.

    • When the screws are loosened, they will remain connected to the panel.

  13. Hp Pavilion dv6-2155dx USB Port Replacement: étape 13, image 1 de 2 Hp Pavilion dv6-2155dx USB Port Replacement: étape 13, image 2 de 2
    • Remove the memory modules by using your index finger and thumb to spread apart the silver retaining tabs on both sides of the modules. After spreading the tabs apart, lift and pull the module out at angle.

    • Repeat this action for the second memory module that lay under the first.

  14. Hp Pavilion dv6-2155dx USB Port Replacement: étape 14, image 1 de 3 Hp Pavilion dv6-2155dx USB Port Replacement: étape 14, image 2 de 3 Hp Pavilion dv6-2155dx USB Port Replacement: étape 14, image 3 de 3
    • Locate the WLAN module located in the hard drive panel and remove the screw holding the WLAN module.

    • Disconnect the two WLAN antenna cables (white and black) attached to the WLAN module by gently lifting and holding onto the gold base.

    • The wires are numbered as "1" and "2". When reconnecting, connect the designated location notated by "J1" and "J2" on the module.

  15. Hp Pavilion dv6-2155dx USB Port Replacement: étape 15, image 1 de 1
    • Remove the remaining screws on the bottom of the laptop.

    • New line.

  16. Hp Pavilion dv6-2155dx USB Port Replacement: étape 16, image 1 de 3 Hp Pavilion dv6-2155dx USB Port Replacement: étape 16, image 2 de 3 Hp Pavilion dv6-2155dx USB Port Replacement: étape 16, image 3 de 3
    • Disconnect the LED board and power button cables from the connector on the system board by pulling the blue Mylar tabs toward the display screen.

  17. Hp Pavilion dv6-2155dx USB Port Replacement: étape 17, image 1 de 2 Hp Pavilion dv6-2155dx USB Port Replacement: étape 17, image 2 de 2
    • Disconnect the display cable by lifting the Mylar tab up towards the screen.

  18. Hp Pavilion dv6-2155dx USB Port Replacement: étape 18, image 1 de 2 Hp Pavilion dv6-2155dx USB Port Replacement: étape 18, image 2 de 2
    • Remove the yellow or clear tape in the upper right hand corner to reveal the webcam/microphone cables.

    • Using a plastic flat spudger, disconnect the silver webcam/microphone cable from the system board by pulling the white connector out with the spudger.

  19. Hp Pavilion dv6-2155dx USB Port Replacement: étape 19, image 1 de 2 Hp Pavilion dv6-2155dx USB Port Replacement: étape 19, image 2 de 2
    • Disconnect the power connector cable by using the point of the plastic spudger. continue to slide the plastic part until it is completely removed or you are able to grab the plastic with your fingers.

    • It is not advised to pull the cable bundle to remove this. By doing that you can damage the small wires that are connected.

  20. Hp Pavilion dv6-2155dx USB Port Replacement: étape 20, image 1 de 1
    • Now disconnect the audio cable (red and white) also using the flat plastic spudger. Gently pry the black piece of the connector away from the white connecting dock it sits in.

  21. Hp Pavilion dv6-2155dx USB Port Replacement: étape 21, image 1 de 3 Hp Pavilion dv6-2155dx USB Port Replacement: étape 21, image 2 de 3 Hp Pavilion dv6-2155dx USB Port Replacement: étape 21, image 3 de 3
    • support the display while removing the screws for this step to avoid damaging the display.

    • Remove the 4, 4 mm long screws that connect the display to the laptop, 2 screws per side.

    • Now you can safely remove the screen from the body of the laptop.

  22. Hp Pavilion dv6-2155dx USB Port Replacement: étape 22, image 1 de 1
    • Remove the 4, 4mm black screws, 3 from the top cover and 1 from the speaker unit cover.

    • the screws are black, 4 mm long and heads are 4 mm wide.

  23. Hp Pavilion dv6-2155dx USB Port Replacement: étape 23, image 1 de 2 Hp Pavilion dv6-2155dx USB Port Replacement: étape 23, image 2 de 2
    • Disconnect the touch pad ribbon cable from the system board by pulling on the blue tab towards you.

  24. Hp Pavilion dv6-2155dx USB Port Replacement: étape 24, image 1 de 2 Hp Pavilion dv6-2155dx USB Port Replacement: étape 24, image 2 de 2
    • Starting in the front of the laptop, use a flat plastic spudger to gently pry the silver/chrome plastic bar off of the front of the laptop.

    • Once the silver/chrome bar is removed, the laptop cover should be loosened enough to remove.

    • You may need to pry along the sides of the laptop with the spudger if the laptop cover isn't loosened completely.

  25. Hp Pavilion dv6-2155dx USB Port Replacement: étape 25, image 1 de 2 Hp Pavilion dv6-2155dx USB Port Replacement: étape 25, image 2 de 2
    • Locate and disconnect the white and blue USB ribbon cable by grasping the ribbon with index finger and thumb to gently pull away from the USB ports.

  26. Hp Pavilion dv6-2155dx USB Port Replacement: étape 26, image 1 de 3 Hp Pavilion dv6-2155dx USB Port Replacement: étape 26, image 2 de 3 Hp Pavilion dv6-2155dx USB Port Replacement: étape 26, image 3 de 3
    • Remove the 2 black screws holding the 2 USB ports to the system board.

    • The 2 USB ports can now be removed and replaced.

Conclusion

To reassemble your device, follow these instructions in reverse order.

3 autres ont terminé cette réparation.

Joseph Sanda

Membre depuis le 03/10/16

522 Réputation

4 tutoriels rédigés

Équipe

UMass Dartmouth, Team 2-2, Isaacson Fall 2016 Membre de l'équipe UMass Dartmouth, Team 2-2, Isaacson Fall 2016

UMASSD-ISAACSON-F16S2G2

3 membres

5 tutoriels rédigés

0 commentaires

Ajouter un commentaire

Nombre de vues :

Dernières 24 heures : 1

7 derniers jours : 3

30 derniers jours : 9

Total : 2,400