Aller au contenu principal

Infant Optics DXR-8 Monitor Motherboard Replacement

Ce dont vous avez besoin

  1. Infant Optics DXR-8 Monitor Motherboard Replacement, Internal Monitor Components: étape 1, image 1 de 3 Infant Optics DXR-8 Monitor Motherboard Replacement, Internal Monitor Components: étape 1, image 2 de 3 Infant Optics DXR-8 Monitor Motherboard Replacement, Internal Monitor Components: étape 1, image 3 de 3
    • Using the plastic opening tool, remove screen protector from front of monitor.

  2. Infant Optics DXR-8 Monitor Motherboard Replacement: étape 2, image 1 de 3 Infant Optics DXR-8 Monitor Motherboard Replacement: étape 2, image 2 de 3 Infant Optics DXR-8 Monitor Motherboard Replacement: étape 2, image 3 de 3
    • Remove the six 4mm screws using a Phillips #00 screwdriver.

    • Remove the screen, exposing the circuit board.

    • Turn device over to expose rear circuit board.

  3. Infant Optics DXR-8 Monitor Motherboard Replacement: étape 3, image 1 de 3 Infant Optics DXR-8 Monitor Motherboard Replacement: étape 3, image 2 de 3 Infant Optics DXR-8 Monitor Motherboard Replacement: étape 3, image 3 de 3
    • Disconnect speaker from monitor for ease of access by unplugging wire.

  4. Infant Optics DXR-8 Monitor Motherboard Replacement, Monitor Screen: étape 4, image 1 de 3 Infant Optics DXR-8 Monitor Motherboard Replacement, Monitor Screen: étape 4, image 2 de 3 Infant Optics DXR-8 Monitor Motherboard Replacement, Monitor Screen: étape 4, image 3 de 3
    • Using a plastic opening tool, disconnect the ribbon cable connector.

    • Gently separate the ribbon cable from the motherboard.

  5. Infant Optics DXR-8 Monitor Motherboard Replacement: étape 5, image 1 de 2 Infant Optics DXR-8 Monitor Motherboard Replacement: étape 5, image 2 de 2
    • Using a Phillips #000 screwdriver, remove the four 4mm screws around the edge of the motherboard.

    • Flip the motherboard away from the front case to reveal the screen on the other side.

  6. Infant Optics DXR-8 Monitor Motherboard Replacement: étape 6, image 1 de 1
    • Using a plastic opening tool, carefully pry the top retaining frame off of the screen. Start in one corner and work around the bottom of the frame.

  7. Infant Optics DXR-8 Monitor Motherboard Replacement: étape 7, image 1 de 3 Infant Optics DXR-8 Monitor Motherboard Replacement: étape 7, image 2 de 3 Infant Optics DXR-8 Monitor Motherboard Replacement: étape 7, image 3 de 3
    • Using a plastic opening pick, carefully pry a corner of the screen away from the motherboard.

    • Lift the screen off of the motherboard.

  8. Infant Optics DXR-8 Monitor Motherboard Replacement, Monitor Motherboard: étape 8, image 1 de 2 Infant Optics DXR-8 Monitor Motherboard Replacement, Monitor Motherboard: étape 8, image 2 de 2
    • Flip the motherboard away from the case.

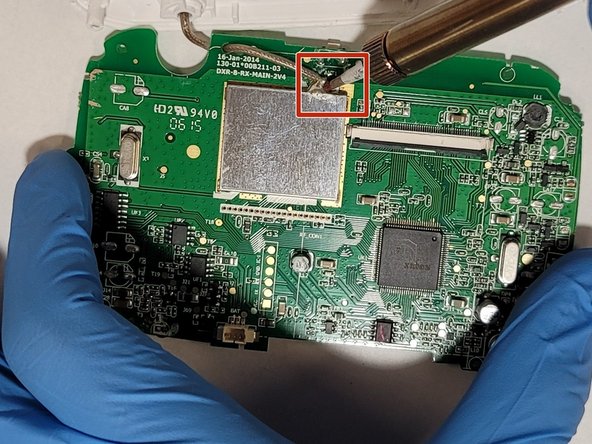
    • Using a soldering iron and desoldering braid, desolder the antenna from the motherboard.

    • For more information on soldering, please visit the How to Solder and Desolder Connections guide.

Conclusion

To reassemble your device, follow these instructions in reverse order.

Une autre personne a terminé cette réparation.

2 commentaires

Can you do one for the DXR-8 Pro monitor? Mine randomly stoped turning on and I want to see if I can open it up and try to fix it.

Andfel - Réponse

Can you please tell me where to buy a replacement motherboard??

Ilya Nechay - Réponse

Ajouter un commentaire

Nombre de vues :

Dernières 24 heures : 0

7 derniers jours : 4

30 derniers jours : 21

Total : 1,082