Aller au contenu principal

Installation d'un second SSD dans le MacBook Pro 15" Unibody 2,53 GHz mi-2009

Ce dont vous avez besoin

  1. Installation d'un second SSD dans le MacBook Pro 15" Unibody 2,53 GHz mi-2009, Boîtier inférieur: étape 1, image 1 de 1
    • Retirez les dix vis suivantes par lesquelles le boîtier inférieur est fixé au boîtier supérieur :

    • Sept vis Phillips 3 mm.

    • Trois vis Phillips 13,5 mm.

  2. Installation d'un second SSD dans le MacBook Pro 15" Unibody 2,53 GHz mi-2009: étape 2, image 1 de 1
    • En vous servant des deux mains, soulevez le boîtier inférieur au niveau de la fente pour le libérer des deux clips par lesquels il est fixé au boîtier supérieur.

    • Retirez le boîtier inférieur et mettez-le de côté.

  3. Installation d'un second SSD dans le MacBook Pro 15" Unibody 2,53 GHz mi-2009, Batterie: étape 3, image 1 de 1
    Outil utilisé dans cette étape :
    P6 Pentalobe Screwdriver 2009 15" MacBook Pro Battery
    $5.49
    J'achète
    • Trois vis Pentalobe fixent la batterie au boîtier supérieur. Vous pouvez les dévisser avec ce tournevis spécial.

    • Si vous n'avez pas de tournevis Pentalobe, un tournevis à tête plate de 1,5 mm peut être utilisé éventuellement. Assurez-vous que la tête de votre tournevis à tête plate s'adapte parfaitement à deux des cinq "dents" de la tête de la vis avant d'essayer de libérer la vis, car laisser du jeu pourrait facilement abîmer la tête de vis.

    • Si la prise est trop lâche, trouvez un embout plus gros et limez-le à la bonne taille pour qu'il s'insère bien avant de procéder.

    • Vous n'êtes pas obligé de suivre les étapes 3 à 7 pour retirer la batterie avant de remplacer le disque dur. Néanmoins, il est préférable de retirer des appareils électroniques toutes les sources d'énergie avant de travailler dessus.

    It really depends on how thick the 1.5 mm flathead screwdriver is. I tried a low-cost tool and almost destroyed the screw. So be carefull

    Paul - Réponse

    Unfortunately, when I added a second hard drive via these instructions, all went well but Bluetooth is now MIA. Can anyone help?

    Peter Payne - Réponse

    I agree...

    I have bought a used MacBook Pro, when problems arise, opening Corps was trying to turn the screw, but with poor quality could not turn a screwdriver, only to ruin the screw. Try to buy ifixit Screwdriver set. Good luck to all and thank you ifixit team for such assistance as ifixit.com. Thank you.

    remjok - Réponse

  4. Installation d'un second SSD dans le MacBook Pro 15" Unibody 2,53 GHz mi-2009: étape 4, image 1 de 1
    • Retirez les deux vis Pentalobe visibles, qui sont disposées le long du bord supérieur de la batterie.

    The screws holding my battery were all worn out since an earlier removal. So instead of ruining them even more I put some saran wrap on the tip of my pentalobe driver and gently unscrewed them.

    magnus - Réponse

    I have a problem with these screw. They a completly warn and I need some new ones to fix the new Battery.

    Does anyone know which thread it is and which length?

    alexanderleith - Réponse

  5. Installation d'un second SSD dans le MacBook Pro 15" Unibody 2,53 GHz mi-2009: étape 5, image 1 de 1
    • À l'aide de la pointe d'un spudger, repliez la languette de l'autocollant portant la mention « Warning: Do not remove the battery » (Avertissement : ne pas retirer la batterie) et, de l'autre main, retirez la vis Pentalobe masquée par la languette.

  6. Installation d'un second SSD dans le MacBook Pro 15" Unibody 2,53 GHz mi-2009: étape 6, image 1 de 2 Installation d'un second SSD dans le MacBook Pro 15" Unibody 2,53 GHz mi-2009: étape 6, image 2 de 2
    • Soulevez la batterie en tirant sur la languette d'extraction et dégagez-la du boîtier supérieur.

    • N'essayez pas de retirer complètement la batterie pour le moment.

  7. Installation d'un second SSD dans le MacBook Pro 15" Unibody 2,53 GHz mi-2009: étape 7, image 1 de 1
    • Inclinez la batterie vers l'arrière suffisamment pour accéder au connecteur du câble de la batterie.

    • Débranchez le câble de la batterie de sa prise sur la carte mère et retirez la batterie du boîtier supérieur.

    • Si vous installez une nouvelle batterie, calibrez-la aussi tôt que possible.

  8. Installation d'un second SSD dans le MacBook Pro 15" Unibody 2,53 GHz mi-2009, Remplacement du lecteur optique dans le MacBook Pro 15" Unibody 2,53 GHz mi-2009: étape 8, image 1 de 1
    • Apple colle une petite bande de plastique transparent, dont l'un des côtés est adhésif, sur la carte mère, derrière le connecteur du câble vidéo, pour le maintenir dans sa prise. Lorsque vous l'enlevez, veillez à ne pas casser des composants montés en surface sur la carte mère.

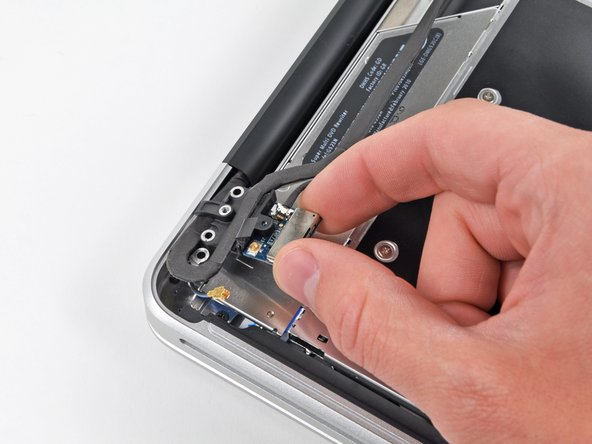
    • Tout en maintenant l'extrémité du clip de fixation du câble vers le bas avec un doigt, soulevez légèrement l'autre extrémité à l'aide de la pointe d'un spudger et dégagez-la du connecteur du câble vidéo en la faisant pivoter.

    I tried to move the plastic piece, but it seemed risky for someone with no experience like me. It was not hard at all to just peel off the camera cable without messing with the connector, and then, carefully take the optical drive out.

    joaquingoyret - Réponse

    Totally agree. Optical drive is easily removed by peeling off camera cable

    John Doyle - Réponse

  9. Installation d'un second SSD dans le MacBook Pro 15" Unibody 2,53 GHz mi-2009: étape 9, image 1 de 1
    • Débranchez le câble vidéo en sortant l'extrémité mâle de la prise.

    • Tirez le connecteur parallèlement à la surface de la carte mère, et non vers le haut.

  10. Installation d'un second SSD dans le MacBook Pro 15" Unibody 2,53 GHz mi-2009: étape 10, image 1 de 1
    • Décollez le câble vidéo de la bande adhésive qui le maintient sur le lecteur optique.

  11. Installation d'un second SSD dans le MacBook Pro 15" Unibody 2,53 GHz mi-2009: étape 11, image 1 de 2 Installation d'un second SSD dans le MacBook Pro 15" Unibody 2,53 GHz mi-2009: étape 11, image 2 de 2
    • Cet étape n'est requise que si vous possédez un écran antireflet. Si vous avez un écran brillant, ignorez cette étape.

    • Débranchez le câble Bluetooth en sortant l'extrémité mâle de la prise.

    • Tirez le connecteur parallèlement à la surface de la carte mère, et non vers le haut.

    • À l'aide de l'extrémité plate d'un spudger, faites levier sur le câble d'antenne Bluetooth pour le débrancher de la prise sur la carte mère.

  12. Installation d'un second SSD dans le MacBook Pro 15" Unibody 2,53 GHz mi-2009: étape 12, image 1 de 2 Installation d'un second SSD dans le MacBook Pro 15" Unibody 2,53 GHz mi-2009: étape 12, image 2 de 2
    • Cet étape n'est requise que si vous possédez un écran antireflet.

    • Retirez les deux vis Phillips 8 mm par lesquelles le câble vidéo/Bluetooth est fixé au boîtier supérieur.

    • Il est possible que l'une des vis reste captive dans la boucle de terre du câble vidéo/Bluetooth. Si vous remplacez l'écran, réutilisez cette vis pour la nouvelle unité.

    • Soulevez l'ensemble de retenue de la carte et du câble Bluetooth hors du boîtier supérieur.

  13. Installation d'un second SSD dans le MacBook Pro 15" Unibody 2,53 GHz mi-2009: étape 13, image 1 de 1
    • À l'aide d'un spudger, faites levier sur le connecteur du lecteur optique pour le débrancher de la carte mère.

  14. Installation d'un second SSD dans le MacBook Pro 15" Unibody 2,53 GHz mi-2009: étape 14, image 1 de 1
    • Retirez les trois vis Phillips 3,5 mm par lesquelles le lecteur optique est fixé au boîtier supérieur.

  15. Installation d'un second SSD dans le MacBook Pro 15" Unibody 2,53 GHz mi-2009: étape 15, image 1 de 2 Installation d'un second SSD dans le MacBook Pro 15" Unibody 2,53 GHz mi-2009: étape 15, image 2 de 2
    • Soulevez le lecteur optique par le côté gauche et sortez-le de l'ordinateur.

  16. Installation d'un second SSD dans le MacBook Pro 15" Unibody 2,53 GHz mi-2009: étape 16, image 1 de 1
    • Débranchez le connecteur du câble du lecteur optique de celui-ci.

  17. Installation d'un second SSD dans le MacBook Pro 15" Unibody 2,53 GHz mi-2009, Lecteur optique: étape 17, image 1 de 1
  18. Installation d'un second SSD dans le MacBook Pro 15" Unibody 2,53 GHz mi-2009: étape 18, image 1 de 1
    • Retirez les deux vis noires Phillips n°0 qui maintiennent le petit support métallique. Transférez ce support sur votre nouveau lecteur optique ou votre nouveau boîtier.

  19. Installation d'un second SSD dans le MacBook Pro 15" Unibody 2,53 GHz mi-2009, Second disque dur: étape 19, image 1 de 2 Installation d'un second SSD dans le MacBook Pro 15" Unibody 2,53 GHz mi-2009, Second disque dur: étape 19, image 2 de 2
    • Libérez la cale en plastique du boîtier de disque dur pour baie optique en appuyant sur l'un des clips présents à chaque extrémité et sortez-la du boîtier.

    is it 9,5mm or 12,7mm for the caddy? My stuff macbook pro mid 2010, need advice what size is compatible. Thank you

    Adi Purba - Réponse

    All Macbooks use 9.5mm Optical Drive Caddy, also, If you’re wondering as well, the Optical Drive runs at SATA II speeds just like with the main hard drive area, so if you’re using a SSD, then it’s going to run at a slightly slower speed.

    - PS5iscool - - Réponse

  20. Installation d'un second SSD dans le MacBook Pro 15" Unibody 2,53 GHz mi-2009: étape 20, image 1 de 3 Installation d'un second SSD dans le MacBook Pro 15" Unibody 2,53 GHz mi-2009: étape 20, image 2 de 3 Installation d'un second SSD dans le MacBook Pro 15" Unibody 2,53 GHz mi-2009: étape 20, image 3 de 3
    • Assurez-vous que les connecteurs du disque dur sont orientés vers le bas avant de placer ce dernier dans le boîtier.

    • Insérez doucement le disque dur dans le boîtier à l'emplacement approprié.

    • Tout en tenant fermement le boîtier en place d'une main, appuyez sur le disque dur avec l'autre main pour le raccorder aux connecteurs du boîtier.

    Okay it seems like some models of MacBook Pro have issues with a fast (6Gbit/s) SSD in the optical bay. Even though my Mac says it offers 6Gbit on both bays it simply didn't work in the optical bay. So I switched places between the two drives and everything seems to work. My Mac booted from the old HDD in optical bay automatically and then I cloned it afterwards and changed the startup disk to the new one. As said before, don't put a fast SSD in the optical bay!

    Carl - Réponse

    This is an extremely late response to an old comment, but… whatev’s. My 2011 MacBook Pro had that issue: the main (HDD bay) SATA operated at 6Gbit, and while the optical bay said it was 6Gbit, the “Negotiated Link Speed” was like 1.5Gbits regardless of what you put in it (I can understand 1.5Gbits for an optical drive, but not for an SSD). Some of the early 2012 models did the same thing, from what I understand, but that was corrected pretty early on; both my 13” and 15” 2012’s run at 6Gb/s on both SATA busses.

    AJH -

    It’s not wise to swop the optidrive for an HD as there is no physical protection. The caddy is only intended for an SSD.

    Ben Ormerod - Réponse

  21. Installation d'un second SSD dans le MacBook Pro 15" Unibody 2,53 GHz mi-2009: étape 21, image 1 de 2 Installation d'un second SSD dans le MacBook Pro 15" Unibody 2,53 GHz mi-2009: étape 21, image 2 de 2
    • Une fois le disque dur en place, réinsérez la cale en plastique tout en maintenant le disque dur contre le bas du boîtier.

    Normally with the HD enclosure there come a set of screws. use these to screw down the HD in the enclosure since you need to flip it up side down to reinstall it into the MBP

    Bart - Réponse

  22. Installation d'un second SSD dans le MacBook Pro 15" Unibody 2,53 GHz mi-2009: étape 22, image 1 de 2 Installation d'un second SSD dans le MacBook Pro 15" Unibody 2,53 GHz mi-2009: étape 22, image 2 de 2
    • Fixez le disque dur au boîtier à l'aide de deux vis Phillips n°1.

    Where are these screws coming from? Were they part of the original optical drive?

    Bradley DeHerrera - Réponse

    The new enclosure should include these two Phillips screws.

    Sam Omiotek -

    Can someone show the step of removal process of hdd/SSD placed in the caddy? I am unable to revert this process. Do we have to apply back greater force to remove back the hard drive/SSD from the caddy?

    Tarun Kumar Verma - Réponse

    Gads, I wish they made a caddy where the optical drive was removable without having to remove the entire caddy. That is a major peeve of mine. Like… just mount it the other way! I don’t want to have to go through this entire process every time I upgrade the secondary drive.

    AJH - Réponse

    These screws seems to be located in different places on different enclosures. I had serious trouble getting the SSD that the previous owner of this MacBook installed out of the enclosure until I realized the screws holding the SSD in place were on the side and not on the bottom. In case anyone else has the same issue!

    nessie1001 - Réponse

  23. Installation d'un second SSD dans le MacBook Pro 15" Unibody 2,53 GHz mi-2009: étape 23, image 1 de 1
    • Fixez le support du lecteur optique au nouveau boîtier avec deux vis Phillips n°0.

    • Rebranchez les câbles que vous avez retirés du lecteur optique d'origine sur le boîtier de la baie optique.

    Replaced the optical with hdd, as well as replaced the hard drive with an ssd. Now I get the circle with a line through it. But, when I hold the option key down, it gives me both hard drives, PLUS, the thumb drive I have in the USB port with a Mountain Lion installer. It even shows the recovery disks, but gives me the circle with the line when I choose one. Any help is appreciated.

    claude - Réponse

    Mate,

    My mbp shipped with OS 10.8, and I had upgraded twice to 10.10

    I've a 10.7 USB which upgraded my old MBP.

    My plan today was to boot with my new ssd, my time machine back up and the Lion usb plugged in.

    I would then click on the Lion usb, and tell it to put the OS and time machine back up on the ssd.

    So I help down ALT and when it started it gave me the options of the usual Mac internal or the Lion USB.

    I clicked Lion, but instead of taking me to the install options (Disk utility, restore from time machine etc etc) it gave me that grey circle with a diagonal line through it. The no entry sign - grey on grey - that I think you have.

    Some googling said that it is because I was trying to usb a 10.7 install on a MBP that shipped 10.8

    You can't go back, apparently.

    So if any of the OSs are older than the mac you got, you will get this error. The grey in grey no entry.

    I just cloned my HDD to my ssd (Carbon copy cloner free 30 day trial) using an external stat-usb3 wire and all is good.

    Rory -

    I have a 17" Macbook Pro6,1 unibody with an Intel Core i5, 2.53GHz. I was successful installing a 250GB SSD in the DVD bay, and I'm able to boot from it. I did this by first installing OS X 10.9.4 on the SSD mounted into an external HD case, testing the system to see if it would boot up into the SSD, then installing the SSD and carrier in the DVD drive bay. The system now boots up from the SSD with no problems. If you are having installation problems, I recommend trying this method.

    roger hall - Réponse

    I just have finished installing second SSD to my MBP (unibody 15` 2010).

    First one was changed like one year ago. Samsung 500GB SSD. It is in my HDD bay and I'm running system from it.

    Today I put a new Samsung 1TB 850 Evo 1 SSD in to my optic bay.

    I encounter problem with SSD not recognized by Finder.

    But It was recognized by Disk Utility.

    What I did was I erase new SSD by Disk Utility. Then the new partition was created and now It has been seen by Finder.

    So If you see it in Disk Utility just erased it.

    Some extra info in under this link--> https://discussions.apple.com/docs/DOC-4...

    Wish you all luck :)

    rybafly - Réponse

    My installation went great thanks to the guide. I did notice a small thing that might make a good tip, and that is to inspect all the visible screws. I saw one that was slightly raised, and when I poked around with the spudger, I found 2 more that had worked themselves out a bit. Its probably something super rare but at the age of these things, it wouldn't hurt to check.

    Tineyi Chapisa - Réponse

  24. Installation d'un second SSD dans le MacBook Pro 15" Unibody 2,53 GHz mi-2009: étape 24, image 1 de 3 Installation d'un second SSD dans le MacBook Pro 15" Unibody 2,53 GHz mi-2009: étape 24, image 2 de 3 Installation d'un second SSD dans le MacBook Pro 15" Unibody 2,53 GHz mi-2009: étape 24, image 3 de 3
    • Ne jetez pas ce lecteur ! Vous pouvez toujours l'utiliser à l'aide d'un câble de lecteur optique SATA à port USB.

    • Positionnez le connecteur du câble SATA devant le port du lecteur optique et branchez-le.

    • Branchez le connecteur USB sur votre ordinateur.

    There is a small metal button in the front of the drive and you can use that to eject the drive if you were wondering.

    Joseph Landry - Réponse

    Maybe that explain the eject button mechanism maybe….

    - PS5iscool - - Réponse

    Die neue SSD wurde durch das Laufwerk ersetzt aber leider wird jetzt die alte HDD nicht mehr erkannt. Hatte schon ein anderer das Problem?

    Alexander Richter - Réponse

Conclusion

Pour remonter votre appareil, suivez les mêmes instructions dans l'ordre inverse.

51 autres ont terminé cette réparation.

Merci à ces traducteurs :

en fr

100%

Ces traducteurs nous aident réparer le monde ! Vous voulez contribuer ?
Commencez à traduire ›

Brittany McCrigler

Membre depuis le 03/05/12

89 011 Réputation

131 tutoriels rédigés

Équipe

iFixit Membre de l'équipe iFixit

Staff

135 membres

16 731 tutoriels rédigés

Un commentaire

Well, actually a question.

Reading the parts list for this project, I find FOUR different drives -- 2 hybrid, 2 SSD -- that I will be installing. Is that correct, or have I misinterpreted something about these components?

Nicky - Réponse

Ajouter un commentaire

Nombre de vues :

Dernières 24 heures : 0

7 derniers jours : 2

30 derniers jours : 16

Total : 23,479