Introduction
Comme il s'agit de la pièce la plus difficile d'accès, la carte mère est la dernière pièce à remplacer si l'enceinte ne fonctionne pas correctement.
Ce dont vous avez besoin
-
-
Retournez votre enceinte et insérez l'outil d'ouverture en plastique à la verticale dans le fente de la coque avant.
-
Tirez doucement l'outil vers l'extérieur pour retirer les quatre clips qui maintiennent la coque en place.
-
Répétez cette manipulation pour chacun des quatre coins de la coque avant.
-
-
-
Extrayez délicatement la coque des deux côtés et enlevez-la du châssis de l'enceinte.
@KanGoon Yes, on mine it took the removal of 6 (reasonably obvious) screws to remove that. I’ll try to insert a photo when I reassemble…
Very good guide! Pics and descriptions make this easy!
There is a step missing here. How do you remove the rubber cover that covers the port?
Gibt es eine Möglichkeit diese wieder wasserdicht zu bekommen?
-
-
-
Enlevez les deux vis cruciformes #1 de 8 mm des ergots.
-
NOTE : Il se peut qu'il n'y ait qu'une vis.
If your Charge 3 doesn’t look like the above. Do not do this step YET. Go directly to Step 7 removal of the battery. By doing the battery first it will tell you which radiator to remove and thus no need to remove both.
NOTE:
On a newer version of the Charge 3 this image will be very different. you will not find a screw. You will also notice that there are two tabs that if slightly lifted while rotating the radiator counter clockwise the radiator is easily removed. There is also no foam or breakable seal on the newer Charge 3.
-
-
-
Insérez les outils d'ouverture en plastique sous chacun des deux ergots.
I believe this is unnecessary, just turn the passive radiator counter clockwise and pull outward. I tried to use the pry tool and broke a plastic tab.
Tip— when you get to this part lightly tap the edge of the speaker on a hard surface— like you’re tapping a jar before opening it.
Muchas gracias a todos, me dieron cada uno la guía perfecta.
My charge 3 had less screws but the process was the same. Thanks for the instructions!
-
-
-
Tournez et tirez pour ouvrir le radiateur passif. Le radiateur gauche tourne dans le sens des aiguilles d'une montre, le droit dans le sens inverse des aiguilles d'une montre.
-
-
-
Répétez les étapes précédentes pour l'autre radiateur passif.
-
NOTE : Seul le radiateur droit a besoin d'être enlevé pour changer la batterie.
right or left…. depends on how you view the Charge 3 i guess. No need to remove both radiators for a newer Charge 3. You can remove the battery cover first…find out what side the battery wires exit the battery compartment and then remove the radiator associated with that same side.
Anybody else have major problems trying to twist the radiator back into position after replacing the battery? I’m having trouble getting the screw holes to line up again on the right radiator.
To twist back I used saliva so it will slide easier against the rubber
-
-
-
Dévissez les huit vis cruciformes #1 de 10 mm qui entourent les deux haut-parleurs.
Die Frage : Ist ob man irgendwo Ersatz Lautsprecher bekommt ???
Probier's mal hier, vergleiche aber ganz genau (Seriennummer GG…):
-
-
-
Appuyez sur la petite cosse en métal du connecteur avec un tournevis cruciforme #000 et retirez délicatement le connecteur.
Where can l buy those speaker for replacing
The speakers that is on my charge 3 is soldered on doesn’t have the clips in picture
-
-
-
-
Maintenant que le second haut-parleur est déconnecté de la carte mère, retirez le haut-parleur avec ses fils de son compartiment.
where can i buy these speaker,i need to replace the left side speaker because it was already damaged
-
-
-
Enlevez les six vis cruciformes #1 de 8 mm du cache de la batterie.
-
Retirez le cache de la batterie du châssis de l'enceinte.
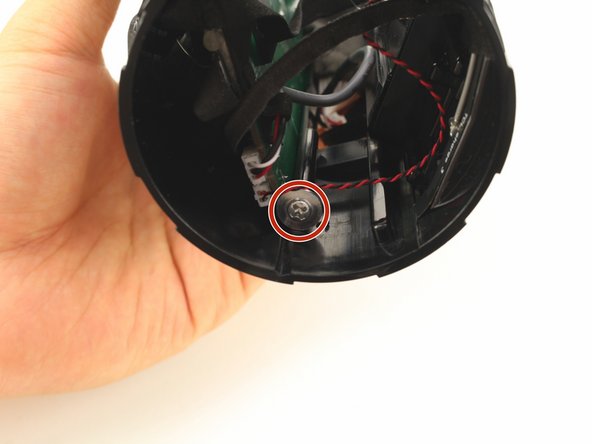
For the newer Charge 3 - there are two silver screws located on the opposite side of the charging ports ….. looking at the first picture above they would be in close proximity to the lower two red circles. However, they placed in horizontally not vertically. Once you remove these two screws you can lift the rubber off.
Note: The rubber is hinged on the opposite side of the two removed screws by tabs. Be careful when rotating it off not to break the tabs.
Once the rubber is removed…. you will be able to see the battery compartment. It has several black screws… one of which is wedged between the charging port rubber and the battery cover. You can gently pry up the rubber away to allow you to get a screw driver in to get the middle screw out.
The battery compartment is water tight and has a seal. You will want to loosen all screws evenly so as not to tear or damage the rubber seal.
-
-
-
Enlevez les sept vis cruciformes #1 de 8 mm du cache intérieur de la batterie.
-
Retirez le cache intérieur de la batterie.
The newer Charge 3 will have a solid black cover. Once removed the battery can be easily lifted out with your fingers. It is not taped in.
Gently lift the battery to determine the radiator that needs to be removed. You can identify it by following the battery wiring. There is a small hole at the bottom of the battery compartment that the battery wires go through. The side with the battery wiring hole is the same side as the radiator that needs to be removed.
-
-
-
Tirez délicatement pour débrancher le câble du côté de l'enceinte. Cette action débranchera la batterie de la carte mère.
mon problème d’origine était pas de charge sur secteur, dans mon cas nappe 11 connecteurs déconnectée. Je n’ai pas vu de système de retient pour cette nappe, je lui ai ajouté un petit point de colle, car bouge relativement beaucoup ! problème résolu
-
-
-
Tirez la batterie et son câble hors de leur compartiment.
yo tambien quiero una bateria donde la cosigo?
Does anyone know where I can buy a replacement battery?
Unbedingt die Isolierung um das Kabel und die Polster an den Ecken der Batterie von der alten an die neue basteln, sonst kann sie im Fach hin und her klappern.
Se podria adactar este dispositivo directo a un cargador directo?
I already did many things to my charge 3 and one of them was to put two direct cables to the battery to be able to charge it since the usb port was damaged and I could not find a replacement, next I will add 4 more batteries
perdon que te respondi en ingles, yo le puse un cable directo usb a la bateria ya que el puerto usb se daño y no pude encontrar repuestos
-
-
-
Retirez les 4 vis cruciformes #1 de 8mm du cache de la rangée de connecteurs.
-
Placez votre outil d’ouverture en plastique autour de la rangée de connecteurs pour l’enlever.
and then wiggle it directly (almost radially from the cylinder) out until you see the cables shown in the next step.
Be careful not to damage the plastic gasket as you pull it out,
-
-
-
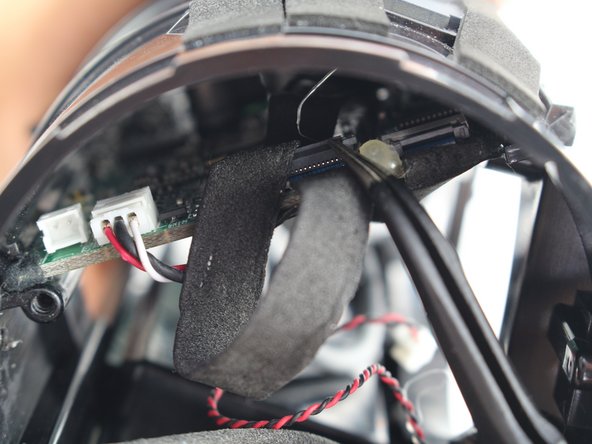
Débranchez les deux connecteurs des câbles sous la rangée de connecteurs.
there’s not much room to get you fingers in. Again I used prying tools to help me get the two connectors off the PCB
How do i get another port bay
-
-
-
Retirez les trois vis cruciformes #1 de 8mm du circuit imprimé de la rangée de connecteurs.
-
Retirez le cache de la rangée de connecteurs du circuit imprimé.
Be careful not to break the 2 plastic lugs you can see just below (on the photo) the 2 screws at the edges
-
-
-
Déssoudez le port USB, micro USB ou AUX du circuit imprimé.
Salve, dove posso ordinare la presa usb piccola di ricarica, c’è un sito apposito?
-
-
-
Retirer les deux vis 9mm cruciformes #1 qui maintiennent les côtés de la carte mère.
-
-
-
Tirer doucement le connecteur de câble connecté sur la carte mère.
I lost that cable what to do
I lost that cable what to
-
-
-
Retirer doucement le connecteur doré de la carte mère.
Buenos días, se me despegó el otro extremo del cable del conector dorado y quisiera que me indiquen en qué lugar se vuelve a conectar. Muchas gracias
-


Pour réassembler votre appareil, suivez ces instructions dans l'ordre inverse.
Pour réassembler votre appareil, suivez ces instructions dans l'ordre inverse.
Annulation : je n'ai pas terminé ce tutoriel.
11 autres ont terminé cette réparation.
Merci à ces traducteurs :
100%


Ces traducteurs nous aident réparer le monde ! Vous voulez contribuer ?
Commencez à traduire ›
Équipe

Cal Poly, Team S13-G1, White Fall 2018 Membre de l'équipe Cal Poly, Team S13-G1, White Fall 2018
CPSU-WHITE-F18S13G1
3 membres
26 tutoriels rédigés
10 commentaires
Internation version is different. There are no screws for passive radiotors.
You have to twist it. I have to managed to get it open because there is no video on youtube (I can’t find any)
If that even is Charge 3.
My JBL charge 3 is not charging …please give me idea to fix ..but it’s working perfectly only
My jbl charge are charging but it won't turn on…… i have tried several times to turn it on but it won't turn…… hoping for solutions……
hello mate! did you find any solution?
MAybe your battery or your power button is dead
Not charging or does not turn on, It might be a battery problem, usually these speakers have a battery that starts to loose capacity in about 2 to 3 years, and if you are a frequent user, then it can last even less... If the battery is not capable of storing power, it may be the reason for which you cannot turn it on or charge it.
Hope it helps.
hi why my jbl don't want to get full charge?
Sometimes disassemblers forget that the first time they disassembled the item it didn’t want to give up easily: I didn’t like the forces I was having to apply at all, so I switched to two plastic prying tools per “corner” and one in-between them (total 5, you could use plectrums…) before I was happy the the forces were low enough not to break anything.
Frank Puranik - Réponse
the front grill is supposed to be first not the back the back has longer while the front has shorter clip
Water Bass Tester (Water BT) - Réponse
There are two Phillips head screws to remove before prying the cover off
jason - Réponse
Where in south Africa can I buy jbl charge3 port bay replacement
Donovan Fransman - Réponse
There appears to be different versions of the Charge 3. If you find it difficult to pry open a second side the two small screws mentioned by Jason will need to be removed but it also indicates that there will be some additional changes to this tear down that I will try to convey in the comments as well.
john Ramirez - Réponse
Sadly I damaged the latches on my charge 3. There was more to it than just prying the front cover up. First, there is a small latch on both sides that you need to push down before pulling the front cover towards you that release the clips holding the front cover in place. Pull only slightly forward because… Second, in the front cover there are 6 circular notches connected to the front cover in tue four corners including the middle corners, you need to squeeze the front cover a little bit gently removing the notches so they dont break (like mine did).
ralphkeneth_gomz - Réponse
Definitely had to watch about 10 videos and still couldn’t get it to pop out easily.. Took a look at the first picture in the next step and really took note of where the little hole that lets you through to push down the tab is. Once I took a look at that and combined the techniques I’d seen in some of the videos it finally popped off easily. https://www.youtube.com/watch?v=u7i0_nD9... I only watched the first minute of this video but it helped a good bit if anyone else is having trouble.
Rowan Darko - Réponse
How do you know if the speakers or one of them is burned or broken.. i notice that one speaker is playing much less hard then the other one.. I wonder now if maybe there is another problem with my device.. Battery problem?
Bukowski101 - Réponse