Introduction
If your speaker is not working, it may need to be replaced. This guide requires having a new, compatible speaker to replace the broken one with.
Ce dont vous avez besoin
-
-
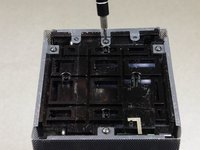
Remove both end caps by putting a plastic opening tool in the center of the seam. Work around the edges to pry the end caps off completely.
-
-
-
Turn the Jambox upside down. Peel the indicated rubber tabs off, using a plastic opening tool if necessary.
-
Remove the three T6, 7.0 mm screws under each rubber tab.
I used rubber cement to reattach the pads. That will hold them in place and be easily removable in future.
Can someone show a picture of the screws…and where they screw not…even just for form’s sake?
-
-
-
With the Jawbone logo facing towards you and with correct orientation, place the Jambox with the left end cap facing upward.
-
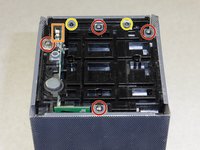
Unscrew indicated T6 9.7 mm screws.
-
Gently loosen the tabs from their anchor points so the bottom may be removed.
-
Flip the Jambox so the other end cap is facing up. The USB cable is on this side (metal grounding clip, indicated in orange). Repeat the above two steps.
Make sure you pay close attention when removing the screw marked with a red circle that is in the left most position, as there’s a small grounding plate that will be completely unrestrained and free to get nice and lost only to be found later leaving you not knowing what the hell it is or where it came from should you not secure it before removing the panel that that screw secures. That grounding plate is crucial for the safety of yourself and your speaker, because it bridges the USB-micro power input jack to the metal frame. That means that should you lose it and put the speaker back together without it, your speaker will not be able to ground out and should there occur any surge during your charge cycle, like during a freak lightning storm, or whatever, your speaker won’t able to discharge that surge, which will no doubt fry your speaker, and likely kill whomever poor bastard happens to grab the speaker, say to turn it off during said storm as a safety precaution. SAFETY FIRST!
Btw, the screw I mentioned is shown in the third picture, since that small detail might have some play over success or failure in finding it…lol. Whoops.
-
-
-
Pry up the bottom panel by lifting from the device.
-
Pull the bottom up. This may take a bit of force as the bottom is glued to device.
-
Once removed, the battery will now be visible.
@jemdem (I assume this is the “Jay” involved) after looking at the pictures 3.1, 3.2, 3.3, I still don’t see what I would normally expect a “clip” to look like. Maybe the corners act as clips? If not, I can’t ‘clearly’ determine them, but it’s a fairly busy looking area with lots of recesses and all, so maybe they’re just blending in well?
There’s a plug on each foot in one of the corners that isn’t meant to be removed. The left one and the right one (when viewed so the writing appears correct way up), both have three pins and one plug, with the pins occupying three of the four corners (northeast, northwest etc.) and the plug occupying the remaining fourth corner. The left foot has pins in the upper right, upper left and lower left, and the plug which is part of the foot and plugs into the frame, is in the lower right corner, while the right foot is opposite, having pins in upper left, upper right and lower right, and the plug in the lower right. If that was too many ‘left’s and ‘right’s to follow along with, then just remember that the plug is on the lower-inside corner on each. The screw is in the center of each foot. If you pull too hard, or attempt to guide your pick/spudger all the way around when separating the foot, you could slice it right off, though adhesive will be needed for reapplying so severing isn’t the end of the world.
This is a reply to the third comment, and sorry for the reply not being immediately following, or better still, not a reply, and instead just correcting my comment, but I can’t edit it…anyway, I noticed a mistake in my description. The plug on the right foot is in the lower LEFT corner, not the Lower right. My apologies to anyone who followed my instructions about that foot and ended up damaging it.
…continuing, the last foot needing removed is the upper center, when viewed so the writing on the feet is correct way up. And the plug on that foot is in the upper position, so only separate the bottom and both sides to access the screw in the center.
After continuing with the side pieces, the ‘clips’ that were holding the end pieces on were indeed at the corners and are NOT visible, clearly or otherwise. In fact only the ‘well’ or socket that each of the clips insert into are clearly shown, however the clips themselves are on the end caps, not the main body. If the speaker you are working on appears to have been dropped before and the corners are at all crumpled inward, take extra care to try and straighten them back to original shape before attempting to unclog the caps because not doing so could result in the clips breaking off. This may sound difficult, but I managed to straighten out all eight corners of the one I’m working on with no issues using a pair of needle nose pliers that are toothless so as to not introduce any bite patterns to the grill.
-
-
-
-
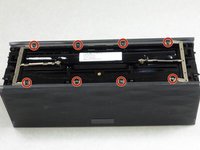
Once all eight screws are removed, pry the sides of the Jambox to lift the body from it's shell.
It was at this precise moment (removing the shell) that I felt a small part hit my knee as it fell from the assembly and land in the carpet. It appears to be a small stainless grounding tab (clip) that I THINK came from the mounting pole beside the Micro B port and may act as a support and ground for the body of the port. Seems to fit but I dunno.
It is a grounding clip and does belong on the power input jack and must be there if you want your speaker to safely ground out in case of a surge. Don’t lose it a please do put it back when reassembling your speaker. Also, it helps to read the comments attached to each step, if you had you would have read my comment regarding exactly this issue in previous steps. I’m glad you at least didn’t lose it when it fell, as it’s not something that is obvious when missing and most people wouldn’t even notice if it was lost.
-
-
-
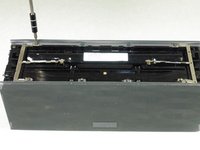
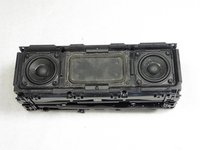
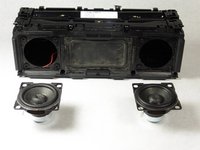
Place the disassembled Jambox with the speakers facing up.
-
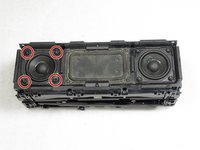
Locate the screws around the broken speaker.
-
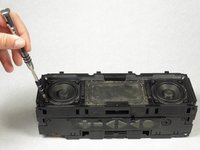
Use a T15 screwdriver to remove the four 12.1 mm screws around the broken speaker.
-
-
-
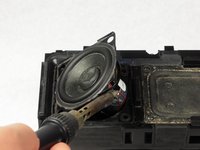
Desolder the wires from the speaker terminal in the Jambox.
Fine, but where did you buy the new speaker ? I can’t find it.
Fabrizio
I’d like to know the speaker capacity or specifications in ohms and watts. If someone know I’ll really appreciate.
-


To reassemble your device, follow these instructions in reverse order.
To reassemble your device, follow these instructions in reverse order.
Annulation : je n'ai pas terminé ce tutoriel.
13 autres ont terminé cette réparation.
Équipe

Cal Poly, Team 24-5, Lancaster Spring 2015 Membre de l'équipe Cal Poly, Team 24-5, Lancaster Spring 2015
CPSU-LANCASTER-S15S24G5
4 membres
9 tutoriels rédigés
18 commentaires
What is actual original speaker size and watts power?
Eu também gostaria de saber qual a potência e o tamanho exato do falante original para substituí-lo
I would also like to know the power and the exact size of the original speaker to replace it
Does anyone know where to buy replacement speakers or for which they can be switched?
@ Oliver,
I just wasted a pair of speakers because you mentioned those worked just fine for you. They are not the same sizes. it's smaller than the jamb speakers... On what basis you made that comment?
does anyone know where to buy replacement parts - looking for the outer metal shell as it’s dented. thanks
What are the symptoms of the problems you guys are having?
Why do you think the speakers are the problem, and not the electronic amplifier?
Mine is sounding bad, and I’m pretty sure it’s from blown amplifier transistors, not the speakers…
How do I know it’s the amplifier and not the speaker? Where can I find these parts for my jawbone jam box? Thank you anyone please?!
Many Years later, but... speakers are rectangular frame 56mm wide, screw holes 46mm.
Model: 130-00028
Found a company in Germany selling them, so i ordered and will see later.
hope it helped someone
https://oaudio.de/LAVOCE-FSN02071-2-full....
Not exact model but very very similar.
I will try them.
Thanks for reviving the thread!
did you note the ohms and watt rating?
If I search the speaker model number I get some choices on Amazon.
Cheers
2pcs 4ohm 8ohm speaker 2 inch Full Range Speaker Portable Speakers 10W 15W 20W Loudspeaker DIY HIFI BT Speakers(8ohm 20W) https://amzn.eu/d/aClOCl0
I found the exact speakers on AliExpress ... https://www.aliexpress.us/item/225580008...
I take that back ... they didn't last a week!
Comotoes -
Thanks anyway @Comotoes. I am willing to Franksteinize mine too.
@jamielittl65681 , which one have you bought? Dit it work out right?
Well. It’s been a while but I’m sure I just ordered either the Amazon link (that appears to still work) or an eBay alternative. I’m sure I installed 2 speakers.
They worked well until my daughter got hold of it and smashed some high volume RnB through it. One of them either popped or came unstuck but still works well at lower levels of volume.
Can someone show the clips please in a photo?
kenneth keen - Réponse