Aller au contenu principal

KRUPS Milk Foamer Type XL2000 Disassembly

Ce dont vous avez besoin

  1. KRUPS Milk Foamer Type XL2000 Disassembly, KRUPS Milk Foamer Type XL2000 Disassembly: étape 1, image 1 de 2 KRUPS Milk Foamer Type XL2000 Disassembly, KRUPS Milk Foamer Type XL2000 Disassembly: étape 1, image 2 de 2
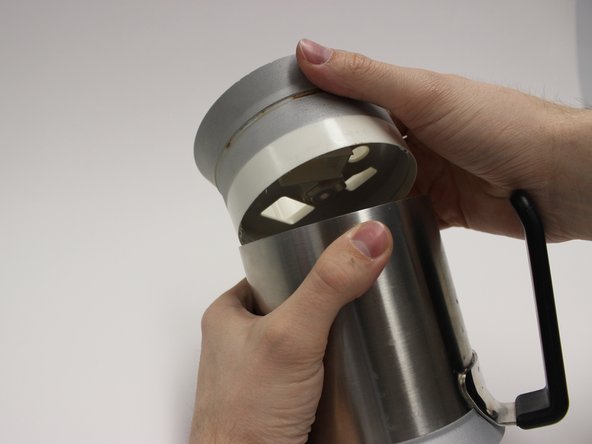
    • Take off the plexiglass top.

    • Remove the white milk spinner from the inside of the foamer.

  2. KRUPS Milk Foamer Type XL2000 Disassembly: étape 2, image 1 de 1
    • Remove the 12mm Torx screws (x3) from the bottom of the foamer using a Torx TR10 screwdriver.

  3. KRUPS Milk Foamer Type XL2000 Disassembly: étape 3, image 1 de 1
    • Open the bottom of the foamer.

  4. KRUPS Milk Foamer Type XL2000 Disassembly: étape 4, image 1 de 3 KRUPS Milk Foamer Type XL2000 Disassembly: étape 4, image 2 de 3 KRUPS Milk Foamer Type XL2000 Disassembly: étape 4, image 3 de 3
    • Take out the grey and white power cables by pulling out the slide connectors from the base.

  5. KRUPS Milk Foamer Type XL2000 Disassembly: étape 5, image 1 de 2 KRUPS Milk Foamer Type XL2000 Disassembly: étape 5, image 2 de 2
    • Remove the 16mm Torx screw in the middle of the base using a Torx TR20 screwdriver.

    • Take off the black bottom from the main body.

  6. KRUPS Milk Foamer Type XL2000 Disassembly: étape 6, image 1 de 1
    • Grab the power connector in the centre of the black bottom with a monkey wrench.

    • Twist the connector clockwise to remove the center power socket.

  7. KRUPS Milk Foamer Type XL2000 Disassembly: étape 7, image 1 de 2 KRUPS Milk Foamer Type XL2000 Disassembly: étape 7, image 2 de 2
    • Remove the electromotor-plug using tweezers.

    • Make sure to squeeze the small tab on the side of the plug to release it easily.

  8. KRUPS Milk Foamer Type XL2000 Disassembly: étape 8, image 1 de 2 KRUPS Milk Foamer Type XL2000 Disassembly: étape 8, image 2 de 2
    • Remove the electromotor by hand.

  9. KRUPS Milk Foamer Type XL2000 Disassembly: étape 9, image 1 de 2 KRUPS Milk Foamer Type XL2000 Disassembly: étape 9, image 2 de 2
    • Remove the rubber housing from the electromotor.

    • Remove the small rubber cap from the other end of the electromotor.

  10. KRUPS Milk Foamer Type XL2000 Disassembly: étape 10, image 1 de 1
    • Press on the two white clips to release the button case.

    • Push one side out first to make it easier.

  11. KRUPS Milk Foamer Type XL2000 Disassembly: étape 11, image 1 de 2 KRUPS Milk Foamer Type XL2000 Disassembly: étape 11, image 2 de 2
    • Pull out the green ribbon cable through the rubber cover.

  12. KRUPS Milk Foamer Type XL2000 Disassembly: étape 12, image 1 de 1
    • Pull off the rubber button caps from the button case.

  13. KRUPS Milk Foamer Type XL2000 Disassembly: étape 13, image 1 de 1
    • Using tweezers, pull off the rubber cover from the base.

    • Slide one side of the tweezers under the rubber to get a grip.

  14. KRUPS Milk Foamer Type XL2000 Disassembly: étape 14, image 1 de 3 KRUPS Milk Foamer Type XL2000 Disassembly: étape 14, image 2 de 3 KRUPS Milk Foamer Type XL2000 Disassembly: étape 14, image 3 de 3
    • Using your thumbs, push off the bottom plastic cover from the body.

    • Make sure to push and rotate frequently. Pushing on multiple points around the edge of the part allows it to come off easier and without breaking.

    • Due to this part being glued in, it takes some force to take it off.

  15. KRUPS Milk Foamer Type XL2000 Disassembly: étape 15, image 1 de 1
    • The product is now fully disassembled.

Conclusion

To reassemble your device, follow these instructions in reverse order.

Une autre personne a terminé cette réparation.

0 commentaires

Ajouter un commentaire

Nombre de vues :

Dernières 24 heures : 0

7 derniers jours : 1

30 derniers jours : 11

Total : 2,541