Aller au contenu principal

Kenwood KDC-BT362U DVD-Drive Replacement

Ce dont vous avez besoin

  1. Kenwood KDC-BT362U DVD-Drive Replacement, Front Panel: étape 1, image 1 de 1
    • Locate the face-plate eject button.

  2. Kenwood KDC-BT362U DVD-Drive Replacement: étape 2, image 1 de 2 Kenwood KDC-BT362U DVD-Drive Replacement: étape 2, image 2 de 2
    • Press the eject button with your forefinger.

    • Remove the face-plate.

  3. Kenwood KDC-BT362U DVD-Drive Replacement: étape 3, image 1 de 2 Kenwood KDC-BT362U DVD-Drive Replacement: étape 3, image 2 de 2
    • Starting on the top side, pop the front panel frame out.

    • Remove the face-plate frame.

  4. Kenwood KDC-BT362U DVD-Drive Replacement: étape 4, image 1 de 2 Kenwood KDC-BT362U DVD-Drive Replacement: étape 4, image 2 de 2
    • Use the plastic opening tool to pry open the tabs.

    • Repeat on the opposite side.

  5. Kenwood KDC-BT362U DVD-Drive Replacement: étape 5, image 1 de 1
    • Remove the front panel.

  6. Kenwood KDC-BT362U DVD-Drive Replacement, Metal Case: étape 6, image 1 de 3 Kenwood KDC-BT362U DVD-Drive Replacement, Metal Case: étape 6, image 2 de 3 Kenwood KDC-BT362U DVD-Drive Replacement, Metal Case: étape 6, image 3 de 3
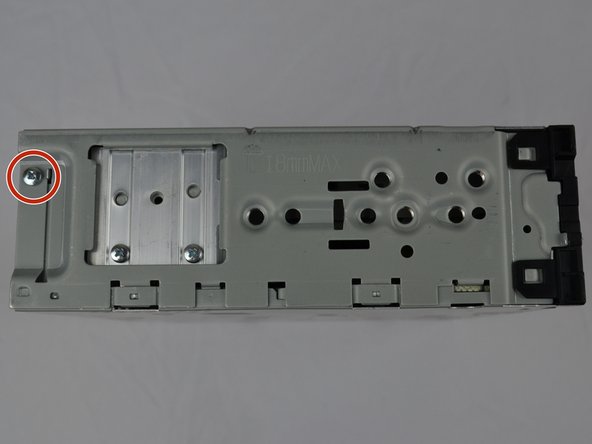
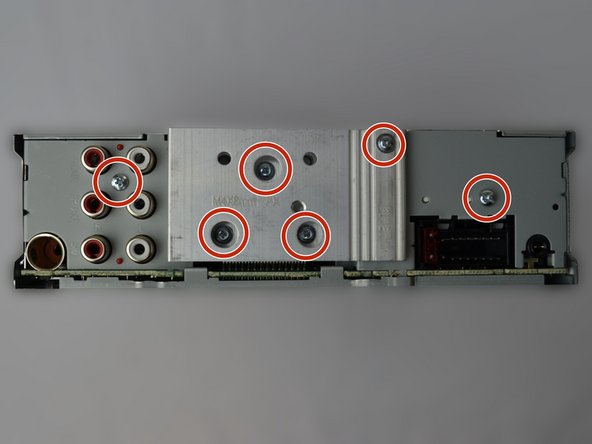
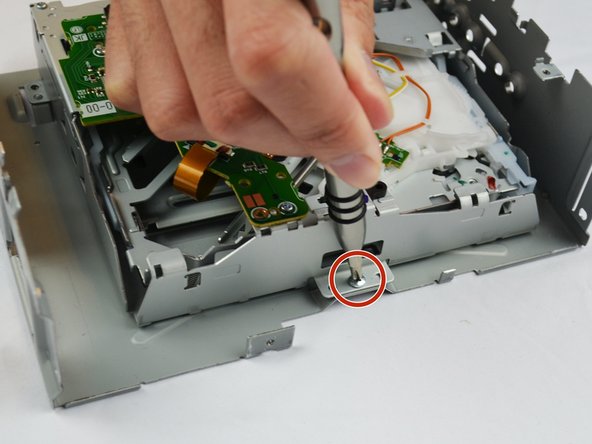
    • Use the Phillips #0 Screwdriver to remove the screws off of the metal case.

  7. Kenwood KDC-BT362U DVD-Drive Replacement: étape 7, image 1 de 3 Kenwood KDC-BT362U DVD-Drive Replacement: étape 7, image 2 de 3 Kenwood KDC-BT362U DVD-Drive Replacement: étape 7, image 3 de 3
    • Carefully separate the top and bottom halves of the metal case apart.

    • Do not separate the metal case halves completely.

    • Carefully pull the DVD-Drive ribbon cable from the motherboard.

  8. Kenwood KDC-BT362U DVD-Drive Replacement, DVD-Drive: étape 8, image 1 de 2 Kenwood KDC-BT362U DVD-Drive Replacement, DVD-Drive: étape 8, image 2 de 2
    • Use the Phillips #0 Screwdriver to remove the three screws.

  9. Kenwood KDC-BT362U DVD-Drive Replacement: étape 9, image 1 de 1
    • Lift the DVD-Drive to separate it from the metal case.

Conclusion

To reassemble your device, follow these instructions in reverse order.

Steven Chov

Membre depuis le 10/04/16

349 Réputation

3 tutoriels rédigés

Équipe

USF Tampa, Team 2-5, Cagle Fall 2016 Membre de l'équipe USF Tampa, Team 2-5, Cagle Fall 2016

USFT-CAGLE-F16S2G5

4 membres

5 tutoriels rédigés

0 commentaires

Ajouter un commentaire

Nombre de vues :

Dernières 24 heures : 1

7 derniers jours : 4

30 derniers jours : 5

Total : 475