Aller au contenu principal

Kindle 3 Screen Replacement

Ce dont vous avez besoin

  1. Kindle 3 Screen Replacement, Battery: étape 1, image 1 de 3 Kindle 3 Screen Replacement, Battery: étape 1, image 2 de 3 Kindle 3 Screen Replacement, Battery: étape 1, image 3 de 3
    • Starting 15mm below the right page-turning button, insert the middle of the pry tool. Pry open the back of the device using the pry tool, or similar plastic opening tool. The flexi cable for the screen is 10mm wide and passes 10mm to 20mm below the right page turn and is very easy to tear the edge.

    • Do not attempt to pry directly on the page turning buttons. This will damage the buttons. By inserting it at 15mm this will reduce the chance of damaging the flexi cable. Look closely at the image of Kindle with the back removed, this will help to identify the location.

    • Be super careful here!! That flex cable is inherently tied into the screen, so if you damage the cable, the screen is ruined. Try opening from the other side, if possible. No single-points-of-failure to damage on that side.

    • If you are having trouble getting an initial gap to pry from, run the flat edge of the pry tool along the front-to-back plate seam until it slips into a gap.

    • Don't insert your tool too far, or you may damage some of the orange flex cables near the edges of the device.

    • When reinstalling the back cover, slide the bottom edge into place first, and then press up the sides and along the top until all the clips snap into place.

  2. Kindle 3 Screen Replacement: étape 2, image 1 de 1
    • Unscrew the two silver 4 mm Phillips screws securing the battery connector.

  3. Kindle 3 Screen Replacement: étape 3, image 1 de 3 Kindle 3 Screen Replacement: étape 3, image 2 de 3 Kindle 3 Screen Replacement: étape 3, image 3 de 3
    • Lift battery out of housing starting at the end that was secured by the screws.

    • Two silver washers beneath the battery connector may come loose—don't lose them.

    • When reinstalling the battery, first slide the bottom edge into place and make sure the two retaining tabs are secure, before screwing down the connector.

  4. Kindle 3 Screen Replacement, Motherboard Assembly: étape 4, image 1 de 1
    • Remove six silver Phillips screws from the locations shown.

  5. Kindle 3 Screen Replacement: étape 5, image 1 de 1
    • Pry the display connector straight up from its socket on the motherboard to disconnect it.

  6. Kindle 3 Screen Replacement: étape 6, image 1 de 1
    • Remove eleven smaller, gray-colored Phillips screws from the locations shown.

  7. Kindle 3 Screen Replacement: étape 7, image 1 de 1
    • Lifting from the top edge, slide the entire motherboard and midframe assembly together away from the bottom edge of the Kindle, and remove it carefully.

  8. Kindle 3 Screen Replacement, Screen: étape 8, image 1 de 2 Kindle 3 Screen Replacement, Screen: étape 8, image 2 de 2
    • Remove the damaged screen from the housing.

    • Press gently from the outside to the inside. Be careful not to break the frame.

    • The preexisting adhesive should be sufficient for attaching the new screen.

    • There are at least two different versions of the screen for this model, TED060SCE(LF)T1-0I and ED060SC7(LF)C1. Check the sticker on the back of your display and make sure your replacement display matches.

Conclusion

To reassemble your device, follow these instructions in reverse order.

97 autres ont terminé cette réparation.

Allison Monahan

Membre depuis le 09/08/14

2 917 Réputation

2 tutoriels rédigés

Équipe

CSU Fullerton, Team 1-5, Bruce Fall 2014 Membre de l'équipe CSU Fullerton, Team 1-5, Bruce Fall 2014

CSUF-BRUCE-F14S1G5

4 membres

7 tutoriels rédigés

37 commentaires

I did it!

But it worked only the third time I opened the kindle, the first and second time the screen stayed frozen with some horizontal lines, the third time I only unlatched and latched all the ribbon cables and...voila! it worked!

Thank you, Im VERY happy!

marferrero - Réponse

Hi!!where have you buy the screen??? I've broken my today, and I doesn't want to buy another e-book reader yet!!

Thank you

edaddezio -

Awesome Guide!!!

Ebay or this place has them.

http://www.powerbookmedic.com/Amazon-Kin...

The screw diagrams for grey and silver sets were very helpful!

note: There 2 or 3 odd cup-shaped washers that differ between versions. 2 go under the batter screws to keep height/pressure constant, on may be under a screw for the modem/RF module.

Lee Studley - Réponse

Yes! I did it! Kindle works properly! Many tnx!!!

Mike Titov - Réponse

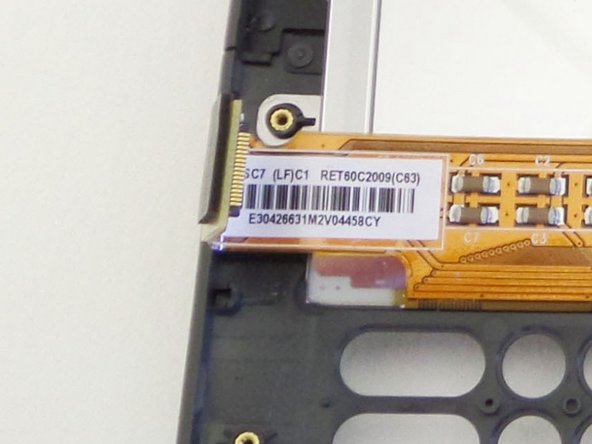
Please note before ordering: there are at least two different models of screen for the Kindle 3 keyboard.

ED060SCE(LF)T1-0I and ED060SC7(LF)C1 (you can find the model no. on a sticker on the back of the screen). My UK 3G model had the ...C1 built in. Be sure to order the correct one. The ...T1 screen will work as a replacement for the ...C1 model, but badly (text is fine, images and screensavers are not display correctly).

ibreakit - Réponse

Ajouter un commentaire

Nombre de vues :

Dernières 24 heures : 11

7 derniers jours : 52

30 derniers jours : 228

Total : 78,230