Cette version peut contenir des modifications incorrectes. Passez au dernier aperçu vérifié.
Ce dont vous avez besoin
-
Cette étape n’est pas traduite. Aidez à la traduire
-
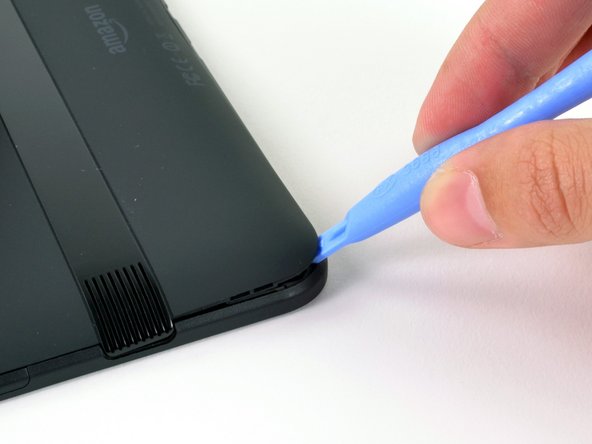
Wedge a plastic opening tool into the lower right corner of the Kindle Fire.
-
Lift up until you hear a slight popping noise.
-
Repeat along the perimeter of the device to release the clips securing the case halves to each other. Remove the back cover.
-
-
Cette étape n’est pas traduite. Aidez à la traduire
-
If your device has copper tape attached to the battery, carefully peel it off the battery.
-
-
-
Cette étape n’est pas traduite. Aidez à la traduire
-
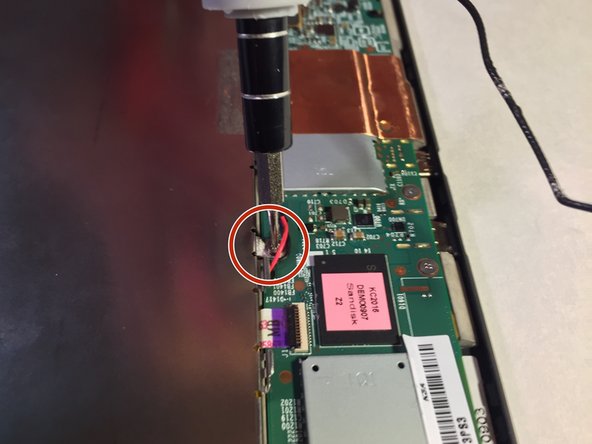
Locate the antenna cable connector which is easier to find if you look for the gold tipped black wire that surrounds the battery.
-
Lift and pull up the antenna connector and the antenna cable that surrounds the battery
-
-
Cette étape n’est pas traduite. Aidez à la traduire
-
Locate and unscrew the four 3 mm screws using the Phillips #00 screwdriver.
-
Unscrew the one T5 Torx screw using the special T5 Torx screwdriver head.
-
-
Cette étape n’est pas traduite. Aidez à la traduire
-
Detach the plastic piece that connects the wires to the motherboard using the plastic opening tool.
-
-
Cette étape n’est pas traduite. Aidez à la traduire
-
Lift the battery out of the device with your finger or the plastic opening tool.
-


Annulation : je n'ai pas terminé ce tutoriel.
39 autres ont terminé cette réparation.
Équipe

Sam Houston State, Team 11-2, Blackburne Winter 2015 Membre de l'équipe Sam Houston State, Team 11-2, Blackburne Winter 2015
SHSU-BLACKBURNE-W15S11G2
3 membres
9 tutoriels rédigés
6 commentaires
Where can you get a replacement battery
Easy peasy! The hardest thing was getting the back cover off (and back on). Our local electronic repair store refused to open the case for me (they’ll never get any business from me), so I asked my dentist to do it, and he did (and loved it). I can’t remember where I ordered the battery from; I just put the model number in a search engine and got several hits. The one I bought was new, cheap ($14), came in two days, and had all the tools with it! Thanks, ifixit; I’ll get a few more years out of this older one, which I use for crosswords puzzles and solitaire; you know, stuff you do in the waiting room. btw, I’m a 78-year-old woman.
Nice work, proud of you.I would have never thought to ask your Dentist.
Dano -
Je voudrais un tuto pour cabler un lecteur de carte DE sur ma kindle Fire hd