Aller au contenu principal

Kindle Paperwhite 1st Generation LED Lights Replacement

Ce dont vous avez besoin

  1. Kindle Paperwhite 1st Generation LED Lights Replacement, Case: étape 1, image 1 de 2 Kindle Paperwhite 1st Generation LED Lights Replacement, Case: étape 1, image 2 de 2
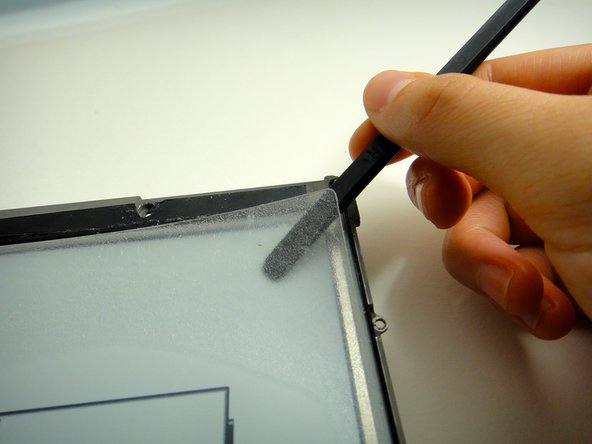
    • Using a spudger or plastic opening tool, gently pry the bezel from the screen. It is easier to start in the corners and work your way around the bezel.

    • Do not insert the spudger too far under the bezel; it could easily damage the screen.

  2. Kindle Paperwhite 1st Generation LED Lights Replacement: étape 2, image 1 de 3 Kindle Paperwhite 1st Generation LED Lights Replacement: étape 2, image 2 de 3 Kindle Paperwhite 1st Generation LED Lights Replacement: étape 2, image 3 de 3
    • Remove the eleven 3.0 mm Phillips screws surrounding the midframe.

    • At the top of the display, a strip of black tape covers one screw.

  3. Kindle Paperwhite 1st Generation LED Lights Replacement: étape 3, image 1 de 1
    • Lift the midframe out of the case.

    • If the midframe is stuck, slide it to the left first, and then lift it out.

  4. Kindle Paperwhite 1st Generation LED Lights Replacement, Battery: étape 4, image 1 de 2 Kindle Paperwhite 1st Generation LED Lights Replacement, Battery: étape 4, image 2 de 2
    • Turn over the midframe to locate the battery.

    • Remove the three Phillips 3.0 mm screws securing the battery to the midframe.

  5. Kindle Paperwhite 1st Generation LED Lights Replacement: étape 5, image 1 de 1
    • Gently lift the battery from the bottom, and slide it out of the midframe.

  6. Kindle Paperwhite 1st Generation LED Lights Replacement, Motherboard: étape 6, image 1 de 3 Kindle Paperwhite 1st Generation LED Lights Replacement, Motherboard: étape 6, image 2 de 3 Kindle Paperwhite 1st Generation LED Lights Replacement, Motherboard: étape 6, image 3 de 3
    • With the case and battery removed from the midframe, begin removing all cables attached to the motherboard.

    • Place the device so the midframe's backside faces up. Start with the cable on the bottom left corner.

    • Use a spudger to lift up the white locking cable tensioner and slide the flex cable out.

    • Proceed counterclockwise to the next cable and repeat. Small flex cable on the bottom won't need cable tensioner lifted, just carefully pull out.

  7. Kindle Paperwhite 1st Generation LED Lights Replacement: étape 7, image 1 de 2 Kindle Paperwhite 1st Generation LED Lights Replacement: étape 7, image 2 de 2
    • Remove the white flex cable by gently lifting the yellow plastic connector.

  8. Kindle Paperwhite 1st Generation LED Lights Replacement: étape 8, image 1 de 3 Kindle Paperwhite 1st Generation LED Lights Replacement: étape 8, image 2 de 3 Kindle Paperwhite 1st Generation LED Lights Replacement: étape 8, image 3 de 3
    • Remove the yellow anti-static tape from the display ribbon cable connector.

    • Use a spudger to lift up and disconnect the cable tensioner.

  9. Kindle Paperwhite 1st Generation LED Lights Replacement: étape 9, image 1 de 2 Kindle Paperwhite 1st Generation LED Lights Replacement: étape 9, image 2 de 2
    • Use a Philips screwdriver to remove the seven 3.0 mm Phillips screws securing the motherboard:

    • Three silver screws with silver washers

    • Two silver screws with no washers

    • One black screw with a golden washer

    • One black screw with a square washer

  10. Kindle Paperwhite 1st Generation LED Lights Replacement: étape 10, image 1 de 1
    • Remove the motherboard.

  11. Kindle Paperwhite 1st Generation LED Lights Replacement, LED Lights: étape 11, image 1 de 2 Kindle Paperwhite 1st Generation LED Lights Replacement, LED Lights: étape 11, image 2 de 2
    • Use a pair of tweezers to remove the white strip of tape that covers the LED lights.

  12. Kindle Paperwhite 1st Generation LED Lights Replacement: étape 12, image 1 de 2 Kindle Paperwhite 1st Generation LED Lights Replacement: étape 12, image 2 de 2
    • Use a spudger to gently remove the plastic screen from the display.

    • The plastic screen is held on by a thick layer of glue. Be patient when lifting the screen to avoid bending or breaking the thin plastic.

  13. Kindle Paperwhite 1st Generation LED Lights Replacement: étape 13, image 1 de 1
    • Once the outer screen is removed from the Kindle, gently use your fingers to pull off the LED lights.

Conclusion

To reassemble your device, follow these instructions in reverse order.

5 autres ont terminé cette réparation.

Anthony Nahal

Membre depuis le 01/25/13

60 Réputation

3 tutoriels rédigés

Équipe

Cal Poly, Team 3-33, Amido Winter 2013 Membre de l'équipe Cal Poly, Team 3-33, Amido Winter 2013

CPSU-AMIDO-W13S3G33

4 membres

17 tutoriels rédigés

13 commentaires

Hello to you! Your guide helped me to understand what happened with my kindle. I've got a scratch on the screen but it seems not very deep; the scratch is on a plastic screen, mentioned on the 12-th step. Is it possible to replace this screen with the same one or simple screen protector can do? Thank you.

Alexander - Réponse

Can the LEDs simply be removed using this method? I think they are giving me a headache, even on the lowest setting...

Jessica - Réponse

Best way is to jailbreak the kindle and use KO reader. In that you can switch off the lights completely. This is a software hack but then you do not need to open the paperweight at all

ziphyr zz -

Is it possible to replace the LEDs with warm white or even yellow (no blue light at all)?

Rob Noble - Réponse

i'd also like to replace the LEDs with a warmer light -- but I wonder foremost: can I really detach and reattach the plastic (as it is glued onto the display?) without destroying the SMOOTH and EVEN lighting when I reattach it?

dominik - Réponse

Ajouter un commentaire

Nombre de vues :

Dernières 24 heures : 0

7 derniers jours : 8

30 derniers jours : 59

Total : 13,984