Cette version peut contenir des modifications incorrectes. Passez au dernier aperçu vérifié.
Ce dont vous avez besoin
-
Cette étape n’est pas traduite. Aidez à la traduire
-
Insert a plastic opening tool between the plastic panel shown on the device.
-
Use the tool to pry the plastic away from the device.
-
-
Cette étape n’est pas traduite. Aidez à la traduire
-
Use an aluminum driver attached with a Phillips head size #00 to remove the four 3mm screws shown in the picture. For reassembly, note that the top two and bottom two screws are different sizes.
-
-
Cette étape n’est pas traduite. Aidez à la traduire
-
Once the screws are removed, the back panel can slide off the device.
-
-
-
Cette étape n’est pas traduite. Aidez à la traduire
-
Remove the magnetic component with the magnetic head of the aluminum driver.
-
-
Cette étape n’est pas traduite. Aidez à la traduire
-
Use an aluminum driver with Phillips head #00 to remove the four 3 mm screws shown in the picture.
-
Use the same driver to remove the two 2.5 mm screws.
-
-
Cette étape n’est pas traduite. Aidez à la traduire
-
Using the tweezers, undo the attached clip.
-
Remove the three 3 mm screws holding down the rest of the antenna with an aluminum driver and the Phillips #00 head.
-
You should now be able to simply take the WiFi bar off of the device.
-
-
Cette étape n’est pas traduite. Aidez à la traduire
-
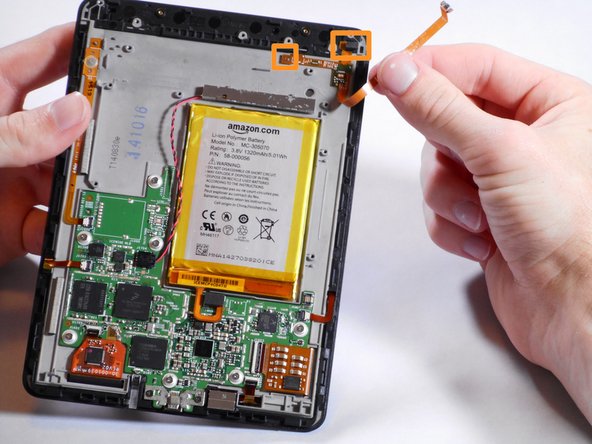
Gently remove the connector to the motherboard using tweezers.
-
Continue to carefully pull the rest of the connector from the adhesive connecting it to the Voyage.
-
Detach sensor from the top using fingers
-


Annulation : je n'ai pas terminé ce tutoriel.
Une autre personne a terminé cette réparation.
Équipe

Cal Poly, Team 19-12, Maness Winter 2015 Membre de l'équipe Cal Poly, Team 19-12, Maness Winter 2015
CPSU-MANESS-W15S19G12
5 membres
10 tutoriels rédigés