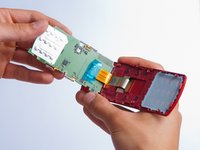
Aller au contenu principal

LG CF360 Front Case Replacement

Ce dont vous avez besoin

  1. LG CF360 Front Case Replacement, Battery: étape 1, image 1 de 2 LG CF360 Front Case Replacement, Battery: étape 1, image 2 de 2
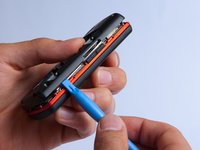
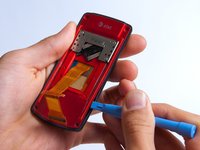
    • On the back of the phone, place your thumb on the three raised bumps and slide the back cover upward.

  2. LG CF360 Front Case Replacement: étape 2, image 1 de 1
    • Lift and remove the battery.

  3. LG CF360 Front Case Replacement, Back Cover: étape 3, image 1 de 2 LG CF360 Front Case Replacement, Back Cover: étape 3, image 2 de 2
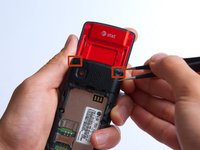
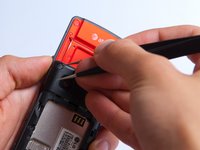
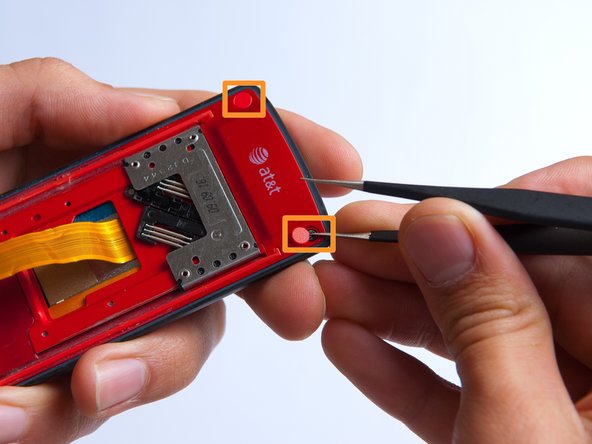
    • Remove the two screw covers at the top of phone with tweezers.

  4. LG CF360 Front Case Replacement: étape 4, image 1 de 1
    • Remove the six Phillips #000 (3mm) screws.

  5. LG CF360 Front Case Replacement: étape 5, image 1 de 3 LG CF360 Front Case Replacement: étape 5, image 2 de 3 LG CF360 Front Case Replacement: étape 5, image 3 de 3
    • Use the plastic opening tool to pry the back cover off. Insert the tool between the back cover and red mid section and go around the entire phone.

    • The plastic side buttons fall out when you take the back cover off.

    • The back cover is connected to the speaker by red and black wires.

  6. LG CF360 Front Case Replacement: étape 6, image 1 de 1
    • Use the tweezers to remove the red and black wires connecting the speaker to the green motherboard by pinching the sides of the plastic base near the motherboard.

    • Set the back cover with the speaker aside.

  7. LG CF360 Front Case Replacement, Motherboard: étape 7, image 1 de 2 LG CF360 Front Case Replacement, Motherboard: étape 7, image 2 de 2
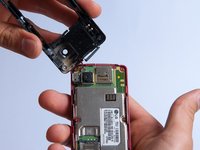
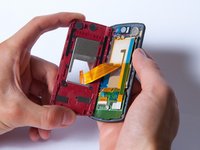
    • Use the plastic opening tool to gently lift the snapped-in motherboard from the front panel.

    • An orange ribbon from the LCD is connected to the underside of the motherboard, so do not force the motherboard from the rest of the phone yet.

  8. LG CF360 Front Case Replacement: étape 8, image 1 de 1
    • Gently remove the blue transparent tape from the connector.

  9. LG CF360 Front Case Replacement: étape 9, image 1 de 1
    • With the plastic opening tool, gently pry the LCD connector from the motherboard.

    • Set the motherboard aside.

  10. LG CF360 Front Case Replacement, Front Case: étape 10, image 1 de 1
    • Take the front case and unscrew the four Phillips #000 (1mm) screws around the ribbon.

  11. LG CF360 Front Case Replacement: étape 11, image 1 de 1
    • Gently pull the orange ribbon from the number pad casing.

    • Set the number pad case to the side once it is detached from the ribbon.

  12. LG CF360 Front Case Replacement: étape 12, image 1 de 1
    • Remove the two red sticker screw coverings at the top corners with tweezers.

  13. LG CF360 Front Case Replacement: étape 13, image 1 de 1
    • Unscrew the four Phillips #000 (3mm) screws at the corners of the phone.

  14. LG CF360 Front Case Replacement: étape 14, image 1 de 2 LG CF360 Front Case Replacement: étape 14, image 2 de 2
    • Pry the red sliding backing from the front cover by inserting the plastic opening tool in between the two sections and going around the entire phone.

    • Set the red sliding backing and front cover to the side.

Conclusion

To reassemble your device, follow these instructions in reverse order.

Une autre personne a terminé cette réparation.

Kathrine Muirhead

Membre depuis le 10/15/13

347 Réputation

3 tutoriels rédigés

Équipe

Cal Poly, Team 4-27, Amido Fall 2013 Membre de l'équipe Cal Poly, Team 4-27, Amido Fall 2013

CPSU-AMIDO-F13S4G27

4 membres

19 tutoriels rédigés

0 commentaires

Ajouter un commentaire

Nombre de vues :

Dernières 24 heures : 0

7 derniers jours : 0

30 derniers jours : 2

Total : 387