Aller au contenu principal

LG Chocolate 3 Keypad Replacement

Ce dont vous avez besoin

  1. LG Chocolate 3 Keypad Replacement, Battery: étape 1, image 1 de 1
    • Turn the phone off before starting the replacement process.

    • Place the phone face down.

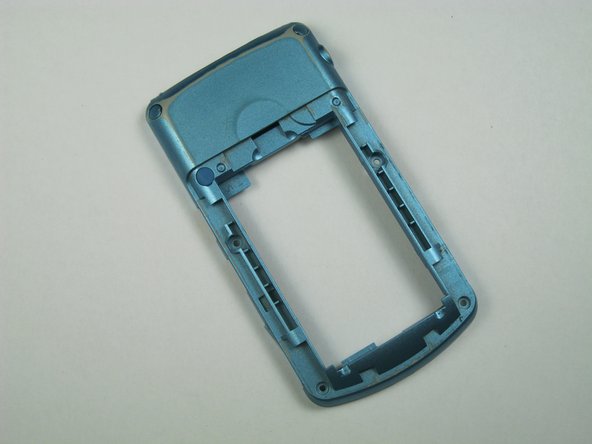
    • Press your finger down on the indentation and slide the back plate off.

  2. LG Chocolate 3 Keypad Replacement: étape 2, image 1 de 3 LG Chocolate 3 Keypad Replacement: étape 2, image 2 de 3 LG Chocolate 3 Keypad Replacement: étape 2, image 3 de 3
    • Using your index finger lift and remove the battery from the phone.

  3. LG Chocolate 3 Keypad Replacement, Rear Case: étape 3, image 1 de 1
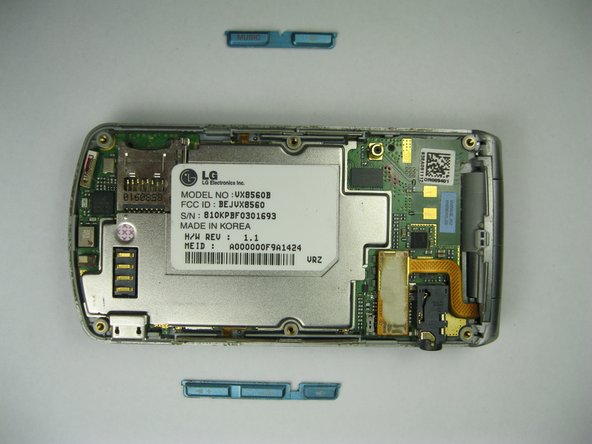
    • Use the pointed end of the spudger to pull out the plastic inserts that are located on the left and right-hand corners.

    • If needed, use the tip of a push pin instead of the spudger to remove the plastic inserts.

  4. LG Chocolate 3 Keypad Replacement: étape 4, image 1 de 1
    • Using a Phillips #00 screwdriver, remove the six 3mm long screws found along the edges of the phone.

    • If needed, use tweezers to remove loose screws from the recessed holes.

    • Screws are small, therefore, they should be placed in a secure location to prevent misplacement.

  5. LG Chocolate 3 Keypad Replacement: étape 5, image 1 de 2 LG Chocolate 3 Keypad Replacement: étape 5, image 2 de 2
    • Pull the rear case up using the spudger.

    • The rear case is connected to the right side of the phone via red and blue cables, be careful not to pull these cables out.

    • The volume control buttons on the side might fall out of their sockets. Carefully replace them with a pair of tweezers before you reassemble the rear case.

  6. LG Chocolate 3 Keypad Replacement: étape 6, image 1 de 1
    • Use tweezers to pull the clear end of the red and blue speaker cables away from motherboard.

  7. LG Chocolate 3 Keypad Replacement: étape 7, image 1 de 2 LG Chocolate 3 Keypad Replacement: étape 7, image 2 de 2
    • Carefully remove the rear case from the phone.

  8. LG Chocolate 3 Keypad Replacement, Side Buttons: étape 8, image 1 de 1
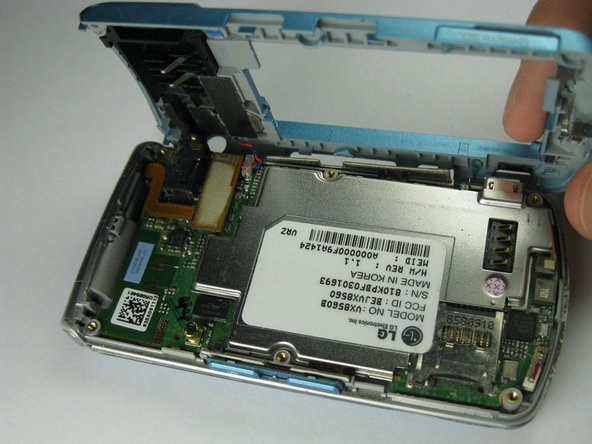
    • Use tweezers to remove the music button found on the side of the phone.

  9. LG Chocolate 3 Keypad Replacement: étape 9, image 1 de 2 LG Chocolate 3 Keypad Replacement: étape 9, image 2 de 2
    • Use tweezers to remove the volume control buttons on the opposite side of the phone.

  10. LG Chocolate 3 Keypad Replacement, Motherboard: étape 10, image 1 de 1
    • Use the flat end of the spudger to lift the orange display data cable.

  11. LG Chocolate 3 Keypad Replacement: étape 11, image 1 de 2 LG Chocolate 3 Keypad Replacement: étape 11, image 2 de 2
    • Carefully insert the plastic opening tool between the motherboard and the back of the phone.

  12. LG Chocolate 3 Keypad Replacement: étape 12, image 1 de 2 LG Chocolate 3 Keypad Replacement: étape 12, image 2 de 2
    • Use your thumb and index finger to carefully lift and separate the motherboard from the back of the phone.

    • Be cautious of the orange display data cable, it may stick to the motherboard.

    • To avoid this, lift the data cable away from the motherboard before removal.

  13. LG Chocolate 3 Keypad Replacement, Keypad: étape 13, image 1 de 1
    • Open the phone.

    • Keep the phone open by keeping a firm grip on the hinges to avoid any damages to the phone.

  14. LG Chocolate 3 Keypad Replacement: étape 14, image 1 de 1
    • Lift the orange data cable up so that it is elevated.

    • Gently use a finger to lift the keypad out.

  15. LG Chocolate 3 Keypad Replacement: étape 15, image 1 de 1
    • Insert the spudger in between the keypad and the phone.

    • Lift the keypad to seperate it from the phone.

  16. LG Chocolate 3 Keypad Replacement: étape 16, image 1 de 2 LG Chocolate 3 Keypad Replacement: étape 16, image 2 de 2
    • Remove the damaged keypad.

    • Insert the replacement keypad.

    • Reassemble the phone after the broken keypad is replaced.

Conclusion

To reassemble this device, follow these instructions in reverse order.

Une autre personne a terminé cette réparation.

Brenna Yagade

Membre depuis le 04/15/13

40 Réputation

6 tutoriels rédigés

Équipe

Cal Poly, Team 12-35, Amido Spring 2013 Membre de l'équipe Cal Poly, Team 12-35, Amido Spring 2013

CPSU-AMIDO-S13S12G35

5 membres

12 tutoriels rédigés

0 commentaires

Ajouter un commentaire

Nombre de vues :

Dernières 24 heures : 1

7 derniers jours : 5

30 derniers jours : 7

Total : 513