Aller au contenu principal

LG Stylo 3 Plus Front Camera Replacement

Ce dont vous avez besoin

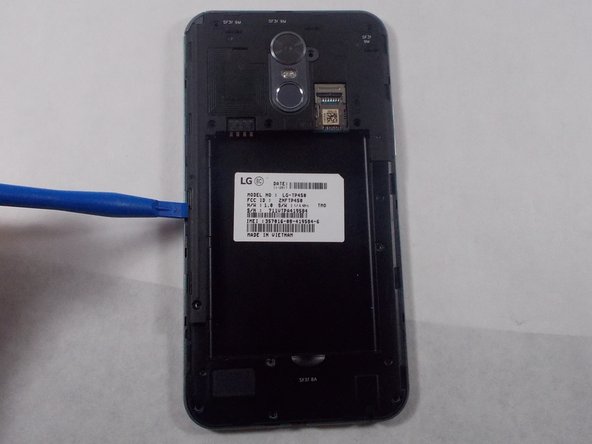
  1. LG Stylo 3 Plus Front Camera Replacement, Back Cover: étape 1, image 1 de 3 LG Stylo 3 Plus Front Camera Replacement, Back Cover: étape 1, image 2 de 3 LG Stylo 3 Plus Front Camera Replacement, Back Cover: étape 1, image 3 de 3
    • Power off the phone before beginning disassembly.

    • Place the phone face down.

    • Insert a fingernail or a plastic opening tool into the gap on the side of the phone.

    • Carefully slide your finger or the tool throughout the edge of the phone to ease the back case off.

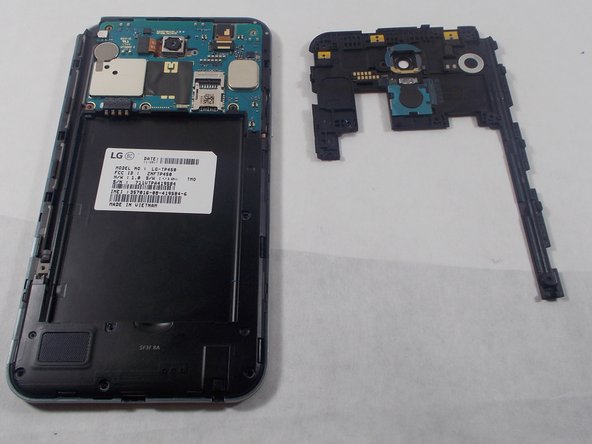
  2. LG Stylo 3 Plus Front Camera Replacement, Battery: étape 2, image 1 de 3 LG Stylo 3 Plus Front Camera Replacement, Battery: étape 2, image 2 de 3 LG Stylo 3 Plus Front Camera Replacement, Battery: étape 2, image 3 de 3
    • Place the back cover off to the side.

    • Insert the opening tool into the small gap below the battery.

    • Carefully pop the battery out to prevent damage.

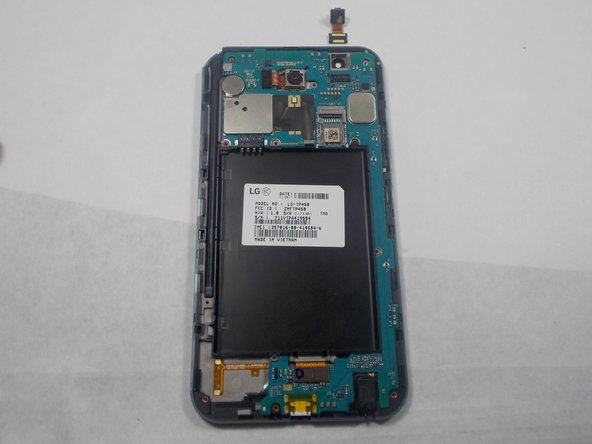
  3. LG Stylo 3 Plus Front Camera Replacement, Rear Camera: étape 3, image 1 de 3 LG Stylo 3 Plus Front Camera Replacement, Rear Camera: étape 3, image 2 de 3 LG Stylo 3 Plus Front Camera Replacement, Rear Camera: étape 3, image 3 de 3
    • Remove the twelve 4mm screws using the Phillips #000 screwdriver.

    • Use the plastic opening tool to remove the inner case.

    • Carefully remove the inner case.

  4. LG Stylo 3 Plus Front Camera Replacement: étape 4, image 1 de 2 LG Stylo 3 Plus Front Camera Replacement: étape 4, image 2 de 2
    Outil utilisé dans cette étape :
    Tweezers
    $4.99
    J'achète
    • Use your fingernail or the plastic opening tool to flip the flex cable.

    • Use the precision tweezers to carefully grasp and pull out the camera.

  5. LG Stylo 3 Plus Front Camera Replacement, Front Camera: étape 5, image 1 de 2 LG Stylo 3 Plus Front Camera Replacement, Front Camera: étape 5, image 2 de 2
    Outil utilisé dans cette étape :
    Tweezers
    $4.99
    J'achète
    • Carefully flip open the flex cable box with the plastic opening tool.

    • Using precision tweezers, carefully lift the front camera off the device.

Conclusion

To reassemble your device, follow these instructions in reverse order.

Une autre personne a terminé cette réparation.

Patricia Pires Dias

Membre depuis le 10/26/18

900 Réputation

5 tutoriels rédigés

Équipe

UMass Dartmouth, Team S2-G6, Peak Fall 2018 Membre de l'équipe UMass Dartmouth, Team S2-G6, Peak Fall 2018

UMASSD-PEAK-F18S2G6

3 membres

15 tutoriels rédigés

0 commentaires

Ajouter un commentaire

Nombre de vues :

Dernières 24 heures : 2

7 derniers jours : 5

30 derniers jours : 19

Total : 803