Aller au contenu principal

LeapFrog LeapPad Ultra Repair Screen Replacement

Ce dont vous avez besoin

  1. LeapFrog LeapPad Ultra Repair Screen Replacement, Battery: étape 1, image 1 de 1
    • Remove the barcode covering the two screws on the lower back of the Leap Pad.

  2. LeapFrog LeapPad Ultra Repair Screen Replacement: étape 2, image 1 de 1
    • Remove the two 5 mm screws that were covered by the sticker.

  3. LeapFrog LeapPad Ultra Repair Screen Replacement: étape 3, image 1 de 1
    • Using a plastic opening tool, pry off the outer protective child proof casing, starting from the bottom.

    A long flat-tip screwdriver can be used to push the tab out from the other side as they hook inwards towards the center. You can see the locations in the step 4 photo near the edges.

    Eric Tong - Réponse

  4. LeapFrog LeapPad Ultra Repair Screen Replacement: étape 4, image 1 de 1
    • Remove the 7 mm screw to the right of the cartridge dock, two 8 mm screws in the top left, and the nine 8 mm screws holding the the green shell.

    My device had the 7mm screw to the right of the cartridge slot and the 2 to the left of the cartridge slot were also 7mm.

    the other 9 were indeed 8mm,

    Mike.

    Mike Gilmour - Réponse

  5. LeapFrog LeapPad Ultra Repair Screen Replacement: étape 5, image 1 de 1
    • Remove the hard plastic casing, exposing the motherboard and battery.

  6. LeapFrog LeapPad Ultra Repair Screen Replacement: étape 6, image 1 de 2 LeapFrog LeapPad Ultra Repair Screen Replacement: étape 6, image 2 de 2
    • Disconnect the battery using tweezers or your fingernails.

    • The battery is glued down, if available put some isopropyl alcohol around the edges of the battery to soften the glue.

    • Gently pry of the battery lose using a spudger or another thin prying tool.

    • Be careful, damaging/puncturing the battery may cause an explosion.

    This was extremely helpful, and easy to do!! Thank you so much! You saved the day!

    Bailey Condon-Salmon - Réponse

  7. LeapFrog LeapPad Ultra Repair Screen Replacement, Motherboard: étape 7, image 1 de 3 LeapFrog LeapPad Ultra Repair Screen Replacement, Motherboard: étape 7, image 2 de 3 LeapFrog LeapPad Ultra Repair Screen Replacement, Motherboard: étape 7, image 3 de 3
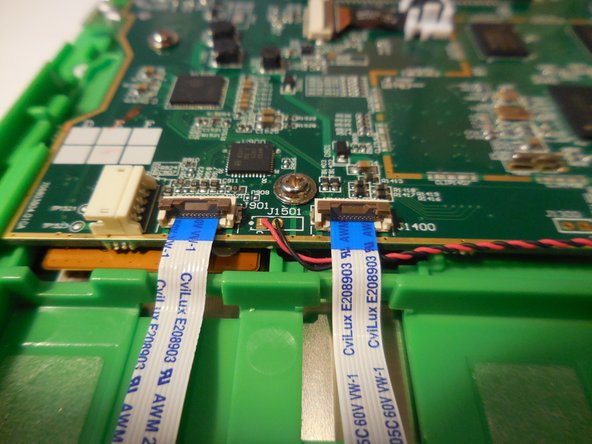
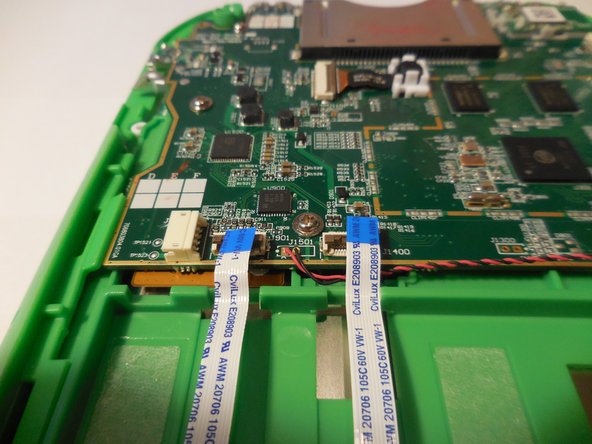
    • Disconnect the three wires that will be visible on top of the motherboard. The wires need to be disconnected by pulling them up vertically.

  8. LeapFrog LeapPad Ultra Repair Screen Replacement: étape 8, image 1 de 1
    • Unscrew the five screws holding the motherboard into the housing.

  9. LeapFrog LeapPad Ultra Repair Screen Replacement: étape 9, image 1 de 3 LeapFrog LeapPad Ultra Repair Screen Replacement: étape 9, image 2 de 3 LeapFrog LeapPad Ultra Repair Screen Replacement: étape 9, image 3 de 3
    • Lift the motherboard up exposing the fourth and final wire. Once you lift up the motherboard you will need to pull down on the wire to disconnect.

  10. LeapFrog LeapPad Ultra Repair Screen Replacement: étape 10, image 1 de 1
    • Remove and replace motherboard.

  11. LeapFrog LeapPad Ultra Repair Screen Replacement, Screen: étape 11, image 1 de 2 LeapFrog LeapPad Ultra Repair Screen Replacement, Screen: étape 11, image 2 de 2
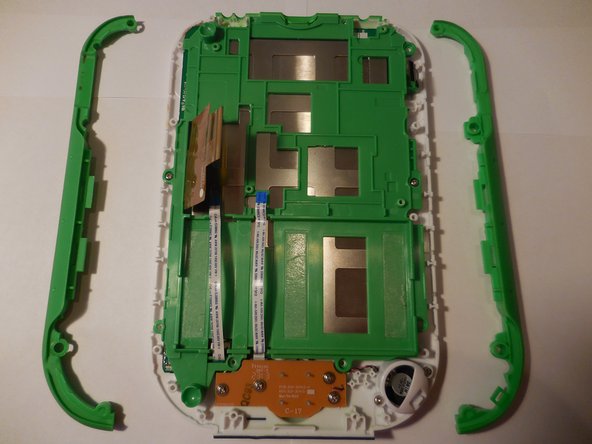
    • Remove the side grips simply pulling them both vertically exposing eight screws.

    from where can I purchase a display? How is the price?

    samiul_shiblee - Réponse

    Does any one know from where I can purchase a display?

    Benedict Cassar - Réponse

  12. LeapFrog LeapPad Ultra Repair Screen Replacement: étape 12, image 1 de 1
    • Using the screwdriver with the PH1 bit, unscrew all nine of the exposed screws holding the plastic base down and remove the base.

  13. LeapFrog LeapPad Ultra Repair Screen Replacement: étape 13, image 1 de 1
    • Using the screwdriver with the PH00 bit, unscrew the twelve screws holding the screen casing down.

  14. LeapFrog LeapPad Ultra Repair Screen Replacement: étape 14, image 1 de 1
    • Separate the screen from the casing and circuit board.

  15. LeapFrog LeapPad Ultra Repair Screen Replacement: étape 15, image 1 de 1
    • Replace screen.

    Where will I find a screen .. can you assist with a part number ?

    nic - Réponse

    Where can I buy the screen. Leap Frog told me they don’t sell them, they said to toss it….Help

    Mike's - Réponse

Conclusion

To reassemble your device, follow these instructions in reverse order.

10 autres ont terminé cette réparation.

Rocky Hirsch

Membre depuis le 08/27/15

848 Réputation

3 tutoriels rédigés

Équipe

USF Tampa, Team 4-99, Meier Fall 2015 Membre de l'équipe USF Tampa, Team 4-99, Meier Fall 2015

USFT-MEIER-F15S4G99

4 membres

10 tutoriels rédigés

8 commentaires

I need a source for the LCD screen. Anyone have a connection?

rhilscher - Réponse

Where would i purchase the new screen?

gaildavies282 - Réponse

You cannot get the screens. I had to get one from a parted device. Best you could try for is finding one the correct size with the connector in the proper place that is 50 pin.

crhouk - Réponse

I bought mine on eBay for 15.00.

Joel Marcarelli - Réponse

Could you send the link to where you bought yours

Michelle Popoff -

What do you mean “remove and replace motherboard”? Do I need to buy a new motherboard??

Gretch- - Réponse

Leapfrog says I have internal damage to my screen. How do I fix that? Buy a new tablet?

advunlmtd - Réponse

Where can I get a screen … and can someone assist with a part number .?

nic - Réponse

Ajouter un commentaire

Nombre de vues :

Dernières 24 heures : 0

7 derniers jours : 6

30 derniers jours : 28

Total : 15,264