Introduction
A broken charging rail will cause an inability to connect directly to the Nintendo Switch console or an inability to charge the Joy-Con. This guide will show you how to replace the charging rail on the Left Joy-Con controller.
Before using this guide, check for potential bent pins on the charging rail that can be bent back. If possible, test if the Joy-Con can be charged from an external source or check if the problem is actually with the sensor rail on the Nintendo Switch console.
If the problem is the Nintendo Switch sensor rail, then follow this guide: Remplacement du rail du Joy-Con gauche de la Nintendo Switch
Ce dont vous avez besoin
-
-
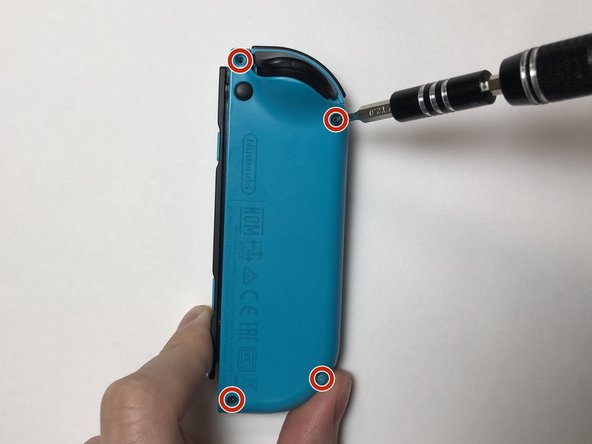
Use the Tri-point Y00 screwdriver to remove the four 6 mm screws from the back of the Joy-Con.
-
-
-
Unlatch the ZIF connector that is locking the ribbon cable on the mid-frame to the motherboard.
-
Use tweezers to gently pull the ribbon cable out of the ZIF connector.
This step (disconnecting the midframe cable) is not strictly necessary, but if you don’t do it the frame can get in the way during reassembly.
-
-
-
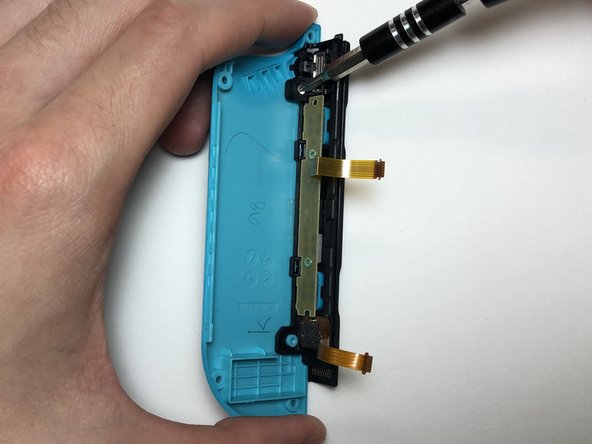
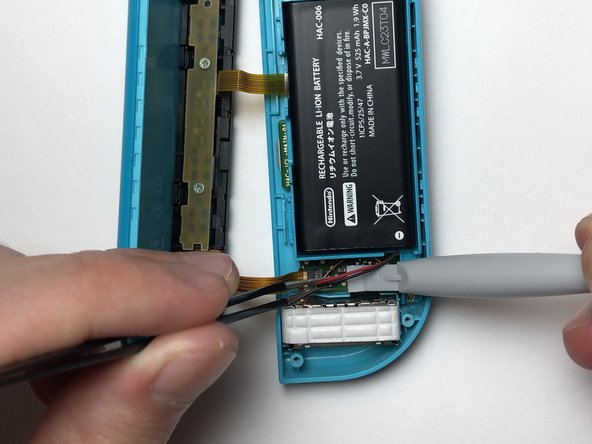
Unlatch the two ZIF connectors that are locking the ribbon cables on the charging rail to the motherboard.
-
Use tweezers to gently pull the ribbon cables out of the ZIF connectors.
How do you unlatch the connections.
The top connector has a latch; raising the cable slightly or prising in the slot on the side will release it. There is no latch on the bottom connector; just gently ease the cable out.
The bottom connector absolutely DOES have a ZIF connector, but it's on the opposite side. The tweezers in the second picture are pointing directly at the connector, and it slides up to the left (from the perspective of the picture).
That little grey piece on the bottom connector flew off the connector when I put a spudger under it. I can't get it back on regardless of what I've tried, so I'm likely to leave it off rather than risk bending pins. Looks like this little grey piece is wedged between two tuning fork shapes for each pin. If anyone knows the connector name I'd love to take a look at the datasheet as the disconnect/reconnect is making no sense to me.
Took me ages to figure out how to put it back on. Just make sure you lift it up to rotate it rather than push it back parallel with the board (like some other connectors). See here for how to replace it if it flies off (and you can find it) :D
Repositionnement du clapet de connecteur de nappe flexible -
-
-
-
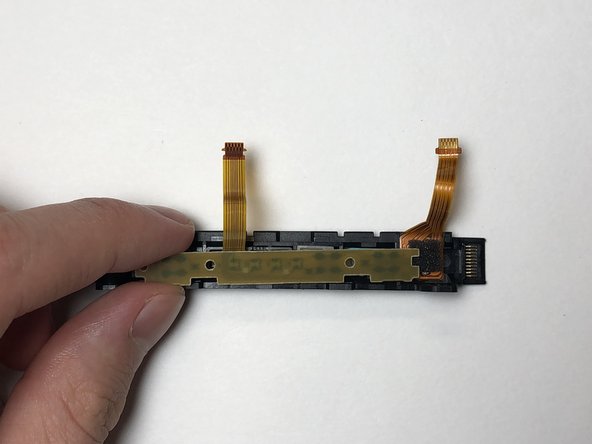
Remove the SL, SR and sync buttons from the charging rail.
If the new charging rail does not have the syncing led extenders, you can take them out and transfer them as well.
-
-
-
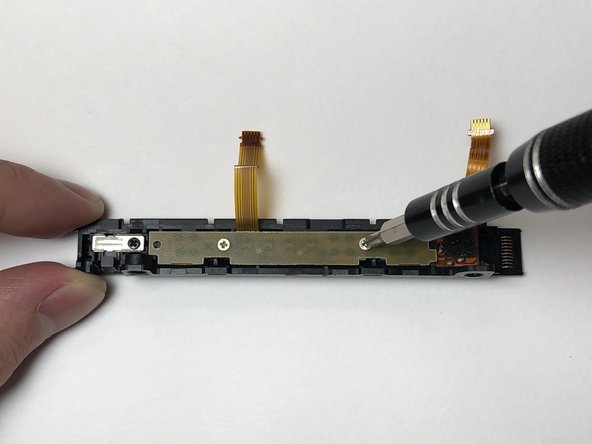
Align the charging rail with the two standoffs on the back shell.
-
Secure the rail onto the back shell using the 2 mm Phillips #000 screws.
-
-
-
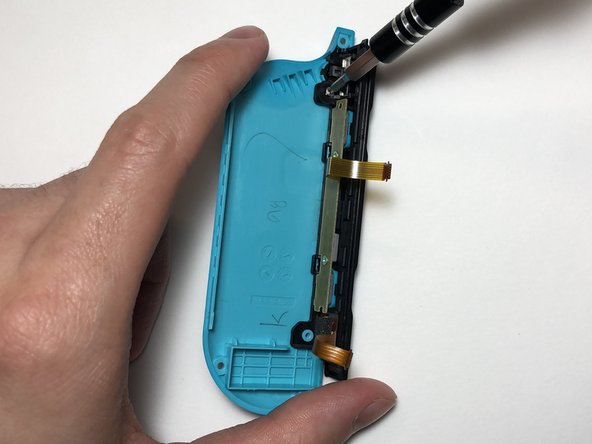
Use tweezers to insert the ribbon cables for the charging rail into the ZIF connectors on the motherboard.
-
Press down on the latch for each ZIF connector to secure the ribbon cables in place.
Note also that there is no latch on the lower cable.
-


Annulation : je n'ai pas terminé ce tutoriel.
29 autres ont terminé cette réparation.
Équipe

York University, Team S1-G14, O'Regan Summer 2021 Membre de l'équipe York University, Team S1-G14, O'Regan Summer 2021
YORK-O'REGAN-SU21S1G14
1 membre
8 tutoriels rédigés
14 commentaires
I did this and still doesn’t work. I also changed the rail on the console side too. Very carefully of course. Any ideas?
Hey Luis,
Can you give me more detail on the problem? Like is the Joy-Con not being detected when it’s plugged in or is it not charging. If possible, can you test the console rail with a working Joy-Con?
If the Joy-Con is not charging, it could also be a battery problem. If you are comfortable with it, I would suggest swapping out the battery with a working one from the other Joy-Con to see if it solves the problem. You should probably attempt this after double-checking the connections for potential tears or if the connectors are too loose in the sockets.
Hi, I need help. My left Joy-Con is not charging because of the ZIF connector for the charging rail ribbon has been detached and I have lost it. Is there a way to fix this problem?
Honestly, I would recommend replacing the entire Motherboard, unless you can find a trusted repair shop to solder it on.
I damaged the ZIF connector for the battery on my Switch. It works with some pressure and perfect alignment, but I've had issues ever since I damaged it during repairs :/
I'm going to swap it with a functional motherboard, I would advise you do the same.
Hello need a little help. the ribbon cable will not stay connected. and it will not charger. Any thing will help.
I damaged my joy con and the lower ribbon wire that connects to the battery has burned out. Is there anyway I can get another set of wires or what not?
Hi There, i trust a bad guide not from here, and seemed to have broke the charging ribbon attachment area. Any way to fix it?
in this guide, it would be step 6, second image. the black part that wraps around the ribbon when it is attached is ripped in half. Some other youtuber said to detach the latch from the front, which i tried. but it was actually in the rear. because he didn't show the step clearly, figured it was that. As i've seen other laptop ribbon latches are similar, pull the thing out, and it pops out. in this case, that was a ribbon connector, and the latch is a flip latch from the rear...
hope you can help. thanks.
What if the charging rail is totally broken off? Like, it was pushed off the counter by a small child and the charging rain is totally torn off from the controller
If both ribbon cables are completely severed on the rail then you would probably have to also buy a SL/SR PCB replacement. The process would still be the same just use the new SL/SR PCB and make sure that the PCB is for the correct joycon. If you want to find it, you can search for SL SR flex cable or sometimes they are also sold with a new charging rail.
I forgot to mention if you broke the peg on the back shell then you may need to replace the back shell. Alternatively, you can try to glue it back together, but if you do, you should check if it can withstand a bit of pressure.
Hi I need someones help with my right joy con stick's charging rail. It is charging alright but it's not connecting to my switch in hand-held mode. Is it possible that somebody could post a tutorial like this but for the right joy con? It will really help me a bunch. Thanks.
I would also like this tutorial but for the Right Joy Con. I would've assumed they are similar, but since the guides are labelled very specifically per side, I'd rather not risk it.
My Right Joy Con is not recognised by the Switch, wirelessly or when attached. As a result it doesn't charge, and so It's now off permanently :(
PuyoBop -
Is there a video of this guide?