Aller au contenu principal

Lenovo 100e Chromebook 2nd Gen Hinges Replacement

Ce dont vous avez besoin

  1. Lenovo 100e Chromebook 2nd Gen Hinges Replacement, Keyboard: étape 1, image 1 de 1
    • Remove the nine 6 mm screws from the back of the laptop using a Phillips #0 screwdriver.

  2. Lenovo 100e Chromebook 2nd Gen Hinges Replacement: étape 2, image 1 de 2 Lenovo 100e Chromebook 2nd Gen Hinges Replacement: étape 2, image 2 de 2
    • Open the laptop and lay it flat.

    • Go along the edge of the keyboard with an opening tool until it pops loose.

    • Potential for device damage: Make sure that the keyboard does not fall away from the laptop, as it is still connected to the internal components

  3. Lenovo 100e Chromebook 2nd Gen Hinges Replacement: étape 3, image 1 de 2 Lenovo 100e Chromebook 2nd Gen Hinges Replacement: étape 3, image 2 de 2
    • Lift the keyboard connectors up using an opening pick.

    • Remove the connectors from their sockets.

  4. Lenovo 100e Chromebook 2nd Gen Hinges Replacement, Battery: étape 4, image 1 de 1
    • Remove the four 4 mm Phillips #0 screws holding the battery in.

  5. Lenovo 100e Chromebook 2nd Gen Hinges Replacement: étape 5, image 1 de 1
    • Using an opening pick, push on the connection where the wires are connected to the motherboard.

    • Potential for device damage: This step takes some force to disconnect, but be careful to not pull the wires out of the battery.

  6. Lenovo 100e Chromebook 2nd Gen Hinges Replacement: étape 6, image 1 de 1
    • The battery is now loose and can be removed from the laptop.

  7. Lenovo 100e Chromebook 2nd Gen Hinges Replacement, Screen Bezel: étape 7, image 1 de 1
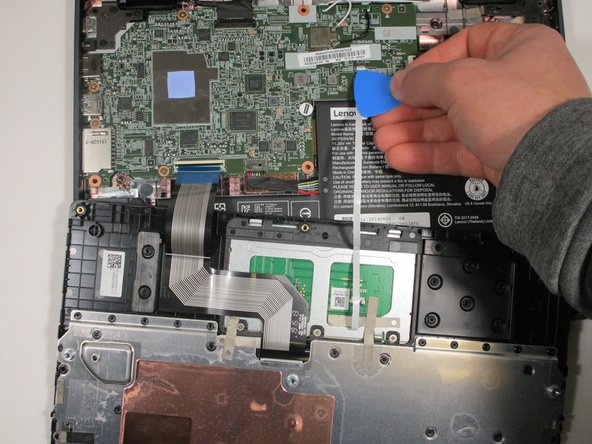
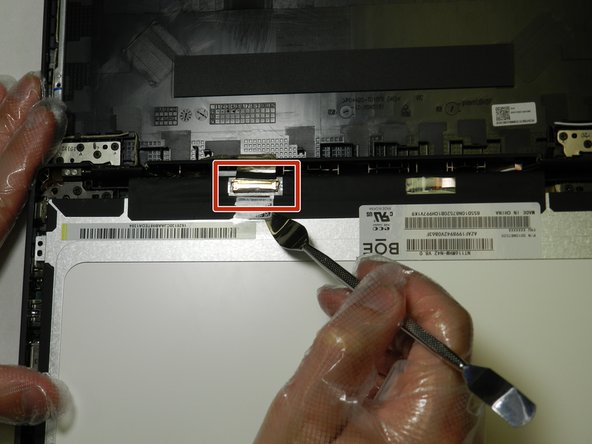
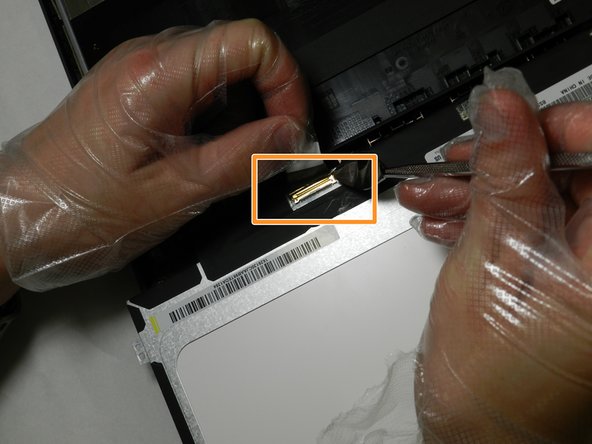
    • Using a spudger, go along the edge of the screen and pop the connections between the cover and the back side out.

  8. Lenovo 100e Chromebook 2nd Gen Hinges Replacement: étape 8, image 1 de 1
    • Insert the spudger into the gap between the hinges and pull up to detach the connections.

  9. Lenovo 100e Chromebook 2nd Gen Hinges Replacement: étape 9, image 1 de 1
    • Remove the screen bezel from the laptop.

  10. Lenovo 100e Chromebook 2nd Gen Hinges Replacement, Display: étape 10, image 1 de 1
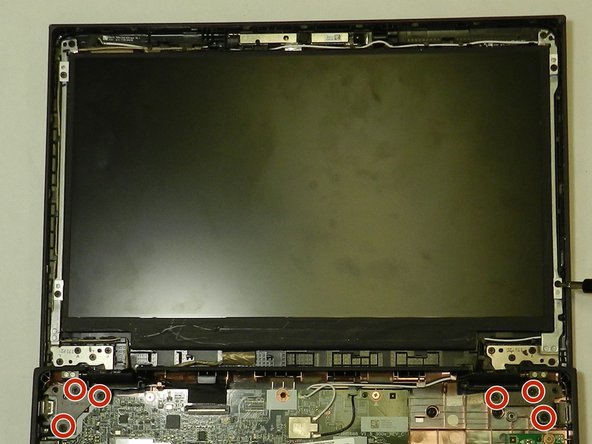
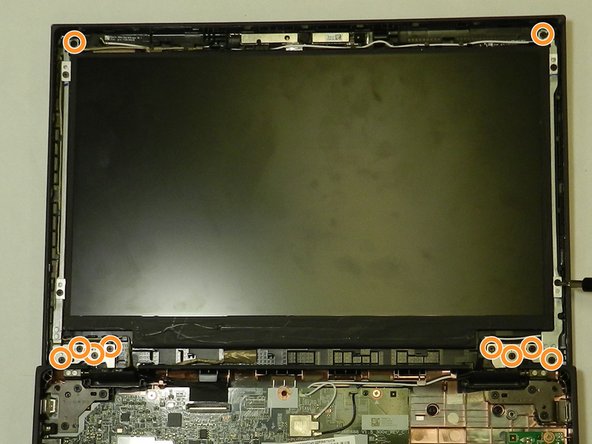
    • Remove the four 3.4 mm screws holding the screen in place using the Phillips #00 screwdriver.

  11. Lenovo 100e Chromebook 2nd Gen Hinges Replacement: étape 11, image 1 de 1
    • Carefully pull the screen back onto the lower assembly.

  12. Lenovo 100e Chromebook 2nd Gen Hinges Replacement: étape 12, image 1 de 3 Lenovo 100e Chromebook 2nd Gen Hinges Replacement: étape 12, image 2 de 3 Lenovo 100e Chromebook 2nd Gen Hinges Replacement: étape 12, image 3 de 3
    • Peel back the protective tape over the display cable using the spudger.

    • Gently lift the black bar latch holding the cable in place, until the cable becomes loose.

    • Pull the cable free and remove the display.

    • DO NOT pull on the cable before lifting the bar latch or the cable will break.

  13. Lenovo 100e Chromebook 2nd Gen Hinges Replacement, Hinges: étape 13, image 1 de 3 Lenovo 100e Chromebook 2nd Gen Hinges Replacement, Hinges: étape 13, image 2 de 3 Lenovo 100e Chromebook 2nd Gen Hinges Replacement, Hinges: étape 13, image 3 de 3
    • Use the Phillips #0 screwdriver to remove the six 4.7 mm screws located on the bottom half of each hinge.

    • Use the Phillips #00 screwdriver to remove the ten 3.4 mm screws located on the upper hinge assembly.

  14. Lenovo 100e Chromebook 2nd Gen Hinges Replacement: étape 14, image 1 de 1
    • Move the screen assembly perpendicular to the keyboard assembly.

    • Remove the hinges by pulling straight up.

Conclusion

To reassemble your device, follow these instructions in reverse order.

Un commentaire

Any Ideas on how to repair popped rivets from the hinges? I've tried epoxy without much luck, but I've got hinges popped at the top and bottom of the display.

Donald Johnson - Réponse

Ajouter un commentaire

Nombre de vues :

Dernières 24 heures : 2

7 derniers jours : 7

30 derniers jours : 49

Total : 1,084