Aller au contenu principal

Lenovo 500e Chromebook 2nd Gen Battery Replacement

Ce dont vous avez besoin

  1. Lenovo 500e Chromebook 2nd Gen Battery Replacement, Back Panel: étape 1, image 1 de 1
    • Remove nine 6 mm screws from the bottom cover of the laptop using a Phillips #0 screwdriver.

  2. Lenovo 500e Chromebook 2nd Gen Battery Replacement: étape 2, image 1 de 2 Lenovo 500e Chromebook 2nd Gen Battery Replacement: étape 2, image 2 de 2
    • Remove stylus from the lower left corner of the back panel.

  3. Lenovo 500e Chromebook 2nd Gen Battery Replacement: étape 3, image 1 de 2 Lenovo 500e Chromebook 2nd Gen Battery Replacement: étape 3, image 2 de 2
    • Go along the edge of the back panel with an iFixit opening tool until it pops loose.

    • Remove the back panel from the laptop.

  4. Lenovo 500e Chromebook 2nd Gen Battery Replacement, Battery: étape 4, image 1 de 1
    • Remove the four 4 mm Phillips #00 screws holding the battery in.

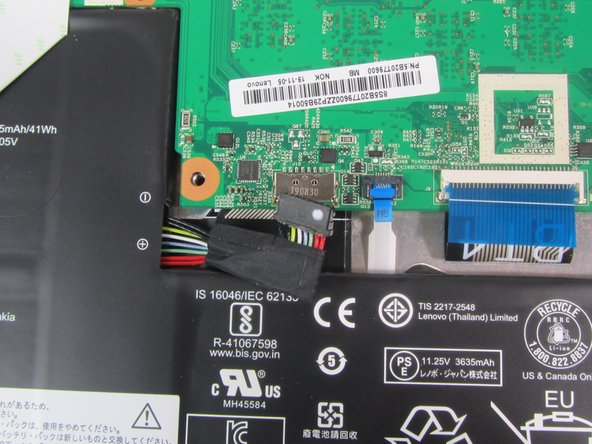
  5. Lenovo 500e Chromebook 2nd Gen Battery Replacement: étape 5, image 1 de 2 Lenovo 500e Chromebook 2nd Gen Battery Replacement: étape 5, image 2 de 2
    • Use the iFixit opening tool to unplug the battery from the motherboard.

    • Potential for device damage: Make sure to be gentle while removing the wire.

  6. Lenovo 500e Chromebook 2nd Gen Battery Replacement: étape 6, image 1 de 1
    • Remove the battery from the laptop.

Conclusion

To reassemble your device, follow these instructions in reverse order.

3 autres ont terminé cette réparation.

Nicolas Lidinsky

Membre depuis le 01/09/22

701 Réputation

5 tutoriels rédigés

0 commentaires

Ajouter un commentaire

Nombre de vues :

Dernières 24 heures : 0

7 derniers jours : 5

30 derniers jours : 24

Total : 478