Aller au contenu principal

Lenovo IdeaPad 1 14IGL7 Fan Replacement

Ce dont vous avez besoin

  1. Lenovo IdeaPad 1 14IGL7 Fan Replacement, Back Panel: étape 1, image 1 de 1
    • Power off your laptop before beginning disassembly.

    • Place the computer upside down on a flat surface.

  2. Lenovo IdeaPad 1 14IGL7 Fan Replacement: étape 2, image 1 de 2 Lenovo IdeaPad 1 14IGL7 Fan Replacement: étape 2, image 2 de 2
    • Remove the nine 7 mm screws from the back panel using a Phillips #00 screwdriver.

  3. Lenovo IdeaPad 1 14IGL7 Fan Replacement: étape 3, image 1 de 1
    • Insert an opening pick between the back panel and the body of the laptop.

    • Pry up the latches around the back panel and remove the panel from the laptop.

  4. Lenovo IdeaPad 1 14IGL7 Fan Replacement, Fan: étape 4, image 1 de 1
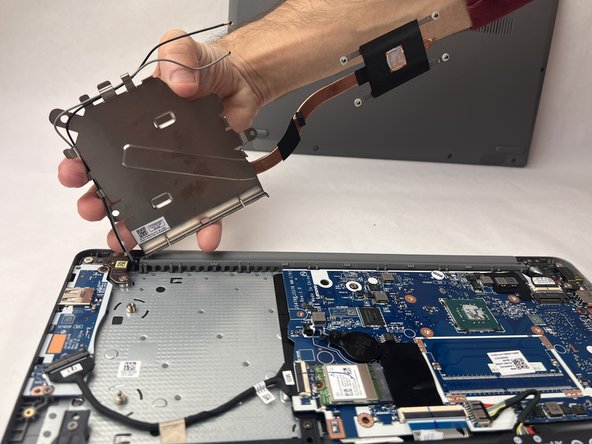
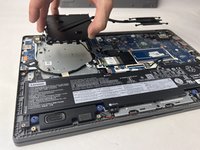
    • Remove the seven 5.5 mm screws that secure the fan using a Phillips #00 screwdriver.

  5. Lenovo IdeaPad 1 14IGL7 Fan Replacement: étape 5, image 1 de 2 Lenovo IdeaPad 1 14IGL7 Fan Replacement: étape 5, image 2 de 2
    • Place your fingers on the perimeter of the fan and gently lift it away from the device.

Conclusion

To reassemble your device, follow these instructions in reverse order.

Nathan Costa

Membre depuis le 03/18/24

360 Réputation

3 tutoriels rédigés

Équipe

UMass Dartmouth, Team 1-6, Konn Spring 2024 Membre de l'équipe UMass Dartmouth, Team 1-6, Konn Spring 2024

UMASSD-KONN-S24S1G6

4 membres

5 tutoriels rédigés

0 commentaires

Ajouter un commentaire

Nombre de vues :

Dernières 24 heures : 2

7 derniers jours : 9

30 derniers jours : 24

Total : 168