Aller au contenu principal

Lenovo IdeaPad 330-15IGM Motherboard Replacement

Ce dont vous avez besoin

  1. Lenovo IdeaPad 330-15IGM Motherboard Replacement, Back Cover: étape 1, image 1 de 3 Lenovo IdeaPad 330-15IGM Motherboard Replacement, Back Cover: étape 1, image 2 de 3 Lenovo IdeaPad 330-15IGM Motherboard Replacement, Back Cover: étape 1, image 3 de 3
    • Press and hold the power button to power off the computer.

  2. Lenovo IdeaPad 330-15IGM Motherboard Replacement: étape 2, image 1 de 1
    • Remove thirteen 6.5 mm screws from the laptop cover using a Phillips #00 screwdriver.

  3. Lenovo IdeaPad 330-15IGM Motherboard Replacement: étape 3, image 1 de 1
    • Use your hands to remove the back cover from the laptop.

  4. Lenovo IdeaPad 330-15IGM Motherboard Replacement, Battery: étape 4, image 1 de 1
    • Remove four 5.7 mm screws that hold the battery unit in place using a Phillips #00 screwdriver.

  5. Lenovo IdeaPad 330-15IGM Motherboard Replacement: étape 5, image 1 de 3 Lenovo IdeaPad 330-15IGM Motherboard Replacement: étape 5, image 2 de 3 Lenovo IdeaPad 330-15IGM Motherboard Replacement: étape 5, image 3 de 3
    • Detach the cable connecting the battery to the motherboard.

  6. Lenovo IdeaPad 330-15IGM Motherboard Replacement: étape 6, image 1 de 1
    • Remove the battery from the laptop.

  7. Lenovo IdeaPad 330-15IGM Motherboard Replacement, Motherboard: étape 7, image 1 de 1
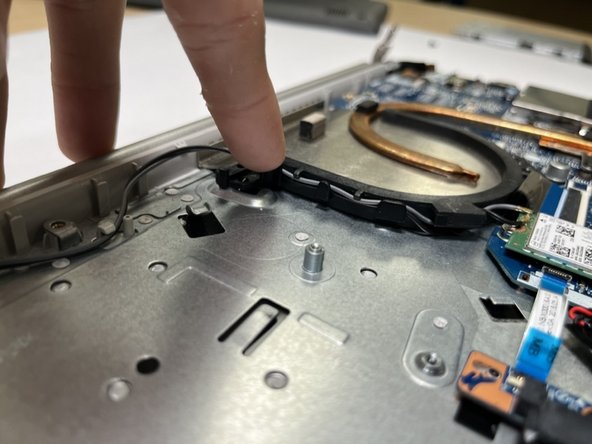
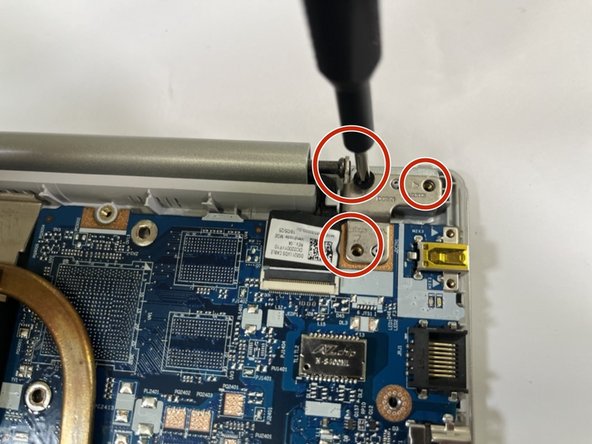
    • Remove four 6.8 mm screws that hold the heatsink component into the chassis and motherboard by using the Phillips #00 screwdriver.

  8. Lenovo IdeaPad 330-15IGM Motherboard Replacement: étape 8, image 1 de 3 Lenovo IdeaPad 330-15IGM Motherboard Replacement: étape 8, image 2 de 3 Lenovo IdeaPad 330-15IGM Motherboard Replacement: étape 8, image 3 de 3
    • The heatsink component has two wires that are tucked into the sides, which are grey and black. It is important to treat these with care as they are connected to the computer's network adapter, which is the green chip below it.

  9. Lenovo IdeaPad 330-15IGM Motherboard Replacement: étape 9, image 1 de 2 Lenovo IdeaPad 330-15IGM Motherboard Replacement: étape 9, image 2 de 2
    • Remove the ribbon cable that is connected to the motherboard. Gently lift up the black plastic that holds it down and pull back the ribbon until it is free from the slot.

  10. Lenovo IdeaPad 330-15IGM Motherboard Replacement: étape 10, image 1 de 3 Lenovo IdeaPad 330-15IGM Motherboard Replacement: étape 10, image 2 de 3 Lenovo IdeaPad 330-15IGM Motherboard Replacement: étape 10, image 3 de 3
    • Take your Phillips 00 screwdriver and remove the 3mm screw that is holding the network adapter card in place.

    • Removing the screw should cause the card to become propped up at a 45-degree angle. Once it is in this position, simply remove it from its slot.

  11. Lenovo IdeaPad 330-15IGM Motherboard Replacement: étape 11, image 1 de 1
    • Remove the ribbon cable that is now exposed by lifting up the little black tab that holds this down and gently pull back the ribbon.

  12. Lenovo IdeaPad 330-15IGM Motherboard Replacement: étape 12, image 1 de 2 Lenovo IdeaPad 330-15IGM Motherboard Replacement: étape 12, image 2 de 2
    • Disconnect the hard disk drive ribbon cable by following the same step as the previous ribbon cables. Gently lift up the plastic that holds the ribbon in place and pull until it is free from the slot.

  13. Lenovo IdeaPad 330-15IGM Motherboard Replacement: étape 13, image 1 de 1
    • Using the Philips 00 screwdriver, remove the 3mm screw which is located next to the CMOS battery connection. This will allow the motherboard to come loose and be taken out of the chassis.

  14. Lenovo IdeaPad 330-15IGM Motherboard Replacement: étape 14, image 1 de 2 Lenovo IdeaPad 330-15IGM Motherboard Replacement: étape 14, image 2 de 2
    • Disconnect the CMOS battery connector.

  15. Lenovo IdeaPad 330-15IGM Motherboard Replacement: étape 15, image 1 de 2 Lenovo IdeaPad 330-15IGM Motherboard Replacement: étape 15, image 2 de 2
    • Remove the speaker connection from the motherboard.

  16. Lenovo IdeaPad 330-15IGM Motherboard Replacement: étape 16, image 1 de 2 Lenovo IdeaPad 330-15IGM Motherboard Replacement: étape 16, image 2 de 2
    • Remove the touchpad ribbon cable in the same manner as the other ribbon cables. Carefully lift the plastic tab that holds it in place and gently remove the cable until it is free from the slot.

  17. Lenovo IdeaPad 330-15IGM Motherboard Replacement: étape 17, image 1 de 2 Lenovo IdeaPad 330-15IGM Motherboard Replacement: étape 17, image 2 de 2
    • Remove the two 3mm screws that hold the display onto the motherboard along with the 4.5mm and 6mm screws next to it that hold the top corner of the motherboard to the computer chassis.

    • Once the screws that hold the display onto the motherboard, lift up the metal piece do that the motherboard can be lifted up and out with better ease.

  18. Lenovo IdeaPad 330-15IGM Motherboard Replacement: étape 18, image 1 de 2 Lenovo IdeaPad 330-15IGM Motherboard Replacement: étape 18, image 2 de 2
    • Carefully lift the plastic that holds the display cable onto the motherboard and gently remove this cable from the slot.

Conclusion

To reassemble your device, follow these instructions in reverse order.

Emmanuel Guadarrama

Membre depuis le 08/24/22

457 Réputation

5 tutoriels rédigés

Équipe

Gateway, Team 1-2, Class Fall 2022 Membre de l'équipe Gateway, Team 1-2, Class Fall 2022

GCC-CLASS-F22S1G2

4 membres

5 tutoriels rédigés

0 commentaires

Ajouter un commentaire

Nombre de vues :

Dernières 24 heures : 0

7 derniers jours : 4

30 derniers jours : 29

Total : 577