Aller au contenu principal

Lenovo ThinkPad T530 Heatsink Replacement

Ce dont vous avez besoin

  1. Lenovo ThinkPad T530 Heatsink Replacement, Place your laptop upside down: étape 1, image 1 de 2 Lenovo ThinkPad T530 Heatsink Replacement, Place your laptop upside down: étape 1, image 2 de 2
    • Ensure that the laptop is disconnected from the wall charger, and that the laptop is entirely powered off before following any of the steps below.

    • Flip your laptop upside down, so that the keyboard is facing down.

  2. Lenovo ThinkPad T530 Heatsink Replacement, Unlock Battery: étape 2, image 1 de 2 Lenovo ThinkPad T530 Heatsink Replacement, Unlock Battery: étape 2, image 2 de 2
    • Locate the latch located on the battery near the top of the laptop.

    • Using your finger, slide the latch to the right-most (Unlocked) position.

    • None of this should require an exhuberant amount of force.

  3. Lenovo ThinkPad T530 Heatsink Replacement, Remove the Battery: étape 3, image 1 de 2 Lenovo ThinkPad T530 Heatsink Replacement, Remove the Battery: étape 3, image 2 de 2
    • You can now pull the battery away from the laptop. When pulling the battery out, ensure to pull it out straight.

  4. Lenovo ThinkPad T530 Heatsink Replacement, Removing bottom screws: étape 4, image 1 de 2 Lenovo ThinkPad T530 Heatsink Replacement, Removing bottom screws: étape 4, image 2 de 2
    • Using a Phillips #00 screwdriver, unscrew the following screws, and then remove the cover.

    • Using a Phillips #00 screwdriver, remove the screw. This is one of the two screws that are holding in the keyboard.

  5. Lenovo ThinkPad T530 Heatsink Replacement, Removing bottom screws (Continued): étape 5, image 1 de 1
    • Using a Phillips #00 screwdriver, unscrew the highlighted screw. This is the last screw securing the keyboard to the laptop.

  6. Lenovo ThinkPad T530 Heatsink Replacement, Revealing the Keyboard: étape 6, image 1 de 2 Lenovo ThinkPad T530 Heatsink Replacement, Revealing the Keyboard: étape 6, image 2 de 2
    • Flip the laptop right-side up, with the keyboard facing towards you.

    • Open the laptop.

  7. Lenovo ThinkPad T530 Heatsink Replacement, Removing the Keyboard: étape 7, image 1 de 3 Lenovo ThinkPad T530 Heatsink Replacement, Removing the Keyboard: étape 7, image 2 de 3 Lenovo ThinkPad T530 Heatsink Replacement, Removing the Keyboard: étape 7, image 3 de 3
    • Place each of your two thumbs on the bottom-left and right most corners of the keyboard (towards the arrow keys, and the Fn (Function) key).

    • Gentilly and slowly push the keyboard up (towards the display)

    • Lift the two corners of the keyboard up enough to see the ribbon cable below.

    • Applying excessive force to the keyboard ribbon connector may result in damage to the system.

  8. Lenovo ThinkPad T530 Heatsink Replacement, Disconnecting the Ribon Cable: étape 8, image 1 de 3 Lenovo ThinkPad T530 Heatsink Replacement, Disconnecting the Ribon Cable: étape 8, image 2 de 3 Lenovo ThinkPad T530 Heatsink Replacement, Disconnecting the Ribon Cable: étape 8, image 3 de 3
    • Angle the keyboard upwards, at a 90° angle.

    • Keep one finger holding the keyboard up, while using the other to disconnect the ribbon cable. To disconnect the ribbon cable, lift it up by the highlighted yellow end.

  9. Lenovo ThinkPad T530 Heatsink Replacement, Taking out the Keyboard: étape 9, image 1 de 1
    • The keyboard is now disconnected from the laptop, and you can remove it and place it aside.

  10. Lenovo ThinkPad T530 Heatsink Replacement, Reconnecting the Ribbon Cable: étape 10, image 1 de 1
    • Reconnect the keyboard ribbon cable by pushing it down onto the slot.

  11. Lenovo ThinkPad T530 Heatsink Replacement, Reinstalling the Keyboard: étape 11, image 1 de 3 Lenovo ThinkPad T530 Heatsink Replacement, Reinstalling the Keyboard: étape 11, image 2 de 3 Lenovo ThinkPad T530 Heatsink Replacement, Reinstalling the Keyboard: étape 11, image 3 de 3
    • Guide the keyboards top edge underneath the frame.

    • 2nd Image was copied from the Lenovo T530/T530i/W530 Service Manual.

  12. Lenovo ThinkPad T530 Heatsink Replacement, Reseating the Keyboard: étape 12, image 1 de 2 Lenovo ThinkPad T530 Heatsink Replacement, Reseating the Keyboard: étape 12, image 2 de 2
    • Push the keyboard down, then pull it back towards your trackpad.

  13. Lenovo ThinkPad T530 Heatsink Replacement, Reinstalling Screws: étape 13, image 1 de 1
    • Using a Phillips #00 screwdriver, re-screw the highlighted screws.

  14. Lenovo ThinkPad T530 Heatsink Replacement, Reinstalling Bottom Cover: étape 14, image 1 de 3 Lenovo ThinkPad T530 Heatsink Replacement, Reinstalling Bottom Cover: étape 14, image 2 de 3 Lenovo ThinkPad T530 Heatsink Replacement, Reinstalling Bottom Cover: étape 14, image 3 de 3
    • Reinsert the bottom memory cover, ensuring all clips are in place.

    • Using a Phillips #00 tighten the two highlighted screws.

  15. Lenovo ThinkPad T530 Heatsink Replacement, Opening Storage Drive Door: étape 15, image 1 de 3 Lenovo ThinkPad T530 Heatsink Replacement, Opening Storage Drive Door: étape 15, image 2 de 3 Lenovo ThinkPad T530 Heatsink Replacement, Opening Storage Drive Door: étape 15, image 3 de 3
    • Using a Phillips #00 screwdriver, remove the bottom screw to unlock the storage drive cover.

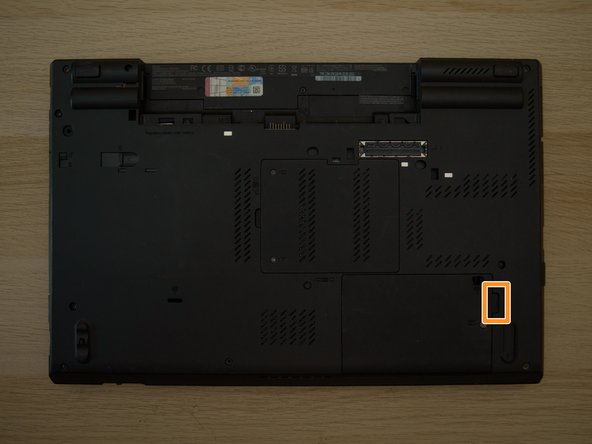
    • Lift up the storage drive cover from the lip highlighted in orange. Put it aside.

  16. Lenovo ThinkPad T530 Heatsink Replacement, Removing Storage Drive: étape 16, image 1 de 2 Lenovo ThinkPad T530 Heatsink Replacement, Removing Storage Drive: étape 16, image 2 de 2
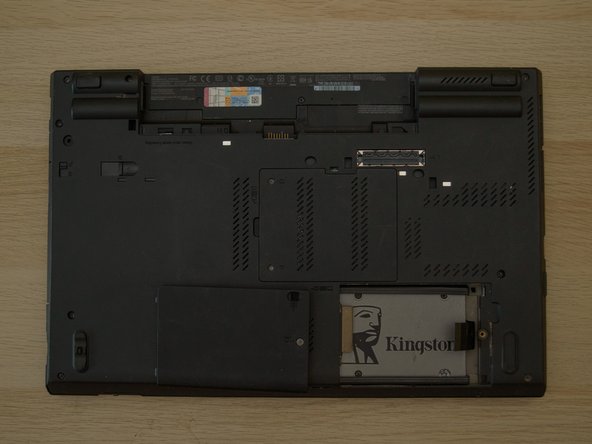
    • Pull the storage drive out of the slot from the tab.

    • Pull the drive at an angle, and not directly up as this could cause damage to the sata connector.

  17. Lenovo ThinkPad T530 Heatsink Replacement, Removing Drive Spacers: étape 17, image 1 de 2 Lenovo ThinkPad T530 Heatsink Replacement, Removing Drive Spacers: étape 17, image 2 de 2
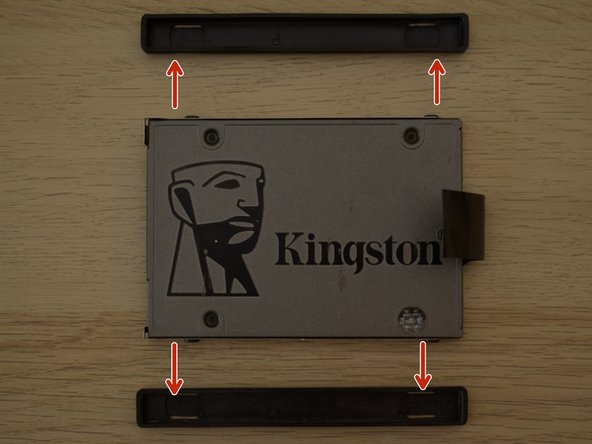
    • Grab the rubber spacers highlighted in red, and pull them away from the drive.

  18. Lenovo ThinkPad T530 Heatsink Replacement, Removing the Drive from the Caddy: étape 18, image 1 de 2 Lenovo ThinkPad T530 Heatsink Replacement, Removing the Drive from the Caddy: étape 18, image 2 de 2
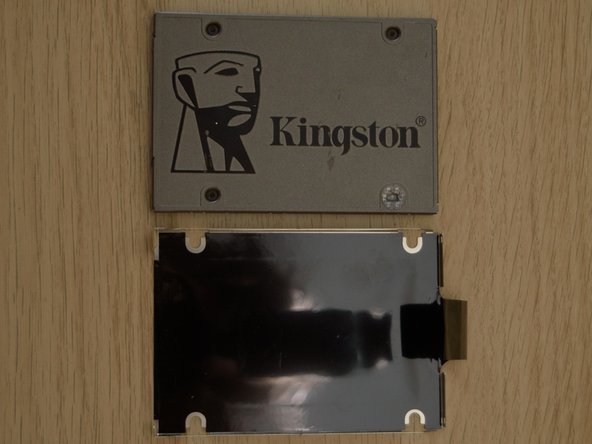
    • Using a Phillips #00 screwdriver, unscrew the four screws, two on each of the left, and right side of the drive.

  19. Lenovo ThinkPad T530 Heatsink Replacement, Unscrewing Keyboard Bezel Assembly: étape 19, image 1 de 1
    • Using a Philips M2 screwdriver, remove the 2 screws highlighted in yellow. The bottom screw is underneath the hard drive, which should have already been removed.

  20. Lenovo ThinkPad T530 Heatsink Replacement, Removing your ExpressCard: étape 20, image 1 de 1
    • Pull the ExpressCard from the ridges on the side, it should pop out of place.

  21. Lenovo ThinkPad T530 Heatsink Replacement, Unscrewing Keyboard Bezel Assembly (Continued): étape 21, image 1 de 1
    • Using a Philips 2 screwdriver, remove the 7 screws highlighted in red.

  22. Lenovo ThinkPad T530 Heatsink Replacement, Removing Keyboard Bezel: étape 22, image 1 de 2 Lenovo ThinkPad T530 Heatsink Replacement, Removing Keyboard Bezel: étape 22, image 2 de 2
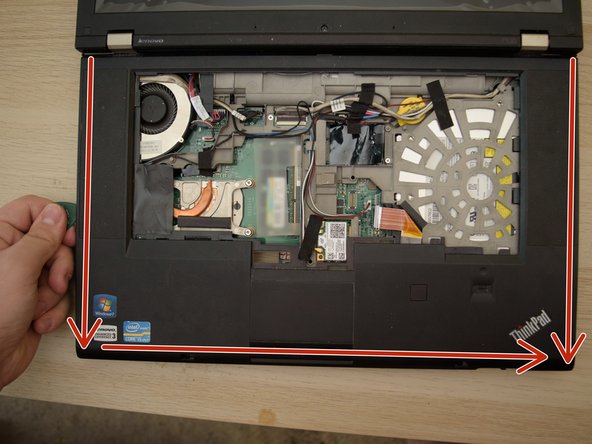
    • Begin by prying the keyboard bezel up from the edges using a guitar pick or shim between the keyboard bezel and the housing of the laptop, as highlighted in red.

  23. Lenovo ThinkPad T530 Heatsink Replacement, Unlocking Ribon Cable: étape 23, image 1 de 3 Lenovo ThinkPad T530 Heatsink Replacement, Unlocking Ribon Cable: étape 23, image 2 de 3 Lenovo ThinkPad T530 Heatsink Replacement, Unlocking Ribon Cable: étape 23, image 3 de 3
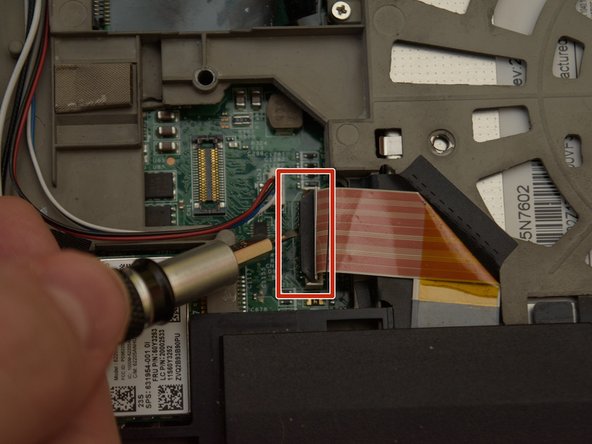
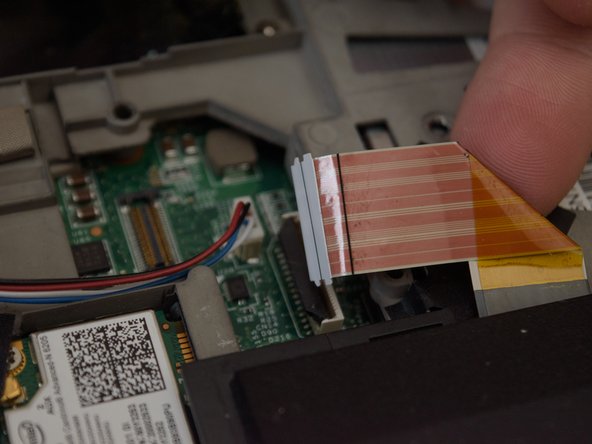
    • Locate the ribbon cable near the trackpad highlighted in red, use a flathead screwdriver or some other flat object to push up the locking leaver to then free the ribbon connector.

  24. Lenovo ThinkPad T530 Heatsink Replacement, Removing Keyboard Bezel: étape 24, image 1 de 2 Lenovo ThinkPad T530 Heatsink Replacement, Removing Keyboard Bezel: étape 24, image 2 de 2
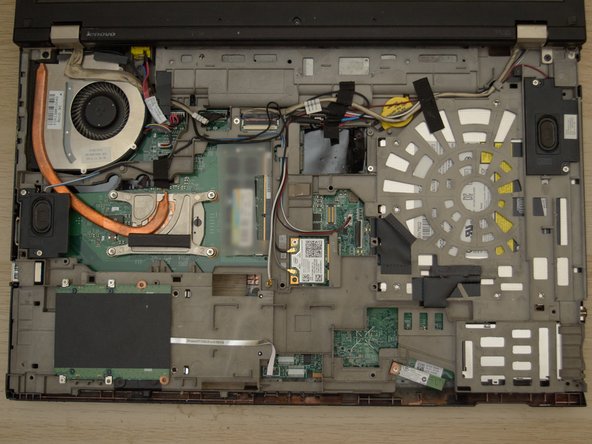
    • Grab the keyboard bezel from the two bottom corners (near the trackpad) and lift the bezel up- and away from the display (away from you).

  25. Lenovo ThinkPad T530 Heatsink Replacement, Removing the Speaker: étape 25, image 1 de 2 Lenovo ThinkPad T530 Heatsink Replacement, Removing the Speaker: étape 25, image 2 de 2
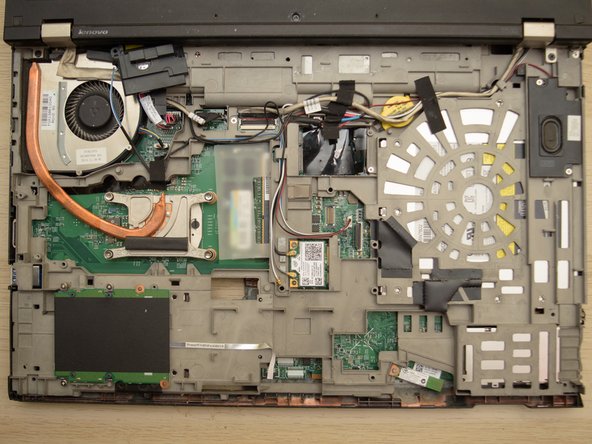
    • Locate the Speaker, on the middle-left of the laptop.

    • Remove the two highlighted silver Phillips #00 screws

    • Now that the two screws have been removed, you can pull the speaker to the side, as seen in the second photo.

  26. Lenovo ThinkPad T530 Heatsink Replacement, Loosening the Heatsink: étape 26, image 1 de 2 Lenovo ThinkPad T530 Heatsink Replacement, Loosening the Heatsink: étape 26, image 2 de 2
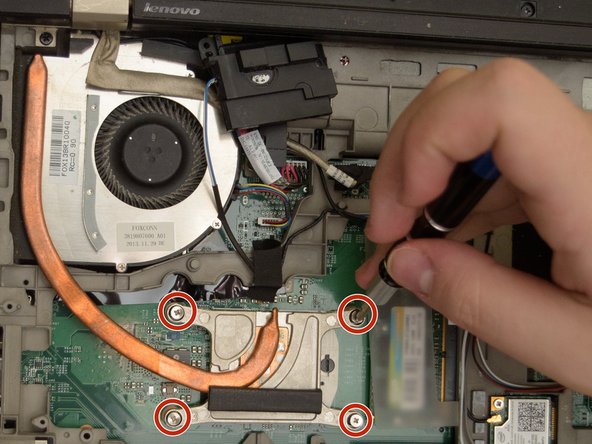
    • Using a Phillips #00, loosten the screws in the order below, however do not entirely remove them from the heatsink.

    • Loosten the top-left screw

    • Loosten the bottom-right screw

    • Loosten the bottom-left screw

    • Loosten the top-right screw

    • If your laptop is equiped with a dedicated gpu, there may be more screws which you will need to remove.

  27. Lenovo ThinkPad T530 Heatsink Replacement, Removing the Heatsink: étape 27, image 1 de 3 Lenovo ThinkPad T530 Heatsink Replacement, Removing the Heatsink: étape 27, image 2 de 3 Lenovo ThinkPad T530 Heatsink Replacement, Removing the Heatsink: étape 27, image 3 de 3
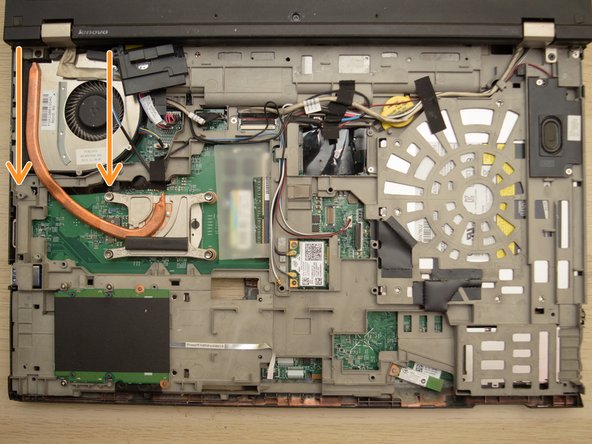
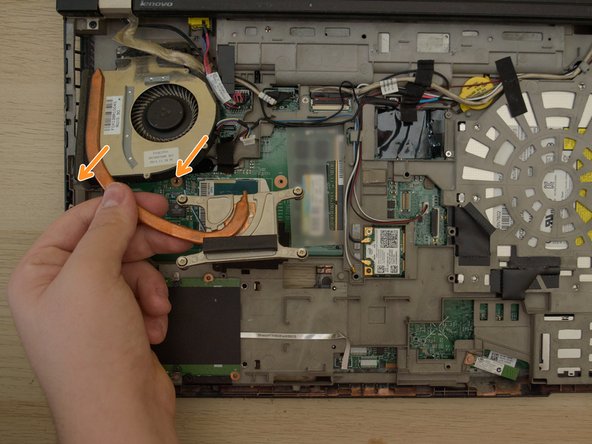
    • Use your hand to unplug the fan cable for the heatsink.

    • Using your hand, gently pull the heatsink away from the display (towards the trackpad) enough to move it up.

    • This process should not require an exhuberant amount of force, if there is any tension- inspect for any cables or screws impeding you.

Conclusion

To reassemble your device, follow these instructions in reverse order.

Albert Stoynov

Membre depuis le 09/11/23

1 198 Réputation

10 tutoriels rédigés

0 commentaires

Ajouter un commentaire

Nombre de vues :

Dernières 24 heures : 0

7 derniers jours : 1

30 derniers jours : 4

Total : 78