Introduction
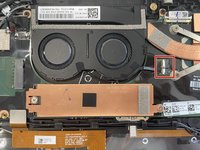
Following the steps laid out in this guide will allow you to replace the internal fan of the Lenovo ThinkPad X1 Yoga (6th Gen) laptop. This repair may be needed if you cannot hear the fan running during operation, and/or your laptop is consistently overheating. Before outright replacement, make sure the fan's blades are free of dirt or debris buildup that may reduce the fan's efficiency.
Ce dont vous avez besoin
-
-
Use a Phillips #1 screwdriver to remove the five 5 mm screws that secure the base panel.
-
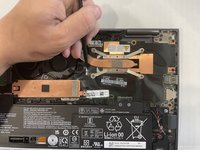
Wedge a spudger between the base panel and chassis, and pry around the entire perimeter until you hear a pop and the base panel releases.
-
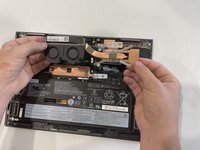
Lift the base panel up and off of the chassis.
-
-


To reassemble your device, follow these instructions in reverse order.
To reassemble your device, follow these instructions in reverse order.
Équipe

Western Carolina University, Team 1-1, Virtue Spring 2022 Membre de l'équipe Western Carolina University, Team 1-1, Virtue Spring 2022
WCU-VIRTUE-S22S1G1
4 membres
10 tutoriels rédigés
3 commentaires
Hi, Do you know what is the fan part number? Where did you get the fan from?
Responding to this oooold comment: Part# 5H40W36671 5H40W36671 - Lenovo Laptop CPU Fan & Heatsink - Genuine
You can look up, and sometimes order, Lenovo parts at their website. They even sometimes have instructions and videos for parts. Many models also have service guides available, at least the Thinkpads do (maybe because they are intended as "corporate" machines).
https://support.lenovo.com/us/en/parts-l...
Also note: when replacing, you need to clean off and replace the thermal compound on the chip dies. And technically the screws should be tightened down in the order shown by the numbers next to each screw...that is to try to ensure the thermal paste is spread evenly/correctly across the chip die when tightening.