Introduction
If you are experiencing issues with your Lenovo ThinkPad X390 such as intermittent shutdowns or restarts, failure to power on, problems with booting, hardware malfunctions, or frequent blue screen errors, use this guide to replace the motherboard.
The motherboard is the computer's main circuit board. It has many important functions, the main ones being connecting the CPU, GPU, hard drive, and other hardware; distributing power to the computer's components; allowing communication between computer components; and defining what storage, memory, and graphics cards the computer is compatible with.
Before using this guide, check to make sure the new motherboard is compatible with your current CPU socket, RAM type, and operating system. Also, check to make sure the new motherboard has the correct amount of expansion slots and connections for storage drives and other peripherals (keyboard, mouse, monitor, speaker, etc.).
You must back up all of your important data before replacing the motherboard because you will be reconnecting storage drives, putting your data at risk.
It is also important that you ground yourself to discharge any static electricity by touching an unpainted metal surface on your computer case or wearing an anti-static wrist strap. A static shock can severely damage the component before you even get to replace it.
Finally, power down your computer, unplug the power cord, and disconnect any peripherals.
Ce dont vous avez besoin
-
-
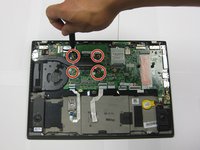
Use a Phillips #0 screwdriver to remove the five screws on the base cover.
-


To reassemble your device, follow these instructions in reverse order.
To reassemble your device, follow these instructions in reverse order.
Équipe

The Citadel Military College of South Carolina, Team 7-9, Eggleston Spring 2022 Membre de l'équipe The Citadel Military College of South Carolina, Team 7-9, Eggleston Spring 2022
CMCSC-EGGLESTON-S22S7G9
3 membres
4 tutoriels rédigés