Introduction
Use this guide to replace the display of a Lenovo ThinkPad X390 Yoga Laptop.
The display/monitor of a device is a crucial piece of computing hardware. It is an output device that displays the information that is being entered/processed on your computer. It generates everything from the images you see, to the videos you watch, to the graphical information from your computer's graphics card, to the text you are reading in this very moment! If your display is somehow damaged or corrupted, however, whether through loose/damaged cables, faulty hardware, damages to the screen itself, etc., it can cause great difficulty when it comes to visibility, and especially basic usability. Your computer's screen may display an error message, have a very blurry or corrupted display, or even not function altogether. A corrupted or damaged monitor is a problem that should be resolved immediately. Luckily, this guide will help you do just that!
Before taking a look at this guide, it is highly recommended that you visit the Lenovo monitor/display troubleshooting page, to confirm whether the issue with your display requires you to replace it with a new one or not.
This task will be much more difficult and risky if you are simply are using your hands or home tools. It is strongly recommended that your purchase a laptop opening tool and spudger prior to beginning this process. You can purchase both of these with an assurance of high-quality, affordable price, and great reviews, from Ifixit. The opening tool is known as the Ifixit Jimmy, and a pack of 3 Ifixitit spudgers can also be purchased.
It is crucial that you perform a system backup of your laptop prior to beginning this process, so as to ensure that none of your data is lost or corrupted during the process.
It is also crucial that you power off your laptop completely and disconnect it from any power sources externally, such as its charger prior to beginning the display replacement process.
Ce dont vous avez besoin
-
-
Safety Procedures:
-
Shutdown and Disable Power Supply: 1. Disconnect adapter. 2. Press F1 key to enter BIOS setup powering up Laptop. 3. Go to Configuration menu. 4. Select Power and press Enter. 5. Highlight Disable Built-in Battery and press Enter. 6. Confirm by selecting "Yes" and pressing Enter. 7. System will power down, and disabled battery.
-
Electrostatic Discharge (ESD) Safety: 1. Ground yourself to prevent static damage by wearing an ESD wrist strap or touching a grounded metal surface.
-
Remove the SIM Card Tray 1. Insert a straightened paperclip into the hole on the SIM card tray. 2. Gently push to eject and remove the tray.
-
Use a Phillips #1 screwdriver to unscrew the captive screws from the back of the device. The screws should not be removed from the back panel, so don't try to force them out.
-
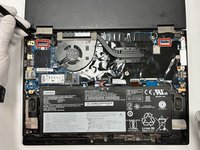
Disassemble the Laptop: Remove the Bottom Cover and Battery: 1. Loosen five captive screws on bottom of laptop. 2. Use a non-metallic pry tool to carefully loosen clips along the rear cover. 3. Lift and remove bottom cover. 4. Disconnect internal battery cable from system board. 5. Remove five screws securing the battery and lift it out of system.
-
-
-
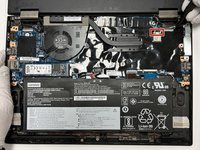
Use the iFixit opening tool to remove the back case by entering the tip of the tool into the seam and prying up.
-
Disconnect Screen Cables: 1. Disconnect the LED camera cable and remove it from its guide. 2. Remove the antenna cables from their guides. 3. Disconnect the LCD cable and remove it from its guide. 4. Remove the Antenna Cables from the guide which is next to LCD cable. 5. Remove three screws from each hinge.
-
-
-
-
Disconnect the display connectors with a spudger or opening tool.
-
Remove the LCD Panel: 1. Lift the LCD panel and flip it over. 2. Remove the tape securing the LCD cable. 3. Disconnect the LCD cable and remove the panel.
-
Install the New LCD Panel Reinstall the LCD Panel: 1. Place the new LCD panel face down and reconnect the LCD cable. 2. Secure the connection with tape. 3. Flip the panel over and position it in place on the LCD unit.
-
Reattach the Bezel: 1. Place the LCD bezel back onto the LCD unit. 2. Secure the clips along the bottom edge first, then press down along the edges until all clips lock into place. 3. Align the new bezel sheet over the LCD unit and press down along the edges to secure the adhesive.
-
-
-
Reassemble the Laptop: 1. Place base cover assembly onto hinges, close it over LCD unit. 2. Reinstall three screws into each hinge. 3. Reconnect and guide antenna cables, LCD cable, and LED camera cable into place.
-
4. Place battery back into the system, secure with five screws, and reconnect battery cable. 5. Reattach bottom cover, aligning front edge first, and tighten five captive screws. 6. Insert SIM card tray and push until it sits flush.
-
Re-enable the Built-in Battery 1. Power on the laptop and press F1 to enter the BIOS setup. 2. Navigate to Configuration > Power using the arrow keys. 3. Highlight Enable Built-in Battery and press Enter.
-
Testing the Display 1. Power on the system and verify the new display is functioning correctly. 2. If issues are observed, double-check the cable connections before fully securing the laptop.
-


To reassemble your device, follow these instructions in reverse order.
To reassemble your device, follow these instructions in reverse order.

Équipe

The Citadel Military College of South Carolina, Team 5-3, Eggleston Fall 2022 Membre de l'équipe The Citadel Military College of South Carolina, Team 5-3, Eggleston Fall 2022
CMCSC-EGGLESTON-F22S5G3
3 membres
5 tutoriels rédigés