Aller au contenu principal

Ce tutoriel a des changements plus récents. Passer à la dernière version non vérifiée.

Lenovo Y50 Touch Speakers Replacement

Ce dont vous avez besoin

  1. Lenovo Y50 Touch Speakers Replacement, Back: étape 1, image 1 de 2 Lenovo Y50 Touch Speakers Replacement, Back: étape 1, image 2 de 2
    • Remove all twelve 6 mm screws from the back of the laptop using a Phillips #1 screwdriver.

    • Apply a lot of pressure to prevent the screws from stripping.

    • Make sure to turn off the computer first!

  2. Lenovo Y50 Touch Speakers Replacement: étape 2, image 1 de 2 Lenovo Y50 Touch Speakers Replacement: étape 2, image 2 de 2
    • Gently pull the back cover off the laptop. It should come off easily.

  3. Lenovo Y50 Touch Speakers Replacement, Fan: étape 3, image 1 de 2 Lenovo Y50 Touch Speakers Replacement, Fan: étape 3, image 2 de 2
    • Remove the three 3.5 mm screws from the fan with a Philips #1 screwdriver.

  4. Lenovo Y50 Touch Speakers Replacement: étape 4, image 1 de 3 Lenovo Y50 Touch Speakers Replacement: étape 4, image 2 de 3 Lenovo Y50 Touch Speakers Replacement: étape 4, image 3 de 3
    • Pull the wire tabs up one at a time to separate them from the motherboard.

    • Do not pull too hard on the wire tabs. It may damage the connection between the wires and motherboard.

  5. Lenovo Y50 Touch Speakers Replacement: étape 5, image 1 de 3 Lenovo Y50 Touch Speakers Replacement: étape 5, image 2 de 3 Lenovo Y50 Touch Speakers Replacement: étape 5, image 3 de 3
    • Remove the black and white antenna cables from the wireless card.

    • Do not pull too hard on the antenna cables, as it might damage the connection to the wireless card.

  6. Lenovo Y50 Touch Speakers Replacement: étape 6, image 1 de 3 Lenovo Y50 Touch Speakers Replacement: étape 6, image 2 de 3 Lenovo Y50 Touch Speakers Replacement: étape 6, image 3 de 3
    • Lift up the fan slightly.

    • Gather the antenna cables(black and white) and speaker wires (red, black, blue, and white). Carefully move them away from the fan.

  7. Lenovo Y50 Touch Speakers Replacement: étape 7, image 1 de 2 Lenovo Y50 Touch Speakers Replacement: étape 7, image 2 de 2
    • Lift the fan off of the laptop.

  8. Lenovo Y50 Touch Speakers Replacement, Speakers: étape 8, image 1 de 1
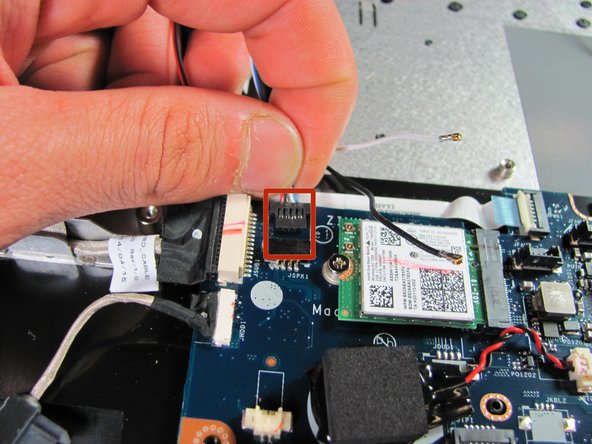
    • Locate the three speakers within the laptop.

    • The bass speaker is located near the fan's original position.

    • The side speakers are located at the upper left and right corners of the laptop.

  9. Lenovo Y50 Touch Speakers Replacement: étape 9, image 1 de 3 Lenovo Y50 Touch Speakers Replacement: étape 9, image 2 de 3 Lenovo Y50 Touch Speakers Replacement: étape 9, image 3 de 3
    • Using a Philips #1 screwdriver, remove the two 2.5 mm screws securing the bass speaker.

  10. Lenovo Y50 Touch Speakers Replacement: étape 10, image 1 de 2 Lenovo Y50 Touch Speakers Replacement: étape 10, image 2 de 2
    • Unplug the bass speaker from the motherboard.

  11. Lenovo Y50 Touch Speakers Replacement: étape 11, image 1 de 3 Lenovo Y50 Touch Speakers Replacement: étape 11, image 2 de 3 Lenovo Y50 Touch Speakers Replacement: étape 11, image 3 de 3
    • Remove the bass speaker from the laptop.

  12. Lenovo Y50 Touch Speakers Replacement: étape 12, image 1 de 3 Lenovo Y50 Touch Speakers Replacement: étape 12, image 2 de 3 Lenovo Y50 Touch Speakers Replacement: étape 12, image 3 de 3
    • Using a Philips #1 screwdriver, Remove the 2.5 mm screw holding each side speaker to the laptop.

  13. Lenovo Y50 Touch Speakers Replacement: étape 13, image 1 de 2 Lenovo Y50 Touch Speakers Replacement: étape 13, image 2 de 2
    • Unplug the side speakers from the motherboard.

  14. Lenovo Y50 Touch Speakers Replacement: étape 14, image 1 de 3 Lenovo Y50 Touch Speakers Replacement: étape 14, image 2 de 3 Lenovo Y50 Touch Speakers Replacement: étape 14, image 3 de 3
    • Remove the side speakers from the laptop.

    • The red and black wires connect to the right speaker, and the blue and white wires connect to to the left speaker.

    • The side speakers are independent from the bass speaker. It is possible to remove them without having to remove the bass speaker.

Conclusion

To reassemble your device, follow these instructions in reverse order.

5 autres ont terminé cette réparation.

Andrew Tran

Membre depuis le 01/21/15

820 Réputation

2 tutoriels rédigés

Équipe

Cal Poly, Team 18-1, Maness Winter 2015 Membre de l'équipe Cal Poly, Team 18-1, Maness Winter 2015

CPSU-MANESS-W15S18G1

5 membres

15 tutoriels rédigés

0 commentaires

Ajouter un commentaire

Nombre de vues :

Dernières 24 heures : 0

7 derniers jours : 0

30 derniers jours : 5

Total : 3,404