Cette version peut contenir des modifications incorrectes. Passez au dernier aperçu vérifié.
Ce dont vous avez besoin
-
Cette étape n’est pas traduite. Aidez à la traduire
-
Remove all twelve 6 mm screws from the back of the laptop using a Phillips #1 screwdriver.
-
-
Cette étape n’est pas traduite. Aidez à la traduire
-
Gently pull the back cover off the laptop. It should come off easily.
-
-
Cette étape n’est pas traduite. Aidez à la traduire
-
Remove the three 3.5 mm screws from the fan with a Philips #1 screwdriver.
-
-
Cette étape n’est pas traduite. Aidez à la traduire
-
Pull the wire tabs up one at a time to separate them from the motherboard.
-
-
Cette étape n’est pas traduite. Aidez à la traduire
-
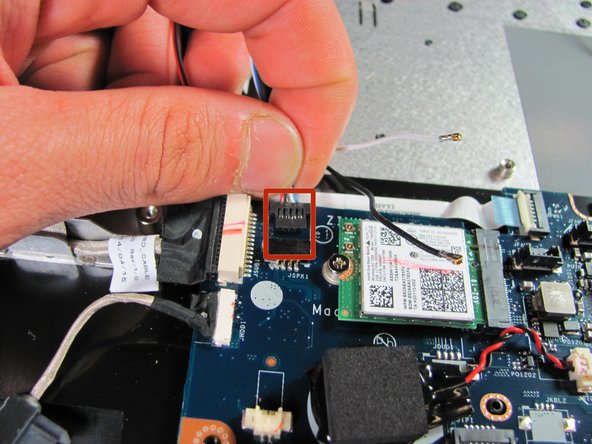
Remove the black and white antenna cables from the wireless card.
-
-
-
Cette étape n’est pas traduite. Aidez à la traduire
-
Lift up the fan slightly.
-
Gather the antenna cables(black and white) and speaker wires (red, black, blue, and white). Carefully move them away from the fan.
-
-
Cette étape n’est pas traduite. Aidez à la traduire
-
Locate the three speakers within the laptop.
-
The bass speaker is located near the fan's original position.
-
The side speakers are located at the upper left and right corners of the laptop.
-
-
Cette étape n’est pas traduite. Aidez à la traduire
-
Using a Philips #1 screwdriver, remove the two 2.5 mm screws securing the bass speaker.
-
-
Cette étape n’est pas traduite. Aidez à la traduire
-
Using a Philips #1 screwdriver, Remove the 2.5 mm screw holding each side speaker to the laptop.
-


Annulation : je n'ai pas terminé ce tutoriel.
5 autres ont terminé cette réparation.
Équipe

Cal Poly, Team 18-1, Maness Winter 2015 Membre de l'équipe Cal Poly, Team 18-1, Maness Winter 2015
CPSU-MANESS-W15S18G1
5 membres
15 tutoriels rédigés