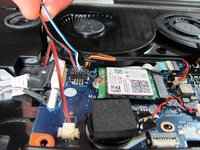
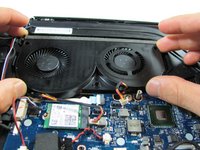
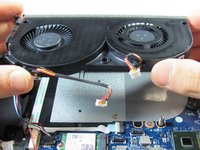
Aller au contenu principal

Lenovo Y50-70 Touch Fan Replacement

Ce dont vous avez besoin

  1. Lenovo Y50-70 Touch Fan Replacement, Back: étape 1, image 1 de 2 Lenovo Y50-70 Touch Fan Replacement, Back: étape 1, image 2 de 2
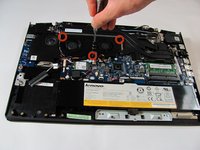
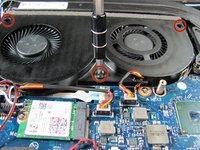
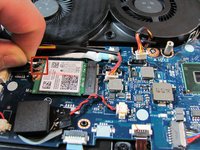
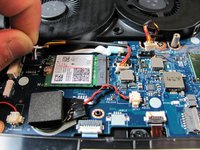
    • Remove all twelve 6 mm screws from the back of the laptop using a Phillips #1 screwdriver.

    • Apply a lot of pressure to prevent the screws from stripping.

    • Make sure to turn off the computer first!

  2. Lenovo Y50-70 Touch Fan Replacement: étape 2, image 1 de 2 Lenovo Y50-70 Touch Fan Replacement: étape 2, image 2 de 2
    • Gently pull the back cover off the laptop. It should come off easily.

  3. Lenovo Y50-70 Touch Fan Replacement, Fan: étape 3, image 1 de 2 Lenovo Y50-70 Touch Fan Replacement, Fan: étape 3, image 2 de 2
    • Remove the three 3.5 mm screws from the fan with a Philips #1 screwdriver.

  4. Lenovo Y50-70 Touch Fan Replacement: étape 4, image 1 de 3 Lenovo Y50-70 Touch Fan Replacement: étape 4, image 2 de 3 Lenovo Y50-70 Touch Fan Replacement: étape 4, image 3 de 3
    • Pull the wire tabs up one at a time to separate them from the motherboard.

    • Do not pull too hard on the wire tabs. It may damage the connection between the wires and motherboard.

  5. Lenovo Y50-70 Touch Fan Replacement: étape 5, image 1 de 3 Lenovo Y50-70 Touch Fan Replacement: étape 5, image 2 de 3 Lenovo Y50-70 Touch Fan Replacement: étape 5, image 3 de 3
    • Remove the black and white antenna cables from the wireless card.

    • Do not pull too hard on the antenna cables, as it might damage the connection to the wireless card.

  6. Lenovo Y50-70 Touch Fan Replacement: étape 6, image 1 de 3 Lenovo Y50-70 Touch Fan Replacement: étape 6, image 2 de 3 Lenovo Y50-70 Touch Fan Replacement: étape 6, image 3 de 3
    • Lift up the fan slightly.

    • Gather the antenna cables(black and white) and speaker wires (red, black, blue, and white). Carefully move them away from the fan.

  7. Lenovo Y50-70 Touch Fan Replacement: étape 7, image 1 de 2 Lenovo Y50-70 Touch Fan Replacement: étape 7, image 2 de 2
    • Lift the fan off of the laptop.

Conclusion

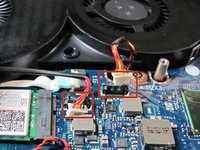
To reassemble your device, follow these instructions in reverse order.

8 autres ont terminé cette réparation.

Vivian

Membre depuis le 01/21/15

351 Réputation

1 tutoriel rédigé

Équipe

Cal Poly, Team 18-1, Maness Winter 2015 Membre de l'équipe Cal Poly, Team 18-1, Maness Winter 2015

CPSU-MANESS-W15S18G1

5 membres

15 tutoriels rédigés

0 commentaires

Ajouter un commentaire

Nombre de vues :

Dernières 24 heures : 0

7 derniers jours : 1

30 derniers jours : 7

Total : 9,308