Aller au contenu principal

Lenovo Yoga 710-14IKB Speaker Replacement

Ce dont vous avez besoin

  1. Lenovo Yoga 710-14IKB Speaker Replacement, Back Cover: étape 1, image 1 de 1
    • Ensure your device is completely OFF before starting this guide.

    • Use a Torx T4 screwdriver to unscrew the nine 5 mm screws holding the cover in place.

    • Use a Torx T4 screwdriver to unscrew the 8 mm screw in the center.

    • When, reassembling, make sure not to tighten the screws too much or you may risk cracking the plastic cover.

  2. Lenovo Yoga 710-14IKB Speaker Replacement: étape 2, image 1 de 3 Lenovo Yoga 710-14IKB Speaker Replacement: étape 2, image 2 de 3 Lenovo Yoga 710-14IKB Speaker Replacement: étape 2, image 3 de 3
    • Use the plastic opening tool to pry the cover up and away from the laptop, starting at one end and working your way around the cover.

    • The cover is large and flat and made of thin plastic. It cracks easily, so make sure not to pry too hard.

  3. Lenovo Yoga 710-14IKB Speaker Replacement, Battery: étape 3, image 1 de 2 Lenovo Yoga 710-14IKB Speaker Replacement, Battery: étape 3, image 2 de 2
    • Use a Phillips #00 screwdriver to remove the four 3 mm screws holding the battery in place.

    • Be careful not to cross-thread the screws. Also, don't let the screws fall down into the laptop case.

  4. Lenovo Yoga 710-14IKB Speaker Replacement: étape 4, image 1 de 2 Lenovo Yoga 710-14IKB Speaker Replacement: étape 4, image 2 de 2
    • Use your fingers or an opening tool to slide the battery connector out of its motherboard socket.

  5. Lenovo Yoga 710-14IKB Speaker Replacement: étape 5, image 1 de 1
    • Remove the battery.

  6. Lenovo Yoga 710-14IKB Speaker Replacement, Speaker: étape 6, image 1 de 1
    • Locate the speaker's plug and disconnect it.

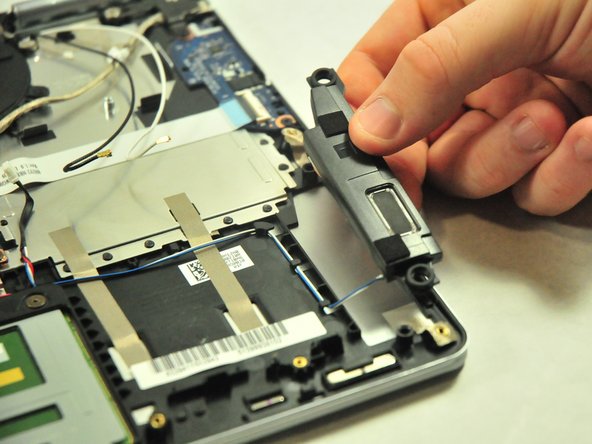
    • Follow the wires connected to the plug to locate the speakers. The left speaker will have red wires, and the right speaker will have blue wires.

  7. Lenovo Yoga 710-14IKB Speaker Replacement: étape 7, image 1 de 2 Lenovo Yoga 710-14IKB Speaker Replacement: étape 7, image 2 de 2
    • Untangle the wires from the plastic hinges of the case to properly lift the speakers out.

Conclusion

To reassemble your device, follow these instructions in reverse order.

Bailey Murphy

Membre depuis le 11/01/18

85 Réputation

1 tutoriel rédigé

Équipe

UMass Dartmouth, Team S5-G8, Gulbrandsen Fall 2018 Membre de l'équipe UMass Dartmouth, Team S5-G8, Gulbrandsen Fall 2018

UMASSD-GULBRANDSEN-F18S5G8

3 membres

9 tutoriels rédigés

0 commentaires

Ajouter un commentaire

Nombre de vues :

Dernières 24 heures : 0

7 derniers jours : 0

30 derniers jours : 5

Total : 710