Aller au contenu principal

Lenovo Yoga 710-14IKB Wi-Fi Card Replacement

Ce dont vous avez besoin

  1. Lenovo Yoga 710-14IKB Wi-Fi Card Replacement, Back Cover: étape 1, image 1 de 1
    • Ensure your device is completely OFF before starting this guide.

    • Use a Torx T4 screwdriver to unscrew the nine 5 mm screws holding the cover in place.

    • Use a Torx T4 screwdriver to unscrew the 8 mm screw in the center.

    • When, reassembling, make sure not to tighten the screws too much or you may risk cracking the plastic cover.

  2. Lenovo Yoga 710-14IKB Wi-Fi Card Replacement: étape 2, image 1 de 3 Lenovo Yoga 710-14IKB Wi-Fi Card Replacement: étape 2, image 2 de 3 Lenovo Yoga 710-14IKB Wi-Fi Card Replacement: étape 2, image 3 de 3
    • Use the plastic opening tool to pry the cover up and away from the laptop, starting at one end and working your way around the cover.

    • The cover is large and flat and made of thin plastic. It cracks easily, so make sure not to pry too hard.

  3. Lenovo Yoga 710-14IKB Wi-Fi Card Replacement, Wi-Fi Card: étape 3, image 1 de 3 Lenovo Yoga 710-14IKB Wi-Fi Card Replacement, Wi-Fi Card: étape 3, image 2 de 3 Lenovo Yoga 710-14IKB Wi-Fi Card Replacement, Wi-Fi Card: étape 3, image 3 de 3
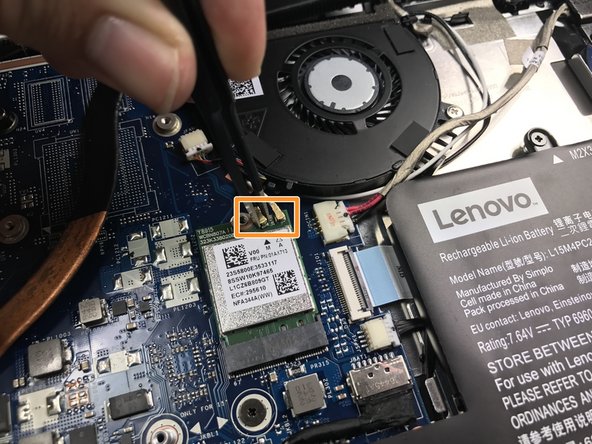
    • Peel off the black tape covering the top of the WiFi card.

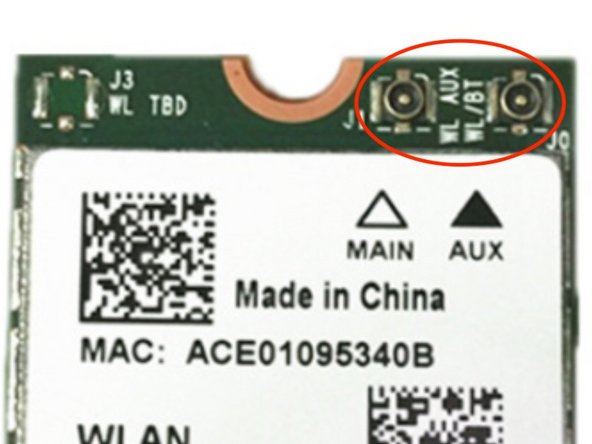
    • Remove the black and white antenna cable attached to the card by pulling them off using the precison tweezers.

    • BE CAREFUL! The antenna socket is VERY FRAGILE. If you use brute force, the antenna socket on board (female) will be pull out with the male connector.

    • If you disconnect the antenna cable properly, the socket will remain undamaged like fig.3

  4. Lenovo Yoga 710-14IKB Wi-Fi Card Replacement: étape 4, image 1 de 1
    • If you disconnect it with brute force, it will be damaged like that.

  5. Lenovo Yoga 710-14IKB Wi-Fi Card Replacement: étape 5, image 1 de 1
    • Use a #00 Phillips screwdriver to remove the 3mm screw in the center at the top of the card.

  6. Lenovo Yoga 710-14IKB Wi-Fi Card Replacement: étape 6, image 1 de 3 Lenovo Yoga 710-14IKB Wi-Fi Card Replacement: étape 6, image 2 de 3 Lenovo Yoga 710-14IKB Wi-Fi Card Replacement: étape 6, image 3 de 3
    • The WiFi Card should be unbound from the surface. Carefully remove the card from the laptop by puling away from the socket.

Conclusion

To reassemble your device, follow these instructions in reverse order.

7 autres ont terminé cette réparation.

Grant Doerksen

Membre depuis le 04/17/17

1 005 Réputation

5 tutoriels rédigés

Équipe

Cal Poly, Team S14-G5, Banghart Spring 2017 Membre de l'équipe Cal Poly, Team S14-G5, Banghart Spring 2017

CPSU-BANGHART-S17S14G5

4 membres

21 tutoriels rédigés

Un commentaire

I haven’t done it yet, but I’m no longer worried in the slightest! Your guide is about as dummy friendly as it gets, and I cannot even tell you how helpful your detailed instructions, ALONG WITH EXACT, CLEAR, and zoom-able pics of every step , PLUS warnings of what NOT to do and how to tell if you’ve screwed it up!!! A breath of fresh air compared what I’ve come to expect anymore online. I get ones like this - a super fast video, cam behind the person, too far away to see what they’re doing & how; The only zoomed-in shots are the before & after; No talking just background music ; Then in the description, where you expect their instructions, you get only stupidity… ie, like, “open laptop, remove wifi card.Put new one in the same way”. Wow, no sh**?! Idiots… Sadly, not exaggerated! So I just had to thank you, this is how it’s DONE! People should follow your example, something might get done (and done right) for a change!! Keep up the good work if this is ur thing! If not, it should be! Thanks again!

Teresa Allton - Réponse

Ajouter un commentaire

Nombre de vues :

Dernières 24 heures : 0

7 derniers jours : 7

30 derniers jours : 23

Total : 3,499