Aller au contenu principal
Pour réparer ensemble - Je crée un compte
Lenovo Yoga C930-13IKB Hinge Assembly Replacement

Ce dont vous avez besoin

    1. Lenovo Yoga C930-13IKB Hinge Assembly Replacement, Back Cover: étape 1, image 1 de 1
      • Flip the device over so that the underside is facing up.

      • Remove the six 3.5 mm T5 Torx screws.

      Demander à FixBot

      Ajouter un commentaire

    2. Lenovo Yoga C930-13IKB Hinge Assembly Replacement: étape 2, image 1 de 2 Lenovo Yoga C930-13IKB Hinge Assembly Replacement: étape 2, image 2 de 2
      • Pry off the back cover using the plastic opening tool.

      • Loosen the back cover in multiple spots using the opening tool, then remove the whole back.

      • You may have to run the plastic tool along the edges until you find a small gap to separate the back cover from the laptop.

      • Do not use a metal tool when working with your device.

      Demander à FixBot

      Ajouter un commentaire

    3. Lenovo Yoga C930-13IKB Hinge Assembly Replacement: étape 3, image 1 de 2 Lenovo Yoga C930-13IKB Hinge Assembly Replacement: étape 3, image 2 de 2
      • Carefully lift the cover off with your hands.

      Demander à FixBot

      Ajouter un commentaire

    1. Lenovo Yoga C930-13IKB Hinge Assembly Replacement, Battery: étape 4, image 1 de 3 Lenovo Yoga C930-13IKB Hinge Assembly Replacement, Battery: étape 4, image 2 de 3 Lenovo Yoga C930-13IKB Hinge Assembly Replacement, Battery: étape 4, image 3 de 3
      • Unplug the battery from the motherboard by pinching the cables with your fingers and tugging out with force.

      • Use the spudger for assistance.

      Demander à FixBot

      Ajouter un commentaire

    2. Lenovo Yoga C930-13IKB Hinge Assembly Replacement: étape 5, image 1 de 1
      • Unscrew the four 3mm screws with a Phillips screwdriver.

      Demander à FixBot

      Ajouter un commentaire

    3. Lenovo Yoga C930-13IKB Hinge Assembly Replacement: étape 6, image 1 de 2 Lenovo Yoga C930-13IKB Hinge Assembly Replacement: étape 6, image 2 de 2
      • The battery is still held in place with two stretch-release adhesive strips, similar to ones found in an iPhone.

      • Use your fingers to pry up the clear plastic pull-tab for one of the stretch release adhesives.

      • Grasp the pull-tab and slowly pull away from the battery at a shallow angle. The adhesive strip will stretch to many times its length and slowly release from underneath the battery.

      • Repeat the procedure for the second strip on the opposite side of the battery.

      • Be careful not to bend the battery. Breaking the battery is dangerous.

      • Remove the battery with your hands.

      Demander à FixBot

      Ajouter un commentaire

    1. Lenovo Yoga C930-13IKB Hinge Assembly Replacement, Coolant Fans: étape 7, image 1 de 1
      • Remove the four 3 mm Phillips #0 screws from the fan assembly.

      Demander à FixBot

      Ajouter un commentaire

    2. Lenovo Yoga C930-13IKB Hinge Assembly Replacement: étape 8, image 1 de 1
      • Remove the four 2 mm Phillips #00 screws from the fans themselves.

      Demander à FixBot

      Ajouter un commentaire

    3. Lenovo Yoga C930-13IKB Hinge Assembly Replacement: étape 9, image 1 de 1
      • Unscrew the three 3 mm Phillips #0 screws on the heatsink.

      Demander à FixBot

      Ajouter un commentaire

    4. Lenovo Yoga C930-13IKB Hinge Assembly Replacement: étape 10, image 1 de 2 Lenovo Yoga C930-13IKB Hinge Assembly Replacement: étape 10, image 2 de 2
      • Use a plastic opening tool to remove the two small, white power cable connectors for each of the two fans.

      Demander à FixBot

      Ajouter un commentaire

    5. Lenovo Yoga C930-13IKB Hinge Assembly Replacement: étape 11, image 1 de 1
      • Gently lift the fan assembly out of the laptop.

      • Be sure to clean and reapply thermal paste to the heatsink during reassembly.

      Demander à FixBot

      Ajouter un commentaire

    1. Lenovo Yoga C930-13IKB Hinge Assembly Replacement, Motherboard: étape 12, image 1 de 3 Lenovo Yoga C930-13IKB Hinge Assembly Replacement, Motherboard: étape 12, image 2 de 3 Lenovo Yoga C930-13IKB Hinge Assembly Replacement, Motherboard: étape 12, image 3 de 3
      Outil utilisé dans cette étape :
      Halberd Spudger
      $2.99
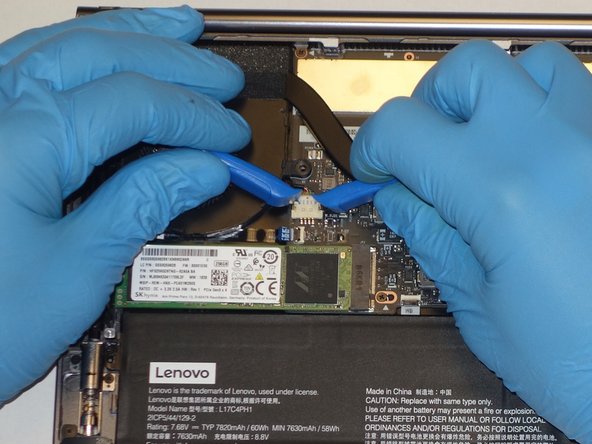
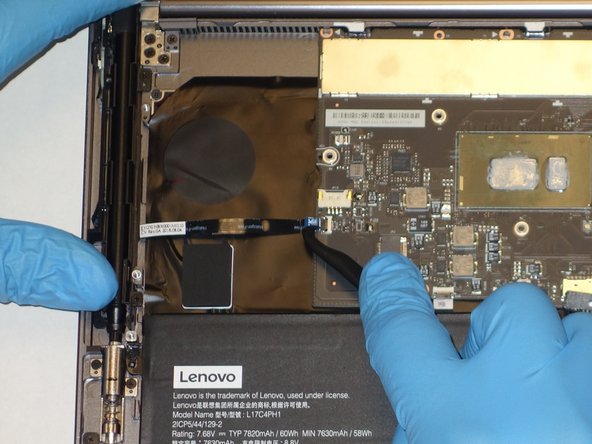
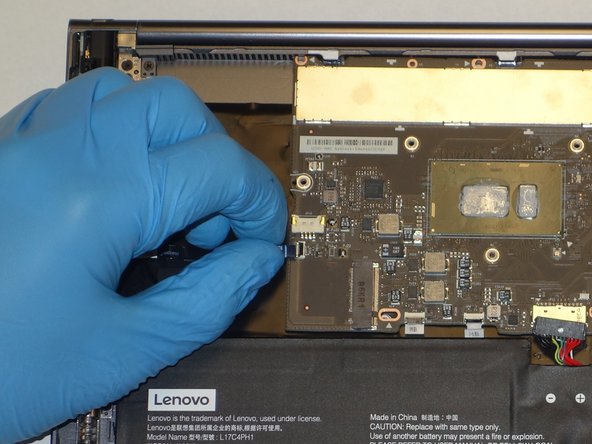
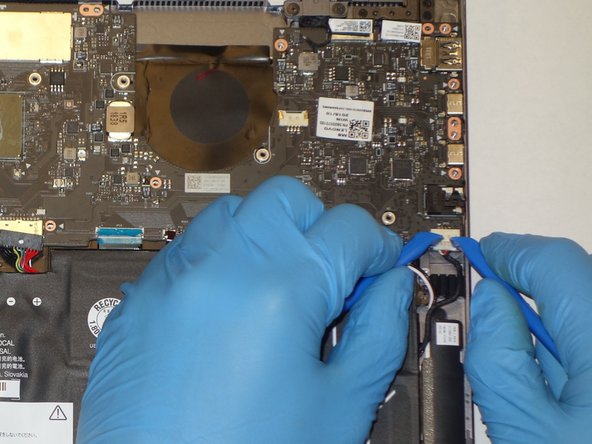
      • Using the Halberd Spudger, gently lift the black tab on top of each of the five ZIF connectors for the ribbon cables. Then pull the cables out from the connectors.

      Demander à FixBot

      Ajouter un commentaire

    2. Lenovo Yoga C930-13IKB Hinge Assembly Replacement: étape 13, image 1 de 2 Lenovo Yoga C930-13IKB Hinge Assembly Replacement: étape 13, image 2 de 2
      Outil utilisé dans cette étape :
      Tweezers
      $4.99
      • Using the reverse tweezers, gently pull out the small black cable towards the top right of the motherboard.

      Demander à FixBot

      Ajouter un commentaire

    3. Lenovo Yoga C930-13IKB Hinge Assembly Replacement: étape 14, image 1 de 2 Lenovo Yoga C930-13IKB Hinge Assembly Replacement: étape 14, image 2 de 2
      • Using two plastic opening tools gently unplug the white speaker cable connector from the bottom left of the motherboard.

      Demander à FixBot

      Ajouter un commentaire

    4. Lenovo Yoga C930-13IKB Hinge Assembly Replacement: étape 15, image 1 de 2 Lenovo Yoga C930-13IKB Hinge Assembly Replacement: étape 15, image 2 de 2
      • Using the plastic opening tool, gently pry up on the metal tabs of the two display cables to remove the cables from the top right corner of the motherboard.

      Demander à FixBot

      Ajouter un commentaire

    5. Lenovo Yoga C930-13IKB Hinge Assembly Replacement: étape 16, image 1 de 2 Lenovo Yoga C930-13IKB Hinge Assembly Replacement: étape 16, image 2 de 2
      • Remove the fourteen 3 mm Phillips #00 screws that hold in the motherboard.

      Demander à FixBot

      Ajouter un commentaire

    6. Lenovo Yoga C930-13IKB Hinge Assembly Replacement: étape 17, image 1 de 1
      • While gently grasping each side of the motherboard, carefully lift the assembly out.

      Demander à FixBot

      Ajouter un commentaire

    1. Lenovo Yoga C930-13IKB Hinge Assembly Replacement, Display: étape 18, image 1 de 2 Lenovo Yoga C930-13IKB Hinge Assembly Replacement, Display: étape 18, image 2 de 2
      Outil utilisé dans cette étape :
      Halberd Spudger
      $2.99
      • Using a halberd spudger, gently lift up the metal bezel that lines the lower edge of the display.

      Demander à FixBot

      Ajouter un commentaire

    2. Lenovo Yoga C930-13IKB Hinge Assembly Replacement: étape 19, image 1 de 1
      • Remove the ten 3 mm screws along the bottom edge of the display with a Phillips #00 screwdriver.

      Demander à FixBot

      Ajouter un commentaire

    3. Lenovo Yoga C930-13IKB Hinge Assembly Replacement: étape 20, image 1 de 2 Lenovo Yoga C930-13IKB Hinge Assembly Replacement: étape 20, image 2 de 2
      Outil utilisé dans cette étape :
      iFixit Opening Picks (Set of 6)
      $4.95
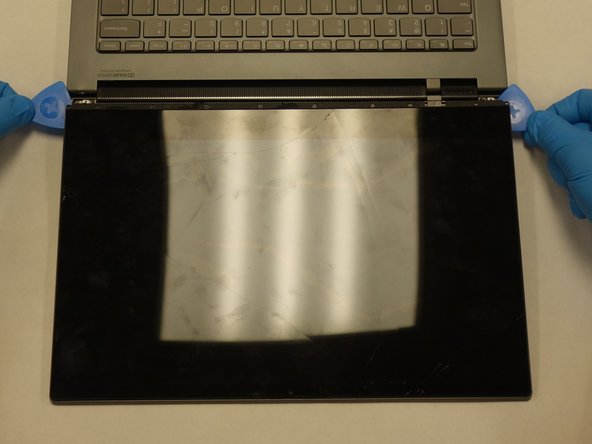
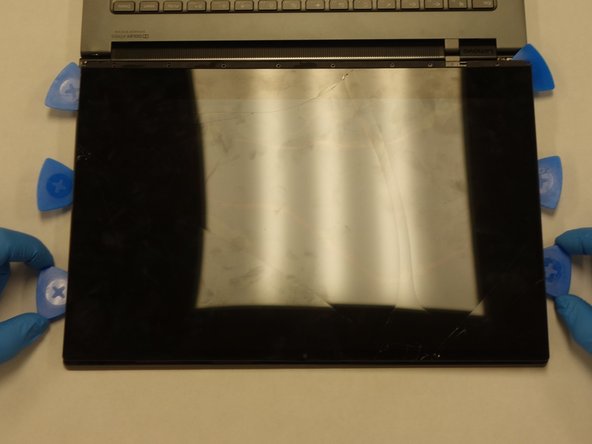
      • Gently wedge two opening picks underneath the display.

      • Slowly work the opening picks around the display.

      • Add opening picks as needed to keep display separated from the frame.

      • Use caution if dealing with broken glass.

      • The iFixit suction cup tool can be used to add some extra leverage to the mix when removing the display.

      Demander à FixBot

      Ajouter un commentaire

    4. Lenovo Yoga C930-13IKB Hinge Assembly Replacement: étape 21, image 1 de 2 Lenovo Yoga C930-13IKB Hinge Assembly Replacement: étape 21, image 2 de 2
      • Gently flip the display assembly to rest on top of the keyboard.

      Demander à FixBot

      Ajouter un commentaire

    5. Lenovo Yoga C930-13IKB Hinge Assembly Replacement: étape 22, image 1 de 2 Lenovo Yoga C930-13IKB Hinge Assembly Replacement: étape 22, image 2 de 2
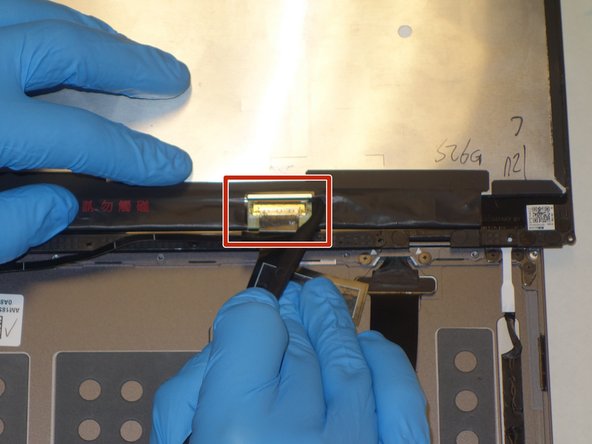
      • Use the halberd spudger to lift the locking tab of the ZIF connector holding the black ribbon cable that runs vertically across the display.

      • Pull out the black ribbon cable from the connector.

      Demander à FixBot

      Ajouter un commentaire

    6. Lenovo Yoga C930-13IKB Hinge Assembly Replacement: étape 23, image 1 de 3 Lenovo Yoga C930-13IKB Hinge Assembly Replacement: étape 23, image 2 de 3 Lenovo Yoga C930-13IKB Hinge Assembly Replacement: étape 23, image 3 de 3
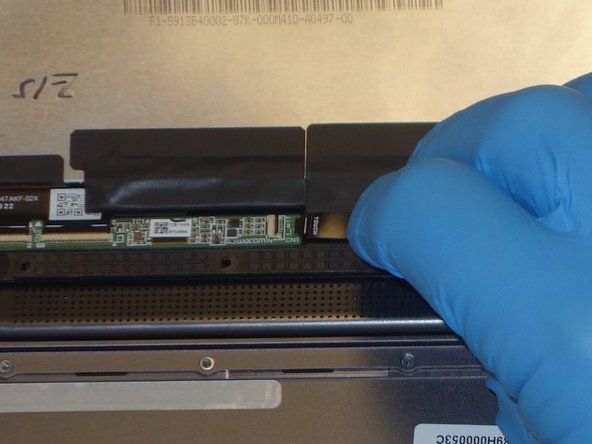
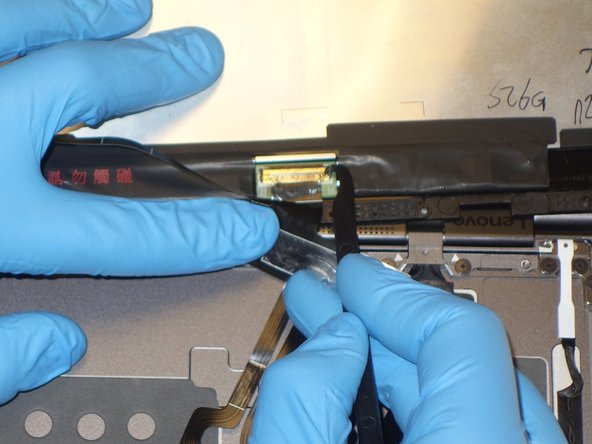
      • Use the halberd spudger to lift the latch on the ZIF connector of the horizontal black ribbon cable.

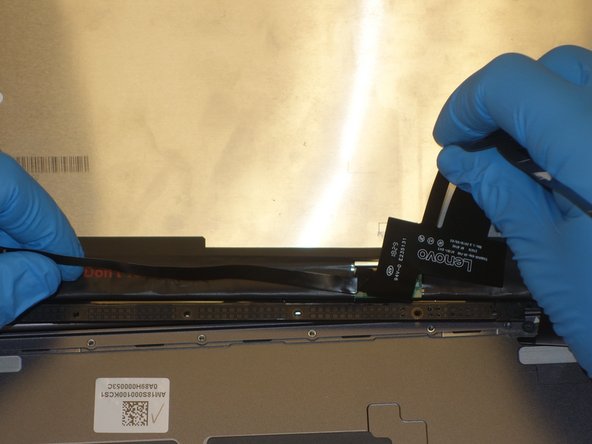
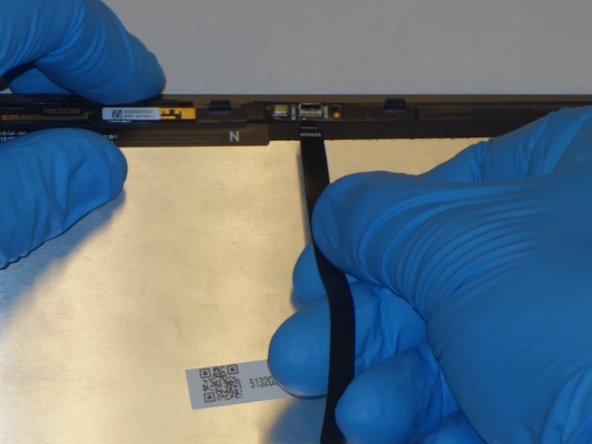
      • Pull out the horizontal black ribbon cable from the connector.

      • Gently pull the rest of the horizontal black ribbon cable from the back of the display.

      Demander à FixBot

      Ajouter un commentaire

    7. Lenovo Yoga C930-13IKB Hinge Assembly Replacement: étape 24, image 1 de 3 Lenovo Yoga C930-13IKB Hinge Assembly Replacement: étape 24, image 2 de 3 Lenovo Yoga C930-13IKB Hinge Assembly Replacement: étape 24, image 3 de 3
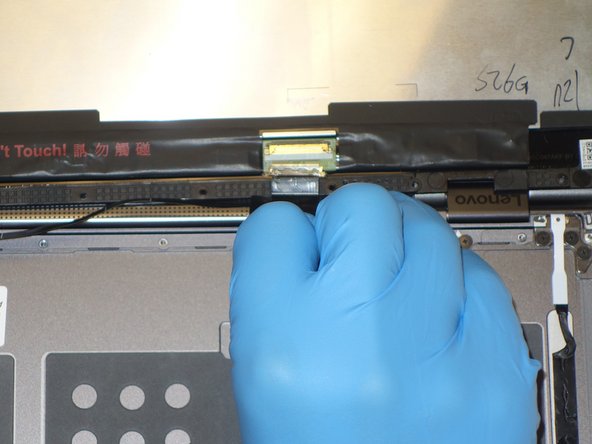
      • Use the halberd spudger to flip the metal latch of the display cable up.

      • Using the halberd spudger, gently pull the connector out of the display.

      Demander à FixBot

      Ajouter un commentaire

    8. Lenovo Yoga C930-13IKB Hinge Assembly Replacement: étape 25, image 1 de 1
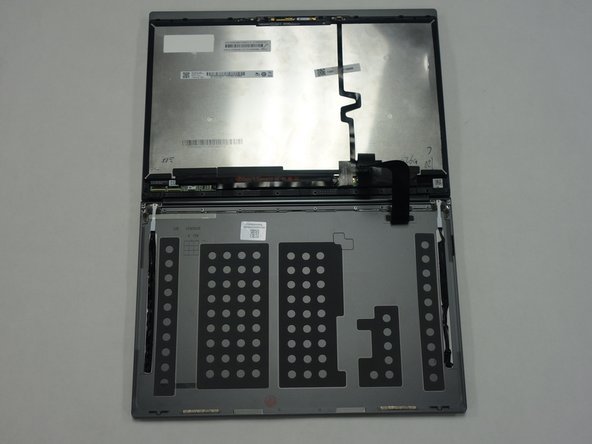
      • Gently lift the display away from the laptop frame.

      Demander à FixBot

      Ajouter un commentaire

    1. Lenovo Yoga C930-13IKB Hinge Assembly Replacement, Hinge Assembly: étape 26, image 1 de 2 Lenovo Yoga C930-13IKB Hinge Assembly Replacement, Hinge Assembly: étape 26, image 2 de 2
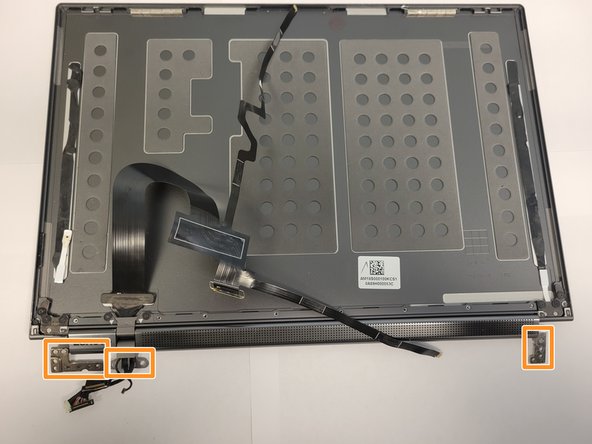
      • Remove the eight 3 mm screws from the hinge attachments on the back cover using the Phillips #00 screwdriver.

      • Carefully detach the hinge assembly connectors from the LCD cover to detach it from the back cover.

      Demander à FixBot

      Ajouter un commentaire

    2. Lenovo Yoga C930-13IKB Hinge Assembly Replacement: étape 27, image 1 de 3 Lenovo Yoga C930-13IKB Hinge Assembly Replacement: étape 27, image 2 de 3 Lenovo Yoga C930-13IKB Hinge Assembly Replacement: étape 27, image 3 de 3
      Outil utilisé dans cette étape :
      Tweezers
      $4.99
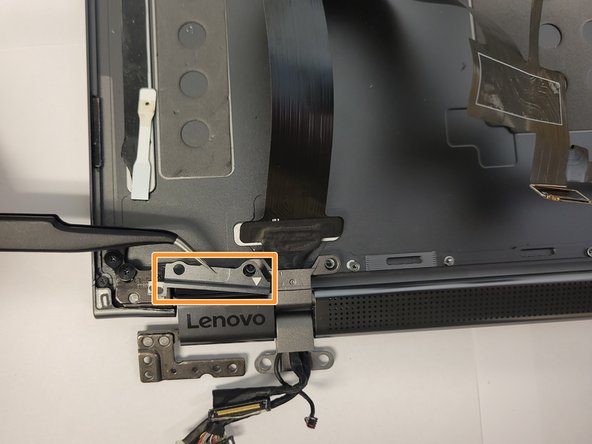
      • Using a Phillips #00 screwdriver, remove the two 3 mm screws from the hinge attachment on the LCD cover.

      • Detach the two hinge retention brackets using the angled ESD tweezers.

      Demander à FixBot

      Ajouter un commentaire

    3. Lenovo Yoga C930-13IKB Hinge Assembly Replacement: étape 28, image 1 de 2 Lenovo Yoga C930-13IKB Hinge Assembly Replacement: étape 28, image 2 de 2
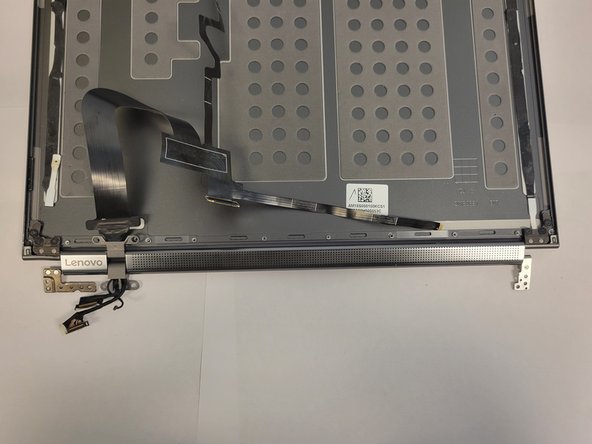
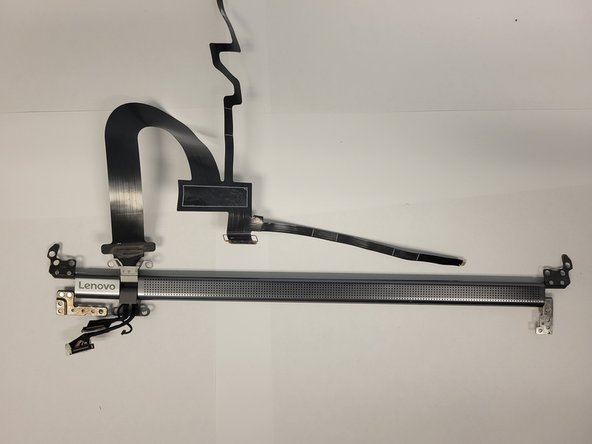
      • Using a Phillips #00 screwdriver remove the six 3 mm screws from the corners of the LCD cover.

      • Carefully lift the hinge assembly, detaching it from the LCD cover.

      Demander à FixBot

      Ajouter un commentaire

Conclusion

To reassemble your device, follow these instructions in reverse order.

Annulation : je n'ai pas terminé ce tutoriel.

4 autres ont terminé cette réparation.

1 commentaire de tutoriel

Is it possible to just replace the hinge on the side that is broken, where the pin has snapped?

xTryHarder - Réponse Partager

Ajouter un commentaire

Nombre de vues :

Dernières 24 heures : 0

7 derniers jours : 13

30 derniers jours : 72

Total : 2,245