Aller au contenu principal

Logitech C920 Webcam Disassembly

Ce dont vous avez besoin

  1. Logitech C920 Webcam Disassembly, Logitech C920 Webcam Disassembly: étape 1, image 1 de 2 Logitech C920 Webcam Disassembly, Logitech C920 Webcam Disassembly: étape 1, image 2 de 2
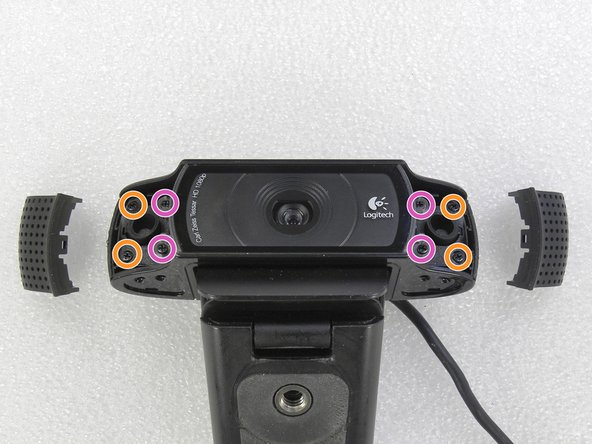
    • On the bottom side of the webcam, remove the stickers from both sides

  2. Logitech C920 Webcam Disassembly: étape 2, image 1 de 1
    • Remove the four Phillips screws.

    • Press into the holes to unlock the side covers.

  3. Logitech C920 Webcam Disassembly: étape 3, image 1 de 2 Logitech C920 Webcam Disassembly: étape 3, image 2 de 2
    • Once you’ve removed the side covers, unscrew all eight Phillips screws highlighted.

  4. Logitech C920 Webcam Disassembly: étape 4, image 1 de 3 Logitech C920 Webcam Disassembly: étape 4, image 2 de 3 Logitech C920 Webcam Disassembly: étape 4, image 3 de 3
    • Remove the lens's cover.

    • Remove the five Phillips screws of the metal bracket.

    • Remove the rubber pieces of both microphones (one on each side).

  5. Logitech C920 Webcam Disassembly: étape 5, image 1 de 1
    • Carefully remove the metal supports from the webcam's base.

  6. Logitech C920 Webcam Disassembly: étape 6, image 1 de 2 Logitech C920 Webcam Disassembly: étape 6, image 2 de 2
    • Carefully remove the base of the plastic support. Loosen the three screws that secure the electronic circuit.

  7. Logitech C920 Webcam Disassembly: étape 7, image 1 de 1
    • Disconnect the USB cable connector.

  8. Logitech C920 Webcam Disassembly: étape 8, image 1 de 1
    • Remove the electronic circuit.

  9. Logitech C920 Webcam Disassembly: étape 9, image 1 de 2 Logitech C920 Webcam Disassembly: étape 9, image 2 de 2
    • Release the clip that secures the cable holder. Pull this cable holder out of the camera.

  10. Logitech C920 Webcam Disassembly: étape 10, image 1 de 2 Logitech C920 Webcam Disassembly: étape 10, image 2 de 2
    • Front and back images of the webcam's electronic circuit board.

  11. Logitech C920 Webcam Disassembly: étape 11, image 1 de 1
    • The problem was the broken cable on the back of the camera. I've cut the faulty part and redid the connections by soldering them and insulated them with heat shrink tubes.

  12. Logitech C920 Webcam Disassembly: étape 12, image 1 de 1
    • The repaired cable is reattached to the camera. Wrapped it with some masking tape. Camera tested: OK!

    • Assemble the webcam following the steps in a reverse order.

Conclusion

To reassemble your device, follow these instructions in reverse order.

34 autres ont terminé cette réparation.

Merci à ces traducteurs :

pt en

100%

Ces traducteurs nous aident réparer le monde ! Vous voulez contribuer ?
Commencez à traduire ›

Jose Gustavo Abreu Murta

Membre depuis le 07/06/10

4 598 Réputation

9 tutoriels rédigés

30 commentaires

Excellent! Helped me figure out how to get the base off to mount it to an ikea worklamp as a hacky boom.

Cory Elsmore - Réponse

Can you post a guide or technique of the process?

Or share some photos? (On meta.ifixit.com)

Kind-hearted, spirited Man -

Cory,

I did not understand your question.

This repair guide contains several photos.

Jose Gustavo Abreu Murta -

thanks for an excellent guide . I am now more positive that it is something I can perform now. Many thanks

Graham Klaer - Réponse

im having trouble releasing the 4 screws on step 3!!! the screw driver keeps slipping and i’ve tried a few and another webcam…

Dojo Mats - Sunny - Réponse

Ajouter un commentaire

Nombre de vues :

Dernières 24 heures : 27

7 derniers jours : 171

30 derniers jours : 886

Total : 50,792