Aller au contenu principal

Logitech G700s Side Button Array Replacement

Ce dont vous avez besoin

  1. Logitech G700s Side Button Array Replacement, Top Case Replacement: étape 1, image 1 de 1
    • Remove the batteries from the mouse.

    • Use a plastic opening tool to peel up the four mouse feet.

  2. Logitech G700s Side Button Array Replacement: étape 2, image 1 de 2 Logitech G700s Side Button Array Replacement: étape 2, image 2 de 2
    • Remove the five 5.5mm Phillips #00 screws found underneath the mouse feet.

  3. Logitech G700s Side Button Array Replacement: étape 3, image 1 de 3 Logitech G700s Side Button Array Replacement: étape 3, image 2 de 3 Logitech G700s Side Button Array Replacement: étape 3, image 3 de 3
    • Pull the top of the mouse off of the bottom half.

    • There's a wire connecting the two halves.

    • Unplug the programmable buttons from the motherboard.

    • The white pin housing on the motherboard may come off while unplugging. In that case, use tool to pry between at location indicated to separate them and insert the housing back onto the motherboard.

  4. Logitech G700s Side Button Array Replacement, Programmable Side Buttons: étape 4, image 1 de 3 Logitech G700s Side Button Array Replacement, Programmable Side Buttons: étape 4, image 2 de 3 Logitech G700s Side Button Array Replacement, Programmable Side Buttons: étape 4, image 3 de 3
    • Remove the three 5.5mm Phillips #00 screws holding the button assembly to the mouse.

    • Do not remove any of the screws on the circuit board, only the ones holding the plastic assembly in place

  5. Logitech G700s Side Button Array Replacement: étape 5, image 1 de 3 Logitech G700s Side Button Array Replacement: étape 5, image 2 de 3 Logitech G700s Side Button Array Replacement: étape 5, image 3 de 3
    • To remove the side button assembly:

    • First, unhook the cables from the cable guide so it won't get caught while popping the assembly out

    • The assembly is held in by some clip-in action from the screw posts on the top shell and screw holes on the assembly. The next step will explain in detail how to pop it out.

    • Definitely don't pull on the cable to remove like shown in the first picture. The wires are kind of frail.

  6. Logitech G700s Side Button Array Replacement: étape 6, image 1 de 3 Logitech G700s Side Button Array Replacement: étape 6, image 2 de 3 Logitech G700s Side Button Array Replacement: étape 6, image 3 de 3
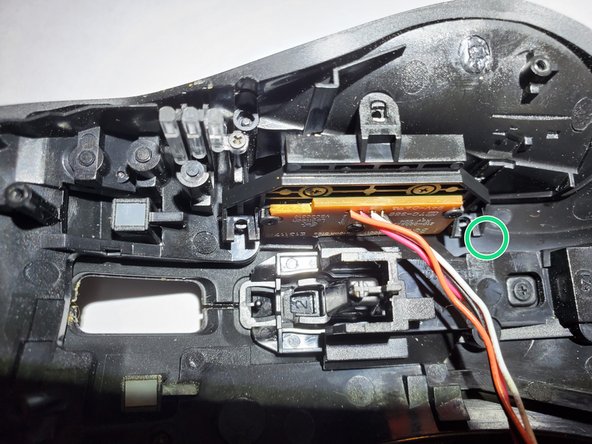
    • The screw hole near the left and button side seems to be easier to pop out first. Use thumbnail to pry under the marked location while simultaneously pushing on G7 to pop it out.

    • Repeat on the other side, pressing on G8.

    • The assembly should come loose. Push on the buttons and gently wiggle and pull it out.

    • There will still be a bit of friction between the PCB and the center post on the top shell but it won't take too much force. Try to gently persuade it out.

Conclusion

To reassemble your device, follow these instructions in reverse order.

Une autre personne a terminé cette réparation.

Chase Tisinger

Membre depuis le 02/14/18

687 Réputation

5 tutoriels rédigés

Équipe

USF Tampa, Team S2-G3, Nance Spring 2018 Membre de l'équipe USF Tampa, Team S2-G3, Nance Spring 2018

USFT-NANCE-S18S2G3

4 membres

15 tutoriels rédigés

2 commentaires

Greetings, Is the quad side button assembly still avail. for replacement?

Doesn't appear when checking the parts item for this replacement build.

Thanks.

C McDonald - Réponse

Would like to know about side button assembly availability also.

derekod18 - Réponse

Ajouter un commentaire

Nombre de vues :

Dernières 24 heures : 0

7 derniers jours : 8

30 derniers jours : 32

Total : 3,119