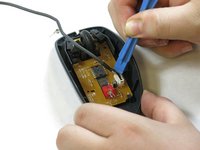
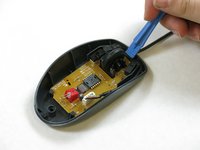
Aller au contenu principal

Logitech M100 USB Cable Replacement

Ce dont vous avez besoin

  1. Logitech M100 USB Cable Replacement, USB Cable: étape 1, image 1 de 2 Logitech M100 USB Cable Replacement, USB Cable: étape 1, image 2 de 2
    • Not all variants of this mouse require the mouse feet to be taken off for disassembly, but their removal is detailed anyway.

    • Carefully remove the feet of the mouse with an opening pick.

    • Keep track of the mouse feet, as you'll be reapplying them at the end of the guide.

  2. Logitech M100 USB Cable Replacement: étape 2, image 1 de 2 Logitech M100 USB Cable Replacement: étape 2, image 2 de 2
    • Use a Phillips #0 screwdriver to remove the 10mm screws on the bottom of the mouse.

    • Once all screws are removed, use the plastic opening tool to gently pry the mouse apart. This shouldn't take much force.

  3. Logitech M100 USB Cable Replacement: étape 3, image 1 de 2 Logitech M100 USB Cable Replacement: étape 3, image 2 de 2
    • Once the mouse is opened, locate the USB cable's 5-pin connector, which is plugged directly into the mouse's mainboard.

    • Take note of the position and route that the USB cable takes before removal. The replacement cable must follow the same route when inserted.

    • Using a plastic opening tool, gently remove the 5-pin connector from the mainboard.

  4. Logitech M100 USB Cable Replacement: étape 4, image 1 de 2 Logitech M100 USB Cable Replacement: étape 4, image 2 de 2
    • Take the replacement USB cable and connect it to the mainboard.

  5. Logitech M100 USB Cable Replacement: étape 5, image 1 de 2 Logitech M100 USB Cable Replacement: étape 5, image 2 de 2
    • Ensure that the 5-pin connector is fully seated into its slot on the mainboard. You may want to use a spudger to apply pressure onto it.

    • Using a plastic opening tool, route the cable through the case in the same way that was noted in Step 3.

  6. Logitech M100 USB Cable Replacement: étape 6, image 1 de 1
    • After re-assembling the mouse, don't forget to reattach the mouse feet onto their correct locations on the bottom of the mouse.

Conclusion

To reassemble, follow the steps in reverse order.

4 autres ont terminé cette réparation.

Jake Janicke

Membre depuis le 10/26/17

161 Réputation

1 tutoriel rédigé

Équipe

DePaul University, Team S1-G5, Dush Fall 2017 Membre de l'équipe DePaul University, Team S1-G5, Dush Fall 2017

DPU-DUSH-F17S1G5

2 membres

1 tutoriel rédigé

Un commentaire

Removing the mouse feet is completely unnecessary, as there are no screws underneath the feet.

Andy Joonseo Bae - Réponse

Ajouter un commentaire

Nombre de vues :

Dernières 24 heures : 4

7 derniers jours : 10

30 derniers jours : 66

Total : 5,113