Aller au contenu principal

Logitech V220 - Cordless Optical Mouse Scroll Wheel Replacement

Ce dont vous avez besoin

  1. Logitech V220 - Cordless Optical Mouse Scroll Wheel Replacement, Removing the USB Wireless Receiver: étape 1, image 1 de 3 Logitech V220 - Cordless Optical Mouse Scroll Wheel Replacement, Removing the USB Wireless Receiver: étape 1, image 2 de 3 Logitech V220 - Cordless Optical Mouse Scroll Wheel Replacement, Removing the USB Wireless Receiver: étape 1, image 3 de 3
    • Wash your hands before replacing the battery to prevent debris getting into the mouse and damaging its internal components.

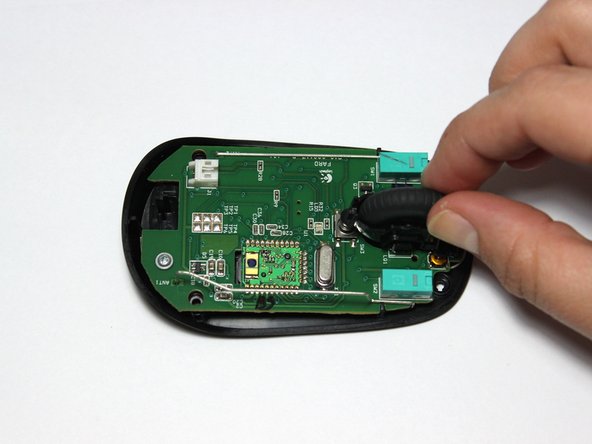
    • Orient the mouse so you are viewing its base.

    • Using your fingers, gently remove the USB wireless receiver by sliding it towards you.

    • USB removal will result in the power switch to be in its ON position.

    • Place the USB to the side for reassembly.

    • With your fingertip, engage the power switch to its OFF position to ensure the mouse is not powered.

  2. Logitech V220 - Cordless Optical Mouse Scroll Wheel Replacement, Removing the Mouse Pads: étape 2, image 1 de 3 Logitech V220 - Cordless Optical Mouse Scroll Wheel Replacement, Removing the Mouse Pads: étape 2, image 2 de 3 Logitech V220 - Cordless Optical Mouse Scroll Wheel Replacement, Removing the Mouse Pads: étape 2, image 3 de 3
    • Locate the four mouse pads.

    • Use the rectangular end of the metal spudger to get underneath each mouse pad, pry them up, and peel them off.

    • Set the peeled mouse pads to the side sticky-side up to maintain its stickiness.

  3. Logitech V220 - Cordless Optical Mouse Scroll Wheel Replacement, Unscrewing the Mouse Housing Screws: étape 3, image 1 de 1
    • Locate the four #0 Phillips screws where the mouse pads previously were.

    • Unscrew the four #0 Phillips screws with the Phillips #0 screwdriver.

    • Set the screws to the side for reassembly.

  4. Logitech V220 - Cordless Optical Mouse Scroll Wheel Replacement, Separating the Mouse Housing: étape 4, image 1 de 2 Logitech V220 - Cordless Optical Mouse Scroll Wheel Replacement, Separating the Mouse Housing: étape 4, image 2 de 2
    • Once the housing screws are fully removed, slowly (and carefully) separate the top and bottom halves of the housing.

    • Rapid separation of the housing halves may result in damaging the power cables (red and black wires) and molex (white plug).

  5. Logitech V220 - Cordless Optical Mouse Scroll Wheel Replacement, Detaching the Top Mouse Housing: étape 5, image 1 de 2 Logitech V220 - Cordless Optical Mouse Scroll Wheel Replacement, Detaching the Top Mouse Housing: étape 5, image 2 de 2
    • Gently set the mouse halves down on a flat surface.

    • Secure the base half with one hand.

    • With thumb and forefinger, grab the end of the molex and pull it away from you until the molex is unplugged.

    • Set the top mold half to the side for reassembly.

  6. Logitech V220 - Cordless Optical Mouse Scroll Wheel Replacement, Removing the Scroll Wheel: étape 6, image 1 de 3 Logitech V220 - Cordless Optical Mouse Scroll Wheel Replacement, Removing the Scroll Wheel: étape 6, image 2 de 3 Logitech V220 - Cordless Optical Mouse Scroll Wheel Replacement, Removing the Scroll Wheel: étape 6, image 3 de 3
    • Locate the one, scroll wheel, #0 Phillips screw near the very front edge of the mouse.

    • Turn the mouse 90 degrees clockwise.

    • While supporting the rear of the mouse base, unscrew the #0 Phillips scroll wheel screw.

    • Set the screw to the side for reassembly.

    • Once the scroll wheel screw is fully removed, manually extract the scroll wheel and spring assembly.

    • Set the remains of the base of the mouse to the side.

  7. Logitech V220 - Cordless Optical Mouse Scroll Wheel Replacement, Removing and Replacing the Scroll Wheel Spring: étape 7, image 1 de 2 Logitech V220 - Cordless Optical Mouse Scroll Wheel Replacement, Removing and Replacing the Scroll Wheel Spring: étape 7, image 2 de 2
    • Locate the scroll wheel spring.

    • Use the tweezers to gently remove the spring by slowly tugging the spring away from the scroll wheel assembly.

    • Set the spring aside for proper disposal.

    • Grab a new spring with the tweezers.

    • Place the new spring on the peg extrusion of the assembly.

    • Now you have a new scroll wheel spring!

Conclusion

To reassemble your device, follow these instructions in reverse order.

2 autres ont terminé cette réparation.

Tyler Price

Membre depuis le 04/07/14

1 038 Réputation

6 tutoriels rédigés

Équipe

Cal Poly, Team 6-2, Forte Spring 2014 Membre de l'équipe Cal Poly, Team 6-2, Forte Spring 2014

CPSU-FORTE-S14S6G2

5 membres

20 tutoriels rédigés

0 commentaires

Ajouter un commentaire

Nombre de vues :

Dernières 24 heures : 2

7 derniers jours : 8

30 derniers jours : 19

Total : 1,358