Aller au contenu principal

Lytro First Generation Light Sensor Replacement

Ce dont vous avez besoin

  1. Lytro First Generation Light Sensor Replacement, Light Sensor: étape 1, image 1 de 1
    • Lytro has closed its doors, and can no longer service your camera if you break it further during this repair. They also cannot provide replacement parts to other camera repair shops.

  2. Lytro First Generation Light Sensor Replacement: étape 2, image 1 de 3 Lytro First Generation Light Sensor Replacement: étape 2, image 2 de 3 Lytro First Generation Light Sensor Replacement: étape 2, image 3 de 3
    • Remove the lens covering by using the plastic opening tool to pry it away from the camera. There are strong magnets attached to the bottom so some force is required.

  3. Lytro First Generation Light Sensor Replacement: étape 3, image 1 de 3 Lytro First Generation Light Sensor Replacement: étape 3, image 2 de 3 Lytro First Generation Light Sensor Replacement: étape 3, image 3 de 3
    • Remove the four screws surrounding the lens using a screwdriver.

    • The screws hold the lens and screen assemblies together.

  4. Lytro First Generation Light Sensor Replacement: étape 4, image 1 de 3 Lytro First Generation Light Sensor Replacement: étape 4, image 2 de 3 Lytro First Generation Light Sensor Replacement: étape 4, image 3 de 3
    • The seperation of the lens assembly and the screen assembly allows access to the motherboard

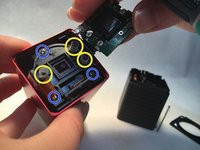
    • gently disconnect the two ribbon cables (indicated in red on the second image) that connect the motherboard to the lens assembly by lifting up the black pieces of the bracket and pulling gently.

    • The ribbon cables are extremely difficult to reattach. Disconnect at your own risk.

    • There will be a slight bit of glue connecting the two potions that can be removed with a a little force.

  5. Lytro First Generation Light Sensor Replacement: étape 5, image 1 de 1
    • Remove the three black screws indicated in red

    • Repeat the same process done to the first two ribbon cables with this one, indicated in orange.

  6. Lytro First Generation Light Sensor Replacement: étape 6, image 1 de 2 Lytro First Generation Light Sensor Replacement: étape 6, image 2 de 2
    • Remove the three springs (yellow) and unscrew the three screws (blue).

    • Replace the light sensor.

Conclusion

To reassemble your device, follow these instructions in reverse order.

2 autres ont terminé cette réparation.

Mira Green

Membre depuis le 05/31/16

57 Réputation

1 tutoriel rédigé

Équipe

0 commentaires

Ajouter un commentaire

Nombre de vues :

Dernières 24 heures : 0

7 derniers jours : 0

30 derniers jours : 4

Total : 1,496