Aller au contenu principal

MSI GT75VR 7RF Titan Pro Cooling Fan Replacement

Ce dont vous avez besoin

  1. MSI GT75VR 7RF Titan Pro Cooling Fan Replacement, Cooling Fan: étape 1, image 1 de 1
    • Using the Phillips #0 screwdriver, unscrew each of the four screws on the back of the laptop case. The screws are 0.5 inches long.

  2. MSI GT75VR 7RF Titan Pro Cooling Fan Replacement: étape 2, image 1 de 2 MSI GT75VR 7RF Titan Pro Cooling Fan Replacement: étape 2, image 2 de 2
    • Pop the back cover off of the laptop using the black nylon spudger.

  3. MSI GT75VR 7RF Titan Pro Cooling Fan Replacement: étape 3, image 1 de 2 MSI GT75VR 7RF Titan Pro Cooling Fan Replacement: étape 3, image 2 de 2
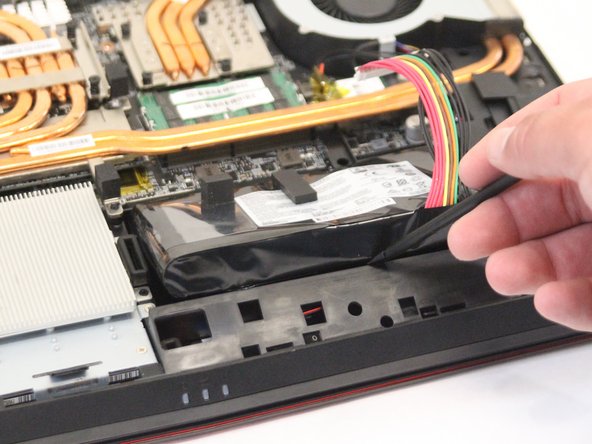
    • Disconnect the battery cable. Pry the battery out using the black nylon spudger.

  4. MSI GT75VR 7RF Titan Pro Cooling Fan Replacement: étape 4, image 1 de 2 MSI GT75VR 7RF Titan Pro Cooling Fan Replacement: étape 4, image 2 de 2
    • Using the Phillips #0 screwdriver, unscrew the two black 0.25 inch screws located on the sides of the cooling fan.

    • Unplug the unit.

Conclusion

To reassemble your device, follow these instructions in reverse order.

Jack Crumpton

Membre depuis le 08/31/18

241 Réputation

2 tutoriels rédigés

Équipe

0 commentaires

Ajouter un commentaire

Nombre de vues :

Dernières 24 heures : 0

7 derniers jours : 2

30 derniers jours : 10

Total : 589