Introduction
Upgrade or replace the combo or SuperDrive.
Ce dont vous avez besoin
-
-
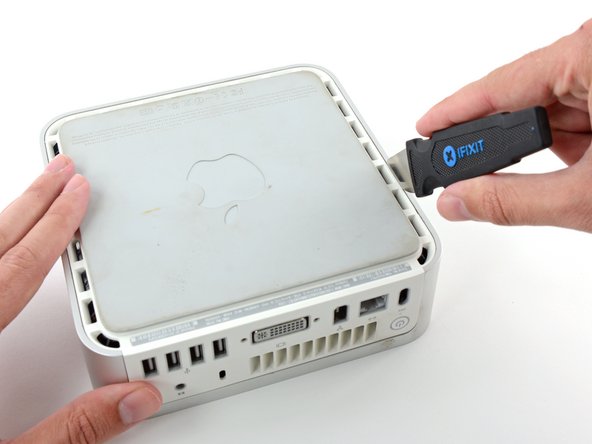
Power down your Mac mini, disconnect all of the cables, and flip it over.
-
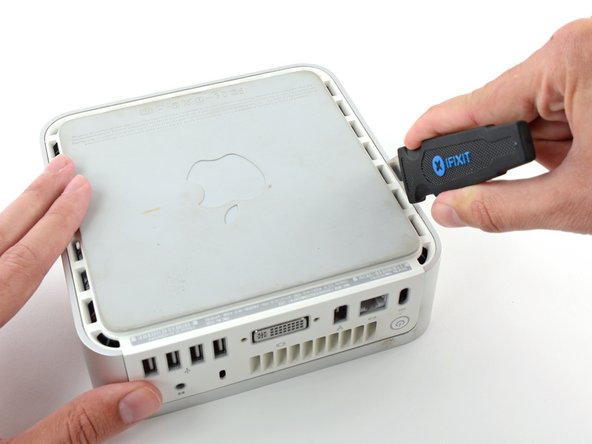
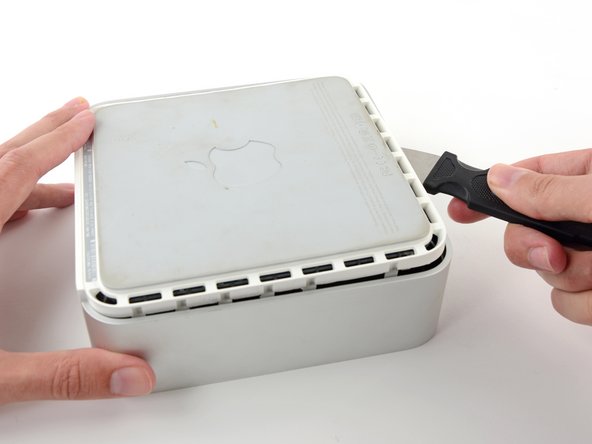
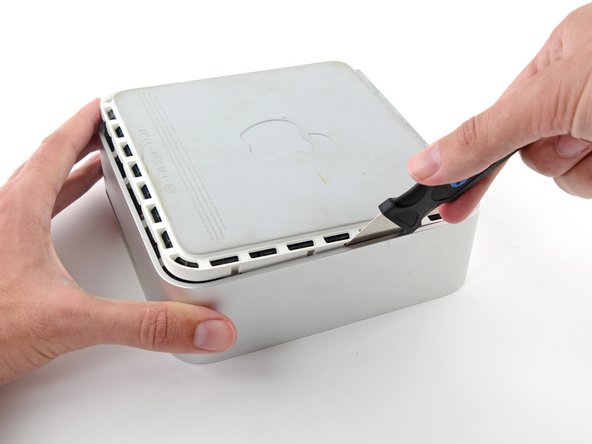
Insert the Jimmy into the crack between the aluminum top housing and the plastic lower housing.
-
The Jimmy should reach a stop about 3/8" down.
-
-
-
Gently bend the Jimmy outwards to pry the crack open a little larger and lift the lower housing up a small amount.
Patience is your best friend.
Do not insert “jimmy in too far. Marking a line from tip upwards on the tool will prevent too far insertion, possibly breaking tabs or damaging internal components.
To prevent the cover closing back up, small strips of matchbook cover (os equivalent) can be inserted about half inch hold prevent closure.
-
-
-
Flip the Mac mini back over and lift the top housing off of the lower housing.
-
-
-
-
Grasp the Airport antenna board and lift it off of the two plastic posts holding it in place. You may need to push back the black plastic tab jutting through the lower left corner of the board.
-
-
-
Grasp the optical drive and mass storage unit in one hand and lift up enough so that you can see beneath it.
I just put in a 1G RAM chip that just came in the mail from iFixit. And though I followed every step this step (removing the HD, cooling fan, and drive unit) was not needed. I put the chip in, put everything back in place then removed and replaced the RAM with no problems. So it would seem that for a/my PowerPC Mac Mini (I have a 1.33 Ghz processor) it was not a needed step.
BTW, it took about 15 - 20 min even with my experimentation.
Citation de mbob518 :
I just put in a 1G RAM chip that just came in the mail from iFixit. And though I followed every step this step (removing the HD, cooling fan, and drive unit) was not needed. I put the chip in, put everything back in place then removed and replaced the RAM with no problems. So it would seem that for a/my PowerPC Mac Mini (I have a 1.33 Ghz processor) it was not a needed step.
-
-
-
With your free hand, pull the Bluetooth cable up from Bluetooth board and unplug the Airport antenna cable from the right of the Airport card. Caution: both of these connections are very small. When re-assembling unit after repair, you may want to remove the two screws holding the airport card to the assembly and lift the card up and out to re-attach the cables.
Same problem here on this one. There seems to be no way to get them off and I can't seem to unscrew this thing. I think this otherwise great guide should be more precise about how to get the antenna cables out of the way :-(
Antenna cables just pop off - straight up.
Must be perfectly aligned when reconnecting as well before you re-seat them.
Small needle nose pliers may be useful or a spudger or flat jewelers screwdriver to pry up on the cable as close to the connector as possible.
-
-
-
Remove the four silver Phillips screws attaching the optical drive to the black plastic framework (two on each side).
-
To reassemble your device, follow these instructions in reverse order.
To reassemble your device, follow these instructions in reverse order.
Annulation : je n'ai pas terminé ce tutoriel.
20 autres ont terminé cette réparation.
Pièces jointes
Un commentaire
If you are careful, there is no need to remove the whole storage unit and can unscrew the optical drive after removing the top case. The screws at the back are a bit tricky, but not impossible to remove while the storage unit remains attached to the logic board and bottom cover.


A spackle knife makes these steps go much faster.
jouniseppanen - Réponse
A double sided letter opener or a thin non-serrated butter knife will suffice.
To prenent cosmetic blemishes, place a matchbook cover or similar thin cardboard on the outer perimeter under the “jimmy”.
Mike - Réponse