Aller au contenu principal
Pour réparer ensemble - Je crée un compte

Mac mini Model A1283 IR Board & Cable Replacement

Ce dont vous avez besoin

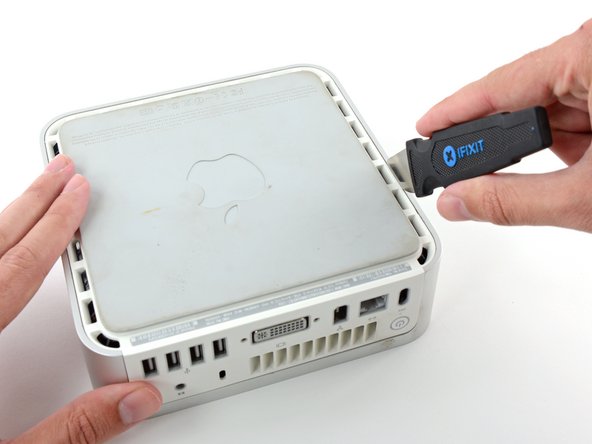
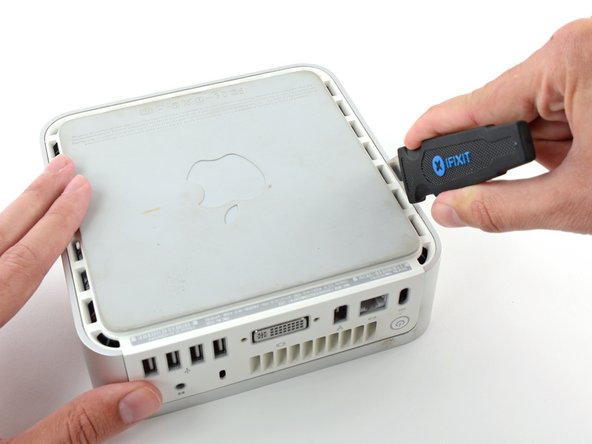
    1. Mac mini Model A1283 IR Board & Cable Replacement, Top Housing: étape 1, image 1 de 2 Mac mini Model A1283 IR Board & Cable Replacement, Top Housing: étape 1, image 2 de 2
      • Power down your Mac mini, disconnect all of the cables, and flip it over.

      • Insert the Jimmy into the crack between the aluminum top housing and the plastic lower housing.

      • The Jimmy should reach a stop about 3/8" down.

      Demander à FixBot

      Ajouter un commentaire

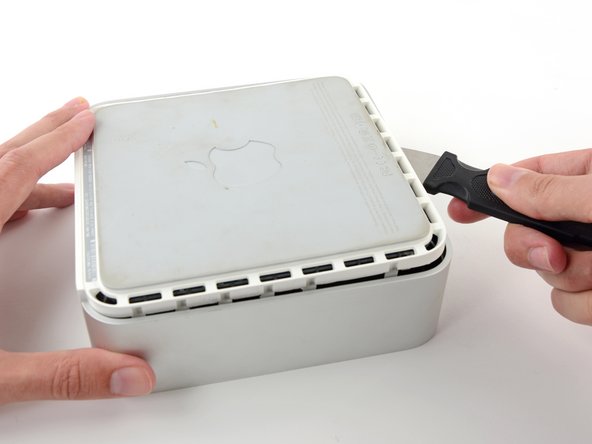
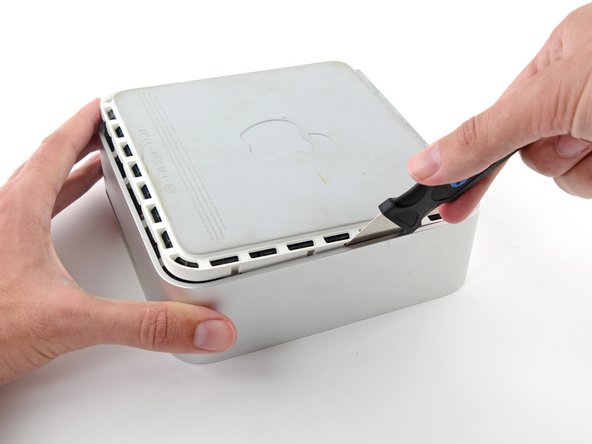
    2. Mac mini Model A1283 IR Board & Cable Replacement: étape 2, image 1 de 3 Mac mini Model A1283 IR Board & Cable Replacement: étape 2, image 2 de 3 Mac mini Model A1283 IR Board & Cable Replacement: étape 2, image 3 de 3
      • Gently bend the Jimmy outwards to pry the crack open a little larger and lift the lower housing up a small amount.

      • There are several plastic clips on the lower housing that fit into a channel in the aluminum top housing. Your goal is to use the Jimmy to push these clips inward enough to free them from the channel, while gently pulling up on the lower housing.

      Demander à FixBot

      Ajouter un commentaire

    3. Mac mini Model A1283 IR Board & Cable Replacement: étape 3, image 1 de 2 Mac mini Model A1283 IR Board & Cable Replacement: étape 3, image 2 de 2
      • Once you have the first side free, rotate the Mac mini and start prying up on the front edge.

      • Use the same prying motion to both bend the clips inward and lift the lower housing up out of the top housing.

      Demander à FixBot

      Ajouter un commentaire

    4. Mac mini Model A1283 IR Board & Cable Replacement: étape 4, image 1 de 2 Mac mini Model A1283 IR Board & Cable Replacement: étape 4, image 2 de 2
      • You may need to move the Jimmy along the edge to pry up all of the clips. Be patient and do a little bit at a time.

      Demander à FixBot

      Ajouter un commentaire

    5. Mac mini Model A1283 IR Board & Cable Replacement: étape 5, image 1 de 2 Mac mini Model A1283 IR Board & Cable Replacement: étape 5, image 2 de 2
      • Keep working around the perimeter, freeing the clips along the final edge.

      Demander à FixBot

      Ajouter un commentaire

    6. Mac mini Model A1283 IR Board & Cable Replacement: étape 6, image 1 de 2 Mac mini Model A1283 IR Board & Cable Replacement: étape 6, image 2 de 2
      • Flip the Mac mini back over and lift the top housing off of the lower housing.

      Demander à FixBot

      Ajouter un commentaire

    1. Mac mini Model A1283 IR Board & Cable Replacement, Internal Frame: étape 7, image 1 de 1
      • In the next few steps you will be removing the AirPort and Bluetooth antennas (shown in red) from the internal frame. Be very careful, as breaking the brackets will require replacing the internal frame.

      • We will first remove the AirPort antenna, located in the lower left corner of this picture.

      Demander à FixBot

      Ajouter un commentaire

    2. Mac mini Model A1283 IR Board & Cable Replacement: étape 8, image 1 de 2 Mac mini Model A1283 IR Board & Cable Replacement: étape 8, image 2 de 2
      • Slightly squeeze the two retaining arms toward each other and lift the AirPort antenna off its post.

      • Squeezing the two posts excessively will surely break them off the internal frame. Work delicately.

      • During reinstallation, you will have to slightly squeeze the two posts together so they fit into the openings on the AirPort antenna board.

      Demander à FixBot

      Ajouter un commentaire

    3. Mac mini Model A1283 IR Board & Cable Replacement: étape 9, image 1 de 2 Mac mini Model A1283 IR Board & Cable Replacement: étape 9, image 2 de 2
      • The two Bluetooth antenna boards simply lift off the internal frame.

      • Grab the Bluetooth antenna nearest the port side of the computer by the edges of the board and pull it straight up off the internal frame.

      • Pull carefully, as it may offer significant resistance and release suddenly.

      Demander à FixBot

      Ajouter un commentaire

    4. Mac mini Model A1283 IR Board & Cable Replacement: étape 10, image 1 de 1
      • Remove the antenna board near the front of the mini by pulling it straight up off the internal frame.

      • If necessary, remove the piece of tape securing the antenna leads to the internal frame.

      • Be sure to keep track of the springs under each of the three antenna boards.

      Demander à FixBot

      Ajouter un commentaire

    5. Mac mini Model A1283 IR Board & Cable Replacement: étape 11, image 1 de 1
      • Use the flat end of a spudger to pry the audio ribbon cable connector up off the audio board.

      Demander à FixBot

      Ajouter un commentaire

    6. Mac mini Model A1283 IR Board & Cable Replacement: étape 12, image 1 de 1
      • Remove the following four screws securing the internal frame to the bottom housing:

      • Three 6.7 mm Phillips #00 screws

      • One 9.5 mm Phillips #00 screw

      • The screw in the lower right corner of this image is recessed deep in the internal frame and longer than the other three screws. A flashlight and a thin screwdriver aid in removal.

      Demander à FixBot

      Ajouter un commentaire

    7. Mac mini Model A1283 IR Board & Cable Replacement: étape 13, image 1 de 1
      • Lift the internal frame off the bottom housing, starting at the rear edge, until you feel the concealed edge connector on the motherboard disconnect. Then lift straight off, minding the bluetooth and 802.11 antenna cables.

      • When reassembling, the wifi antenna wire routes to the inside of the vent and then over the top of the vent.

      Demander à FixBot

      Ajouter un commentaire

    1. Mac mini Model A1283 IR Board & Cable Replacement, Optical Drive : étape 14, image 1 de 2 Mac mini Model A1283 IR Board & Cable Replacement, Optical Drive : étape 14, image 2 de 2
      • Use the tip of a spudger to remove the black electrical tape spanning the interconnect board and optical drive.

      Demander à FixBot

      Ajouter un commentaire

    2. Mac mini Model A1283 IR Board & Cable Replacement: étape 15, image 1 de 1
      • Use the flat end of a spudger to disconnect the audio ribbon cable from the interconnect board.

      Demander à FixBot

      Ajouter un commentaire

    3. Mac mini Model A1283 IR Board & Cable Replacement: étape 16, image 1 de 1
      • If necessary, remove the yellow kapton tape covering the internal frame and the optical drive.

      Demander à FixBot

      Ajouter un commentaire

    4. Mac mini Model A1283 IR Board & Cable Replacement: étape 17, image 1 de 1
      • Remove the two Phillips screws securing the optical drive to the internal frame.

      Demander à FixBot

      Ajouter un commentaire

    5. Mac mini Model A1283 IR Board & Cable Replacement: étape 18, image 1 de 1
      • Turn the mini 180 degrees and remove the two Phillips screws securing the optical drive to the internal frame on the other side.

      Demander à FixBot

      Ajouter un commentaire

    6. Mac mini Model A1283 IR Board & Cable Replacement: étape 19, image 1 de 1
      • Remove the two Phillips screws securing the interconnect board to the optical drive.

      Demander à FixBot

      Ajouter un commentaire

    7. Mac mini Model A1283 IR Board & Cable Replacement: étape 20, image 1 de 1
      • Insert the flat end of a spudger into the crevice between the optical drive and the interconnect board.

      • Carefully increase the crevice to disconnect the optical drive from the interconnect board.

      Demander à FixBot

      Ajouter un commentaire

    8. Mac mini Model A1283 IR Board & Cable Replacement: étape 21, image 1 de 1
      • Gently lift the optical drive out of the internal frame.

      Demander à FixBot

      Ajouter un commentaire

    1. Mac mini Model A1283 IR Board & Cable Replacement, IR Board & Cable: étape 22, image 1 de 1
      • Remove the single Phillips screw securing the IR board to the internal frame.

      Demander à FixBot

      Ajouter un commentaire

    2. Mac mini Model A1283 IR Board & Cable Replacement: étape 23, image 1 de 1
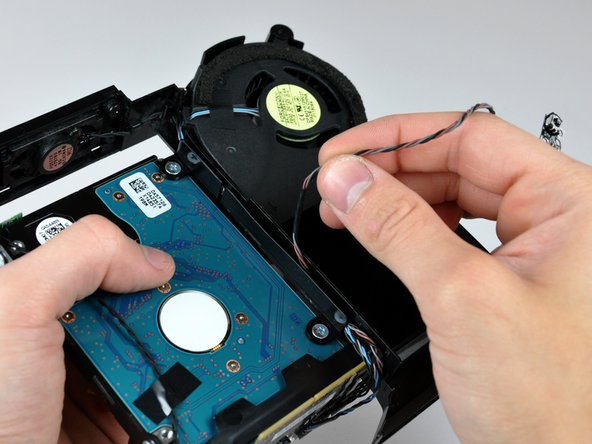
      • De-route the IR board and cable through the opening in the internal frame.

      Demander à FixBot

      Ajouter un commentaire

    3. Mac mini Model A1283 IR Board & Cable Replacement: étape 24, image 1 de 1
      • De-route the IR board cable from the channel along the internal frame.

      Demander à FixBot

      Ajouter un commentaire

    4. Mac mini Model A1283 IR Board & Cable Replacement: étape 25, image 1 de 1
      • Use the flat end of a spudger to pry the IR board connector up off the interconnect board and remove the IR board from your mini.

      Demander à FixBot

      Ajouter un commentaire

Conclusion

To reassemble your device, follow these instructions in reverse order.

Annulation : je n'ai pas terminé ce tutoriel.

2 autres ont terminé cette réparation.

0 commentaires de tutoriel

Ajouter un commentaire

Nombre de vues :

Dernières 24 heures : 2

7 derniers jours : 13

30 derniers jours : 52

Total : 9,994