Cette version peut contenir des modifications incorrectes. Passez au dernier aperçu vérifié.
Ce dont vous avez besoin
-
-
Dévissez les dix vis suivantes :
-
Deux vis Pentalobe 5 points de 8 mm
-
Huit vis Pentalobe 5 points de 2,5 mm
-
-
-
À l'aide de l'extrémité plate d'un spudger, faites levier sur les deux côtés courts du connecteur de la batterie pour le débrancher de sa prise sur la carte mère.
-
Éloignez légèrement la nappe de la batterie de la carte mère afin d'éviter que le connecteur ne touche sa prise par accident .
-
-
-
-
Soulevez la batterie en la saisissant par le bord le plus proche de la carte mère et retirez-la du boîtier supérieur.
-
Chargez-la à 100%, puis laissez-la charger encore au moins deux heures. Utilisez votre appareil normalement. Lors de l'avertissement de batterie faible, enregistrez votre travail et laisser votre ordinateur allumé jusqu'à ce qu'il s'éteint à cause d'une batterie vide. Attendez au moins 5 heures, puis rechargez la batterie à 100% sans interruption.
-
Si vous remarquez quelques chose d'inhabituel ou si vous avez des problèmes après l'installation de la nouvelle batterie, il se peut que vous deviez peut-être réinitialiser le SMC de votre MacBook.
-
-
Cette étape n’est pas traduite. Aidez à la traduire
-
Use the tip of a spudger to pry up the retaining flap on the trackpad data cable ZIF connector.
-
Gently slide the trackpad ribbon cable out of the ZIF connector.
-
-
Cette étape n’est pas traduite. Aidez à la traduire
-
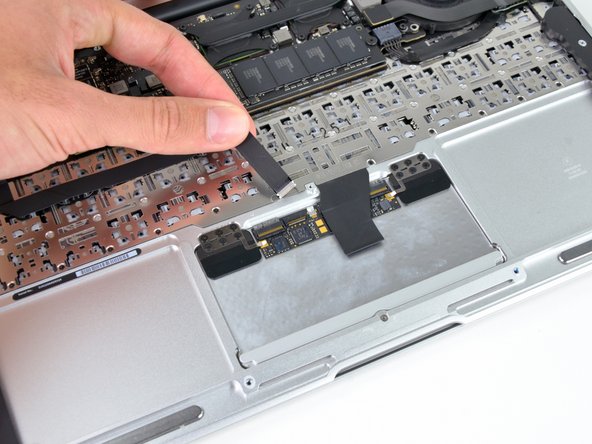
With one hand, lift the keyboard ribbon cable up and push it slightly away from the trackpad to access the ZIF connector underneath.
-
Use a spudger tip to pry up the retaining flap on the keyboard ribbon cable ZIF connector.
-
Gently slide the keyboard ribbon cable out of the ZIF connector.
-
-
Cette étape n’est pas traduite. Aidez à la traduire
-
Remove the six 1.5 mm Phillips #00 screws that secure the trackpad assembly to the upper case.
-
-
Cette étape n’est pas traduite. Aidez à la traduire
-
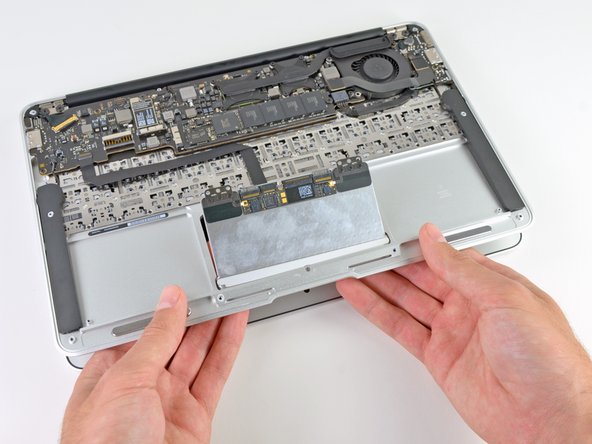
Open the MacBook about 10 degrees.
-
While supporting the upper case, press up on the side of the trackpad closest to the logic board.
-
Remove the trackpad.
-


Annulation : je n'ai pas terminé ce tutoriel.
28 autres ont terminé cette réparation.

4 commentaires
I did it! Replaced the trackpad after the MacBook Air took a dive from a stand, which fortunately just shattered the trackpad's glass. Thanks for the easy to use instructions!
Just one note on step 8: I had to use a PH000 (triple 0) instead of the double 0 - almost destroyed one of the screws before realising.
Best regards,
StH
The trackpad from my macbook air would not click anymore. The pointer still worked, i could still tap and hoover around.
My guess was that something fell between the trackpad and the housing.
And I was right, it was a bread crumb or else of a little seed.
While following this guide, I saw that a little magnet underneath the unibody is lifting the trackpad up again, after being pushed down. Right in that tiny space was the little bugger :)
I'm with Stefan, about his comment by step 8. I actually did destroy one screw (there sat really, really tight) and had to use brute force with a pincer and a tip of WD-40 to loosen it. It seems like Apple took that into account, since there are enough to leave one out :)
I had the same issue, non-clicking mouse, and a dis-assembly & light clean also sorted me out. Thanks everyone!
pabz -
Replacement went well - iFixit guide marvellous as usual and replacement trackpad performs perfectly. So good to resurrect
the trusty MB Air!