Cette version peut contenir des modifications incorrectes. Passez au dernier aperçu vérifié.
Ce dont vous avez besoin
-
-
Dévissez les dix vis suivantes :
-
Deux vis Pentalobe 5 points de 8 mm
-
Huit vis Pentalobe 5 points de 2,5 mm
-
-
-
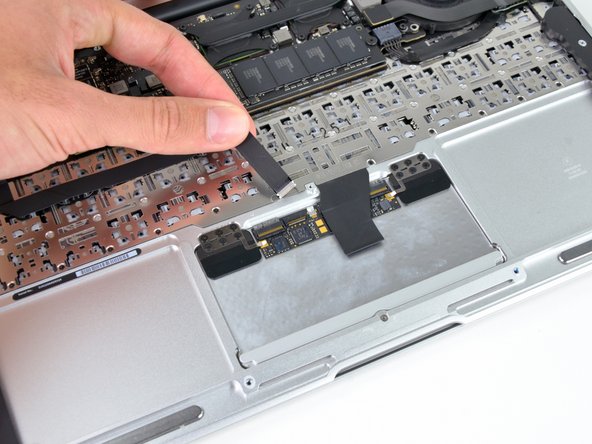
À l'aide de l'extrémité plate d'un spudger, faites levier sur les deux côtés courts du connecteur de la batterie pour le débrancher de sa prise sur la carte mère.
-
Éloignez légèrement la nappe de la batterie de la carte mère afin d'éviter que le connecteur ne touche sa prise par accident .
-
-
-
-
Dévissez les cinq vis suivantes fixant la batterie au boîtier supérieur :
-
Deux vis Torx T5 de 5,2 mm
-
Une vis Torx T5 de 6 mm
-
Deux vis Torx T5 de 2,6 mm
Don’t be like me! Make sure you use the *other* screw driver, not the one you took the case off with. I got five of them out with the wrong screwdriver, stripped the head on the sixth, got it out with a screw extractor, cut a new slot in it so I could use a normal flat head screw driver on it to put it back in, and then realized….
-
-
-
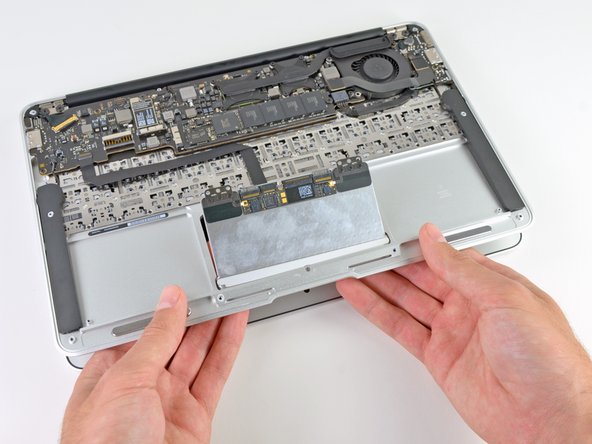
Soulevez la batterie en la saisissant par le bord le plus proche de la carte mère et retirez-la du boîtier supérieur.
-
Chargez-la à 100%, puis laissez-la charger encore au moins deux heures. Utilisez votre appareil normalement. Lors de l'avertissement de batterie faible, enregistrez votre travail et laisser votre ordinateur allumé jusqu'à ce qu'il s'éteint à cause d'une batterie vide. Attendez au moins 5 heures, puis rechargez la batterie à 100% sans interruption.
-
Si vous remarquez quelques chose d'inhabituel ou si vous avez des problèmes après l'installation de la nouvelle batterie, il se peut que vous deviez peut-être réinitialiser le SMC de votre MacBook.
I need to point out here that the replacement battery that I bought here at iFixit for this MacBook Air says that the battery calibration consists on draining the battery below 10%, then charging it uninterruptedly to 100%, but this is not consistent with the battery calibration that appears on this guide. Which one should I follow? Any additional thoughts on this? Thanks.
Hi Rafael,
We updated our battery calibration technique recently. The most reliable way would be to follow the guide method (charge full + 2 hours, drain completely, charge full again).
This was wonderfully easy-peasy! I just have one small suggestion: you might add a word (and a photo would be great), reminding folks that they need to connect the new battery connector. I know, it should (ok, it is! :) obvious and all… but I have to admit, after having my hand held so well through the rest of the process, having to engage brain again and realize that needed to be done (“what’s missing here?”) - took a moment. It was a bit nervous-making, too, since the new battery cable was quite stiff, resistant to bending, and I had to apply a wee bit of brute force and ignorance to position and connect the connector. Adding a note about that might be useful. Just a thought! Otherwise, super easy and straight forward - I feel so empowered! :)
-
-
Cette étape n’est pas traduite. Aidez à la traduire
-
Use the tip of a spudger to pry up the retaining flap on the trackpad data cable ZIF connector.
-
Gently slide the trackpad ribbon cable out of the ZIF connector.
-
-
Cette étape n’est pas traduite. Aidez à la traduire
-
With one hand, lift the keyboard ribbon cable up and push it slightly away from the trackpad to access the ZIF connector underneath.
-
Use a spudger tip to pry up the retaining flap on the keyboard ribbon cable ZIF connector.
-
Gently slide the keyboard ribbon cable out of the ZIF connector.
-
-
Cette étape n’est pas traduite. Aidez à la traduire
-
Remove the six 1.5 mm Phillips #00 screws that secure the trackpad assembly to the upper case.
I had one screw, too, that wouldn't come out. It seems the 00 Philips screwdriver is too big.
Excellent instructions, just replaced my trackpad and everything worked out well. I can confirm that the 000 Philips is the better choice. One more thing: my new tackpad did not click very smoothly so I had to adjust the sensitivity by turning the tiny screw that sits in the upper case opposite the click mechanism of the trackpad (see step 9 photographs) a bit, 1/2 a rotation was enough, thanks a lot, Oliver, Switzerland
-
-
Cette étape n’est pas traduite. Aidez à la traduire
-
Open the MacBook about 10 degrees.
-
While supporting the upper case, press up on the side of the trackpad closest to the logic board.
-
Remove the trackpad.
-


Annulation : je n'ai pas terminé ce tutoriel.
28 autres ont terminé cette réparation.

4 commentaires
I did it! Replaced the trackpad after the MacBook Air took a dive from a stand, which fortunately just shattered the trackpad's glass. Thanks for the easy to use instructions!
Just one note on step 8: I had to use a PH000 (triple 0) instead of the double 0 - almost destroyed one of the screws before realising.
Best regards,
StH
The trackpad from my macbook air would not click anymore. The pointer still worked, i could still tap and hoover around.
My guess was that something fell between the trackpad and the housing.
And I was right, it was a bread crumb or else of a little seed.
While following this guide, I saw that a little magnet underneath the unibody is lifting the trackpad up again, after being pushed down. Right in that tiny space was the little bugger :)
I'm with Stefan, about his comment by step 8. I actually did destroy one screw (there sat really, really tight) and had to use brute force with a pincer and a tip of WD-40 to loosen it. It seems like Apple took that into account, since there are enough to leave one out :)
I had the same issue, non-clicking mouse, and a dis-assembly & light clean also sorted me out. Thanks everyone!
pabz -
Replacement went well - iFixit guide marvellous as usual and replacement trackpad performs perfectly. So good to resurrect
the trusty MB Air!
I recommend that one of the tools you obtain is a jeweler's loupe that mounts on your glasses. It makes things easier.
blairweaver - Réponse
This is not correct. You need the pentalobe tool at this point.
Duane Hellums - Réponse