Cette version peut contenir des modifications incorrectes. Passez au dernier aperçu vérifié.
Ce dont vous avez besoin
-
-
Utilisez un tournevis P5 Pentalobe pour retirer les dix vis qui fixent le boîtier inférieur, dont les dimensions sont les suivantes :
-
Deux vis de 9 mm
-
Huit vis de 2,6 mm
-
-
-
Saisissez la languette en plastique transparent attachée au connecteur de la batterie, et tirez-la vers l'avant du MacBook Air pour déconnecter la batterie de la carte mère.
-
-
-
Avec l'extrémité plate d'une spatule (spudger), soulevez le connecteur de la nappe de la carte E/S hors de sa prise sur la carte E/S.
-
-
-
Avec la pointe d'une spatule, ouvrez soigneusement le clapet de retenue de la prise ZIF de la nappe du ventilateur.
-
-
-
-
Déconnectez la carte E/S en débranchant la nappe d'alimentation de sa prise sur la carte mère.
-
-
Cette étape n’est pas traduite. Aidez à la traduire
-
Remove the two 4.9 mm T8 Torx screws securing the antenna cable retainer on the left display hinge to the upper case.
-
-
Cette étape n’est pas traduite. Aidez à la traduire
-
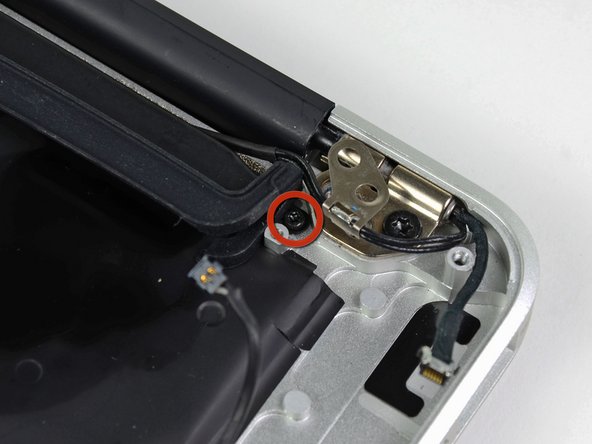
Push the antenna cable retainer out of the way and remove the 3 mm T5 Torx screw securing the end of the heat sink to the upper case.
-
-
Cette étape n’est pas traduite. Aidez à la traduire
-
Remove the four 2.5 mm T5 Torx screws securing the heat sink to the logic board.
-


Annulation : je n'ai pas terminé ce tutoriel.
30 autres ont terminé cette réparation.

4 commentaires
Excellent instructions / guide. Replaced both heat sink and fan without a hitch. Thank you!
I wanted to bring my old 2011 MBA back to life since its still running strong, so I followed this with a new thermal paste, good cleaning and a new battery, its like a brand new computer now. Glad I got the ifixit kit as well when I ordered the battery. Hope to keep this MBS going another year or two before I upgrade. Now I need to do the same with my MBP 2010 for fun.
I have a mid-2011 MacBook Air identical to the model in the instructions, and it frequently gets up to 80C when running under a heavier load. I am planning to disassemble it entirely and repaste the machine, and fully blow out the inside. I will post on here when I get it done and see how it runs! Thanks for the guide!
thanks alot.. I followed the procedure to replace the thermal paste and it was great.but i didn’t realise a difference in heat and sound of fan.